background image

20

to select a source from the list, use the cursor up/Down buttons to highlight the desired 

source, then press the ok button to select it. you can also select a source directly by 

pressing its Input button on the remote.

Input 

Buttons

DISC

AUX

BRIDGE

RADIO

HDMI1

COMPONENT

HDMI3

HDMI2

2

EJECT

POWER

TV 

1

3

5

4

6

8

0

7

9

REPEAT

HOME

DISPLAY

OPTIONS

SURROUND

OK

TOP MENU

POP-UP

CLEAR/EXIT

+

+

VOLUME

CHANNEL

MUTE

THUMBNAIL

ZOOM

BOOKMARK

PROGRAM

to use the playlist function, see 

Using Playlists,

 on page 26.

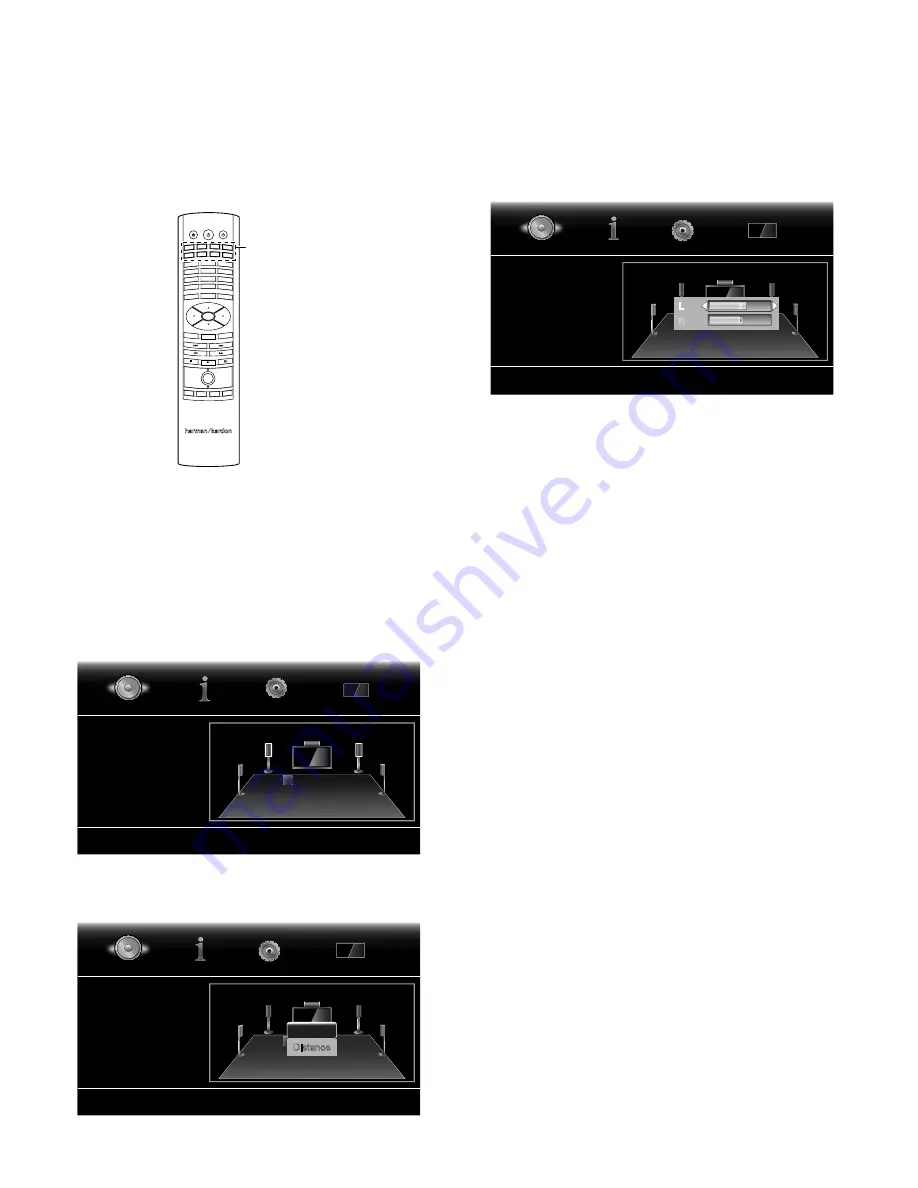
Adjusting Individual Speaker Volumes

you can adjust the volumes of the system’s individual speakers while you’re listening 

to music.

1. press the Home button and use the cursor and ok buttons to select Settings. the 

Settings menu will appear.

2. Select the audio Settings option. the audio Settings menu will appear.
3.  Select  Speaker  Settings,  then  select  Manual  configuration,  and  then  select  your 

system’s speaker configuration. after you select your system’s configuration, the 

speaker setup screen will appear.

L (0.0 dB, 0.9m/3 ft)

R (0.0 dB, 0.9m/3 ft)

Tone Controls

Audio Output

Speaker Settings

SUB

L

LS

RS

R

C

Audio Settings

4. the front left and front right speakers will be highlighted. to adjust either of them, 

press the ok button. to adjust a different speaker, use the cursor buttons to highlight 

it, and press the ok button. the Level and Distance selection screen will appear.

L (0.0 dB, 0.9m/3 ft)

R (0.0 dB, 0.9m/3 ft)

Tone Controls

Audio Output

Speaker Settings

SW1

L

LS

RS

R

C

Audio Settings

Level

Distance

5. Make sure that Level is highlighted, and press the ok button. the Volume adjustment 

bars will appear.

L (0.0 dB, 3.0m/10 ft)

R (0.0 dB, 2.4m/8 ft)

Tone Controls

Audio Output

Speaker Settings

SW1

L

LS

RS

R

C

Audio Settings

L
R

2
0

6. Select the speaker you want to adjust, and use the left and right arrow buttons to 

adjust its volume. you can vary the volume from +10dB to –10dB, in 1dB increments. 

7. press the clear/exit button twice to return to the speaker setup screen (the front left 

and front right speakers will still be highlighted). to adjust the volume of a different 

speaker,  use  the  cursor  buttons  to  highlight  it  and  press  the  ok  button.  repeat 

Steps 5 – 6 for that speaker.

8. When you are finished adjusting the volumes of all of your system’s speakers, press 

the clear/exit button repeatedly to return to the Home Menu screen.

Notes on Setting Speaker Volumes in 5.1-Channel Systems:

While setting your system’s individual speaker volume levels is ultimately up to your 

personal taste, here are some ideas you may find helpful:


• for  films  and  video-music  programs,  your  overall  goal  should  be  to  create  an 

enveloping,  realistic  sound  field  that  draws  you  into  the  film  or  music  program 

without drawing your attention away from the action on the screen.


• for multichannel music recordings, some music producers will create a sound field 

that places the musicians all around you; others will create a sound field that places 

the musicians in front of you, with more subtle ambience in the surround speakers 

(as you would experience in a concert hall). 


• In most 5.1-channel films, the surround channels are not intended to be as loud or 

as active as the front channels. adjusting the surround speakers so they are always 

as loud as the front channels could make dialogue difficult to understand and will 

make some sound effects sound unrealistically loud.

Notes on Setting Subwoofer Volume:


• Sometimes the ideal subwoofer volume setting for music is too loud for films, while 

the ideal setting for films is too quiet for music. When setting the subwoofer volume, 

listen to both music and films with strong bass content and find a “middle ground” 

volume level that works for both. 


• If your subwoofer always seems too loud or too quiet, you may want to place it in 

a different location. placing the subwoofer in a corner will always tend to increase 

its bass output, while placing it away from any walls or corners will always tend to 

lessen its bass output.

IMPORTANT: Do not turn the receiver’s volume up to or past the point where the audio 

from the speakers becomes distorted. Doing so can damage the speakers.

Using the Receiver

BDS 270/BDS 570

Summary of Contents for BDS 770

Page 1: ...Blu ray Disc receiver BDS 270 BDS 570 Owner s Manual...

Page 2: ...Controls 5 Receiver Rear Panel Connections 6 Remote Control Functions 8 Connections 10 Preparing the Remote Control 14 Setting Up the Receiver 15 Using the Receiver 19 Using the Disc Player 21 Listeni...

Page 3: ...perate the equipment IC Statement and Warning Canada Only This Class B digital apparatus complies with Canadian ICES 003 Cet appareil num rique de la classe B est conforme la norme NMB 003 du Canada F...

Page 4: ...he potential for safety hazards place the unit on a firm and level surface When placing the unit on a shelf be certain that the shelf and any mounting hardware can support the weight of the product Pr...

Page 5: ...s jack NOTE When a plug is inserted into the Headphone jack the BDS receiver s speaker outputs automatically mute the HDMI audio output remains active Volume control Rotate the disc clockwise to raise...

Page 6: ...Connector HDMI Input Connectors HDMI Monitor Out Connector AC Power Connector BD Live Connector FM Antenna Connector Analog Audio Input Connectors The Bridge IIIP Connector Subwoofer Output Connector...

Page 7: ...g a Powered Subwoofer on page 10 for more details about making connections Subwoofer Trigger connector This connector provides 12V DC whenever the receiver is on It can be used to turn on and off othe...

Page 8: ...y mode will switch it on Aux Input button Pressing this button selects the receiver s active rear panel audio input as the system s active audio source Repeatedly pressing the button cycles through al...

Page 9: ...c track For Blu ray Disc recordings and DVDs each press cycles through 2x 4x 8x 16x and 32x normal speed Pressing the button while a Blu ray Disc recording or DVD is paused will play through the chapt...

Page 10: ...fier Miswiring one or more speakers results in thin sound weak bass and a poor stereo image CAUTION Make sure the and bare wires do not touch each other or the other terminal Touching wires can cause...

Page 11: ...ries both digital video and digital audio signals you do not have to make any additional audio connections for devices you connect via an HDMI cable HDMI Equipped Source Device To HDMI Output HDMI Cab...

Page 12: ...up to two source devices that don t have HDMI or digital audio connectors To Stereo Analog Audio Output Stereo Audio Cable not supplied Analog Source Device Connecting Your Analog Recorder Connect an...

Page 13: ...t or in a location that is out of the line of sight of the remote control Connect an external IR receiver such as the optional Harman Kardon HE 1000 to the receiver s Remote IR Input connector BDS Rec...

Page 14: ...er from the list for that manufacturer 6 If you run out of codes for a component you can search through all of the codes in the remote s library for that component type a Press and hold the Aux button...

Page 15: ...e into the auxiliary control mode and it will control the auxiliary component s via the codes you have programmed into it To switch the remote back to the BDS receiver control mode from the auxiliary...

Page 16: ...tion and onto a memory device inserted into the receiver s USB port This option lets you see how much space is available on the memory device and allows you to delete previously stored BD Live content...

Page 17: ...ndard Neutral control settings Vivid For video games Cinema For movies and many television broadcasts Custom This option lets you adjust the picture settings manually The Brightness Saturation color s...

Page 18: ...can calibrate the BDS system and configure the loudspeakers parameters automatically to get the best sound performance Tone Controls Audio Output Speaker Settings EzSet EQ Manual Configuration Off 2...

Page 19: ...ghted Press the OK button The Level and Distance screen will appear 8 Repeat Steps 2 7 for the center speaker surround speakers and subwoofer 9 When you have entered the distances to all of your syste...

Page 20: ...een the front left and front right speakers will still be highlighted To adjust the volume of a different speaker use the cursor buttons to highlight it and press the OK button Repeat Steps 5 6 for th...

Page 21: ...rectional cues allowing you to enjoy an enveloping surround sound experience on any ordinary pair of stereo headphones Headphone Bypass which downmixes surround sound programs into normal stereo This...

Page 22: ...ay the audio by up to 250ms until it is synchronized with the video Press the Clear Exit button when you re finished NOTE This setting will be available only when a Blu ray Disc or DVD has been insert...

Page 23: ...ms Random Play songs Random Off Repeat button Pressing the Repeat button will cycle the iPod iPhone device between Repeat Song Repeat All Repeat Off Receiver Information Display When songs are playing...

Page 24: ...grams with sound playing through one of the receiver s rear panel audio inputs Use the Cursor Up Down buttons to increase or decrease the audio delay until the perceived lip sync errors disappear and...

Page 25: ...button while a photo is displayed shows the Options menu which gives you the following options File Select a file to view Play Mode View files in their normal order in random order until you press th...

Page 26: ...video will automatically play If there are other video files in the folder the BDS receiver will play each one in the order they appear on the on screen menu Use the Play Pause Stop Prev Step Next Ste...

Page 27: ...switch to Off If the hum goes away there is a ground loop between the subwoofer and the receiver Plugging the subwoofer s Power cord into the same AC outlet that the receiver is plugged into should el...

Page 28: ...1023 1088 CITIZEN 0132 0128 0123 0045 COMTEL 1032 CONTEC 0045 CONTINENTAL EDISON 1017 1019 1024 1056 1059 CRAIG 0159 0158 0157 0045 CROSLEY 1023 1088 CROWN 0132 0045 CURTIS MATHES 0128 0123 0132 Manuf...

Page 29: ...65 0132 0128 0122 0059 0008 QUASAR 0087 0032 RADIO SHACK 0197 0196 0180 0132 0128 0045 RCA 0163 0161 0145 0133 0128 0123 0115 0021 2001 2012 REALISTIC 0196 0167 0045 RUNCO 0153 0152 0044 0046 SAMPO 01...

Page 30: ...019 3017 MOVIE TIME 3039 3035 NSC 3190 3035 Manufacturer Code Numbers OAK 3220 3197 PACE 3179 PANASONIC 3214 3189 3177 3176 3053 PANTHER 3114 PHILIPS 3090 3085 3020 3019 3013 4023 PIONEER 3216 3215 32...

Page 31: ...E 6080 FUBA 6014 6021 6047 FUJITSU 5034 5029 5024 GENERAL INSTRUMENT 5074 5068 5054 5003 5065 5023 2011 5003 GOODMANS 6011 GRUNDIG 6015 6038 6053 6067 6090 Manufacturer Code Numbers HITACHI 5055 5004...

Page 32: ...E SERVICE 5088 5035 SCIENTIFIC ATLANTA 5039 5056 SCHNEIDER 6053 SIEMENS 6038 6090 Satellite Tuners Manufacturer Code Numbers SKY 6006 SKY MASTER 6033 SKYLAB 6021 SONY 5005 5062 STAR CHOICE DBS 5059 ST...

Page 33: ...Canada BDT 30 Europe Middle East BDT 30 Korea S E Asia BDT 3 Mexico Latin America BDT 30 Australia New Zeland BDT 30 Russia India BDT 30 China A 1 B 2 A 3 A 4 B 4 C 5 C 6 Audio formats Dolby Digital D...

Page 34: ...LBY DIGITAL PLUS TRUE HD Manufactured under license from Dolby Laboratories Dolby and the double D symbol are registered trademarks of Dolby Laboratories DTS DIGITAL SURROUND Manufactured under licens...

Reviews: