Harman Kardon BDS 770 Owner'S Manual Download Page 15

15

Programming Remote Control “Punch-Through” Commands

after programming the remote to control an auxiliary (aux) component, you can also 

program  it  so  it  will  control  the  aux  component’s  channel  up/down  and  transport 

functions (play, pause, etc.) even when the remote is not in the aux-control mode. for 

example, if the remote is programmed to operate your tV in the aux control mode, you 

can also have the tV’s c/– functions “punch through” and operate even when 

the remote is in the Disc, radio or ipod control modes.

1.  press and hold the Input button for the main device the remote will be operating. the 

button will light up, go dark and then light up again. release the button.

2. Select the type of punch-through programming.

a) for “punch-through” channel control, press the channel up button.
b) for “punch-through” transport control, press the play button.

3. press the aux button. the original Input button will flash to confirm.

you can repeat Step 1 – Step 3 for any of the remote’s Input buttons (aux, radio, etc.). 

note:  “punch-through”  channel  and  transport  commands  will  override  the  existing 

commands for those buttons in the source modes you program.
to undo “punch-through” programming, follow the same steps as above, but press the 

same Input button in Step 1 and Step 3.

Erasing All Learned Button Codes

1.  press and hold the options button for more than three seconds. the remote’s aux 

Input button will light up.

2.  press the aux Input button. the button will flash.
3.  Hold down the “9” number button for at least three seconds, three times in a row. 

the aux Input button will flash three times then will go out. all learned button codes 

have now been erased.

Resetting the Remote to Factory Default Condition

1.  press  the  aux  Input  button  and  the  “0”  number  button  simultaneously. the  aux 

button will light up.

2.  Hold down the “3” number button for at least three seconds, three times in a row. all 

of the input buttons will flash three times.

3.  after the input buttons stop flashing, all remote programming has been erased and 

the remote is reset to its factory default programming.

Using the Remote After it is Programmed

pressing  the  remote’s aux  Input  button  will  put  the  remote  into  the  auxiliary-control 

mode, and it will control the auxiliary component(s) via the codes you have programmed 

into it. 
to switch the remote back to the BDS receiver-control mode from the auxiliary-control 

mode, press any of the other Input buttons or the Home button.

Setting Up the Receiver

note: the menu screens shown in this manual are for illustrative purposes and may 

differ somewhat from the actual displays.
to set up your BDS receiver, you will use the remote to navigate through all of the on-

screen menus and to make selections from them.


• use the cursor up/Down buttons to navigate through the menu list. When an item is 

highlighted, a blue border will appear around it.


• to select a highlighted item, press the ok button. the screen will change depending 

on your selection. 


• to return to the previous screen, press the previous button.
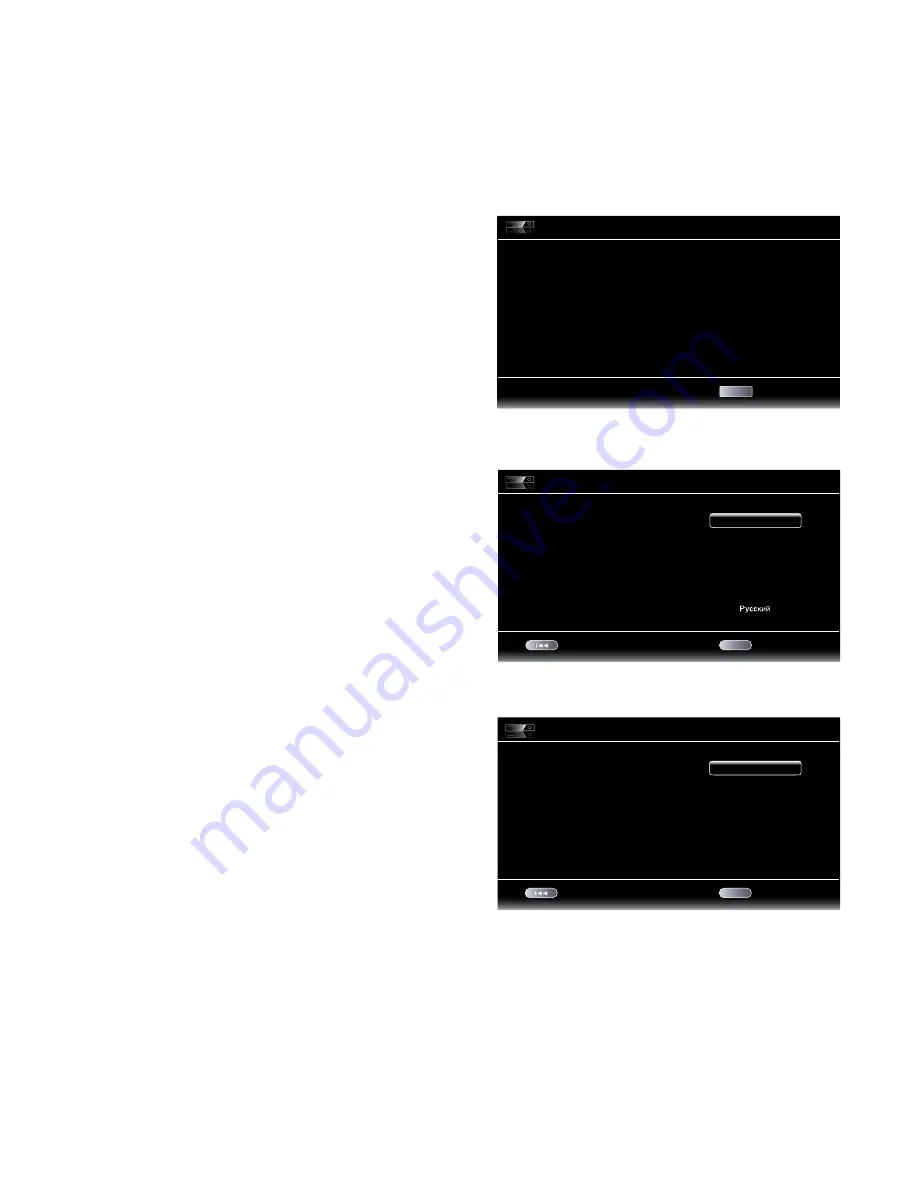
Setup Wizard

When you turn your BDS receiver on for the first time, the on-screen menu will display 

the Setup Wizard.

Setup Wizard

Page: 1/5

Next

Welcome to the Harman/Kardon BDS Setup

Wizard.

Some simple information is needed to ensure

you get the best experience from your product.

You can adjust these settings later in addition

to making changes to more advanced settings

by selecting ‘Settings’ from the Home Menu.

OK

Before you can use your BDS receiver, you need to set the language and make a few 

basic settings so that its video output will work properly with your tV. press the ok 

button and the Wizard’s language screen will appear.

Setup Wizard

Page: 2/5

Next

Please select which language you would like 
the BDS menus to appear in.

OK

Previous

English

Español

Français

Deutsch

Italiano

after setting the language you want the on-screen menus to appear in, press the ok 

button and the Wizard’s tV-resolution screen will appear.

Setup Wizard

Page: 3/5

Next

Please select the highest resolution that your TV
supports. If you are unsure, select ‘Auto’.
Upon making a selection the screen will be
changed to the chosen resolution. You will be
presented with the option to continue with the new
resolution or ‘Cancel’ to return to the previous
resolution. If the screen remains  blank, please wait
15 seconds without pressing anything and the
system will automatically return to the previous
resolution.

OK

Previous

Auto

480p/576p

720p

1080i

1080p

Preparing the Remote Control and 

Setting Up the Receiver

BDS 270/BDS 570

Summary of Contents for BDS 770

Page 1: ...Blu ray Disc receiver BDS 270 BDS 570 Owner s Manual...

Page 2: ...Controls 5 Receiver Rear Panel Connections 6 Remote Control Functions 8 Connections 10 Preparing the Remote Control 14 Setting Up the Receiver 15 Using the Receiver 19 Using the Disc Player 21 Listeni...

Page 3: ...perate the equipment IC Statement and Warning Canada Only This Class B digital apparatus complies with Canadian ICES 003 Cet appareil num rique de la classe B est conforme la norme NMB 003 du Canada F...

Page 4: ...he potential for safety hazards place the unit on a firm and level surface When placing the unit on a shelf be certain that the shelf and any mounting hardware can support the weight of the product Pr...

Page 5: ...s jack NOTE When a plug is inserted into the Headphone jack the BDS receiver s speaker outputs automatically mute the HDMI audio output remains active Volume control Rotate the disc clockwise to raise...

Page 6: ...Connector HDMI Input Connectors HDMI Monitor Out Connector AC Power Connector BD Live Connector FM Antenna Connector Analog Audio Input Connectors The Bridge IIIP Connector Subwoofer Output Connector...

Page 7: ...g a Powered Subwoofer on page 10 for more details about making connections Subwoofer Trigger connector This connector provides 12V DC whenever the receiver is on It can be used to turn on and off othe...

Page 8: ...y mode will switch it on Aux Input button Pressing this button selects the receiver s active rear panel audio input as the system s active audio source Repeatedly pressing the button cycles through al...

Page 9: ...c track For Blu ray Disc recordings and DVDs each press cycles through 2x 4x 8x 16x and 32x normal speed Pressing the button while a Blu ray Disc recording or DVD is paused will play through the chapt...

Page 10: ...fier Miswiring one or more speakers results in thin sound weak bass and a poor stereo image CAUTION Make sure the and bare wires do not touch each other or the other terminal Touching wires can cause...

Page 11: ...ries both digital video and digital audio signals you do not have to make any additional audio connections for devices you connect via an HDMI cable HDMI Equipped Source Device To HDMI Output HDMI Cab...

Page 12: ...up to two source devices that don t have HDMI or digital audio connectors To Stereo Analog Audio Output Stereo Audio Cable not supplied Analog Source Device Connecting Your Analog Recorder Connect an...

Page 13: ...t or in a location that is out of the line of sight of the remote control Connect an external IR receiver such as the optional Harman Kardon HE 1000 to the receiver s Remote IR Input connector BDS Rec...

Page 14: ...er from the list for that manufacturer 6 If you run out of codes for a component you can search through all of the codes in the remote s library for that component type a Press and hold the Aux button...

Page 15: ...e into the auxiliary control mode and it will control the auxiliary component s via the codes you have programmed into it To switch the remote back to the BDS receiver control mode from the auxiliary...

Page 16: ...tion and onto a memory device inserted into the receiver s USB port This option lets you see how much space is available on the memory device and allows you to delete previously stored BD Live content...

Page 17: ...ndard Neutral control settings Vivid For video games Cinema For movies and many television broadcasts Custom This option lets you adjust the picture settings manually The Brightness Saturation color s...

Page 18: ...can calibrate the BDS system and configure the loudspeakers parameters automatically to get the best sound performance Tone Controls Audio Output Speaker Settings EzSet EQ Manual Configuration Off 2...

Page 19: ...ghted Press the OK button The Level and Distance screen will appear 8 Repeat Steps 2 7 for the center speaker surround speakers and subwoofer 9 When you have entered the distances to all of your syste...

Page 20: ...een the front left and front right speakers will still be highlighted To adjust the volume of a different speaker use the cursor buttons to highlight it and press the OK button Repeat Steps 5 6 for th...

Page 21: ...rectional cues allowing you to enjoy an enveloping surround sound experience on any ordinary pair of stereo headphones Headphone Bypass which downmixes surround sound programs into normal stereo This...

Page 22: ...ay the audio by up to 250ms until it is synchronized with the video Press the Clear Exit button when you re finished NOTE This setting will be available only when a Blu ray Disc or DVD has been insert...

Page 23: ...ms Random Play songs Random Off Repeat button Pressing the Repeat button will cycle the iPod iPhone device between Repeat Song Repeat All Repeat Off Receiver Information Display When songs are playing...

Page 24: ...grams with sound playing through one of the receiver s rear panel audio inputs Use the Cursor Up Down buttons to increase or decrease the audio delay until the perceived lip sync errors disappear and...

Page 25: ...button while a photo is displayed shows the Options menu which gives you the following options File Select a file to view Play Mode View files in their normal order in random order until you press th...

Page 26: ...video will automatically play If there are other video files in the folder the BDS receiver will play each one in the order they appear on the on screen menu Use the Play Pause Stop Prev Step Next Ste...

Page 27: ...switch to Off If the hum goes away there is a ground loop between the subwoofer and the receiver Plugging the subwoofer s Power cord into the same AC outlet that the receiver is plugged into should el...

Page 28: ...1023 1088 CITIZEN 0132 0128 0123 0045 COMTEL 1032 CONTEC 0045 CONTINENTAL EDISON 1017 1019 1024 1056 1059 CRAIG 0159 0158 0157 0045 CROSLEY 1023 1088 CROWN 0132 0045 CURTIS MATHES 0128 0123 0132 Manuf...

Page 29: ...65 0132 0128 0122 0059 0008 QUASAR 0087 0032 RADIO SHACK 0197 0196 0180 0132 0128 0045 RCA 0163 0161 0145 0133 0128 0123 0115 0021 2001 2012 REALISTIC 0196 0167 0045 RUNCO 0153 0152 0044 0046 SAMPO 01...

Page 30: ...019 3017 MOVIE TIME 3039 3035 NSC 3190 3035 Manufacturer Code Numbers OAK 3220 3197 PACE 3179 PANASONIC 3214 3189 3177 3176 3053 PANTHER 3114 PHILIPS 3090 3085 3020 3019 3013 4023 PIONEER 3216 3215 32...

Page 31: ...E 6080 FUBA 6014 6021 6047 FUJITSU 5034 5029 5024 GENERAL INSTRUMENT 5074 5068 5054 5003 5065 5023 2011 5003 GOODMANS 6011 GRUNDIG 6015 6038 6053 6067 6090 Manufacturer Code Numbers HITACHI 5055 5004...

Page 32: ...E SERVICE 5088 5035 SCIENTIFIC ATLANTA 5039 5056 SCHNEIDER 6053 SIEMENS 6038 6090 Satellite Tuners Manufacturer Code Numbers SKY 6006 SKY MASTER 6033 SKYLAB 6021 SONY 5005 5062 STAR CHOICE DBS 5059 ST...

Page 33: ...Canada BDT 30 Europe Middle East BDT 30 Korea S E Asia BDT 3 Mexico Latin America BDT 30 Australia New Zeland BDT 30 Russia India BDT 30 China A 1 B 2 A 3 A 4 B 4 C 5 C 6 Audio formats Dolby Digital D...

Page 34: ...LBY DIGITAL PLUS TRUE HD Manufactured under license from Dolby Laboratories Dolby and the double D symbol are registered trademarks of Dolby Laboratories DTS DIGITAL SURROUND Manufactured under licens...

Reviews: