background image

14

Preparing the Remote Control

Preparing the Remote Control

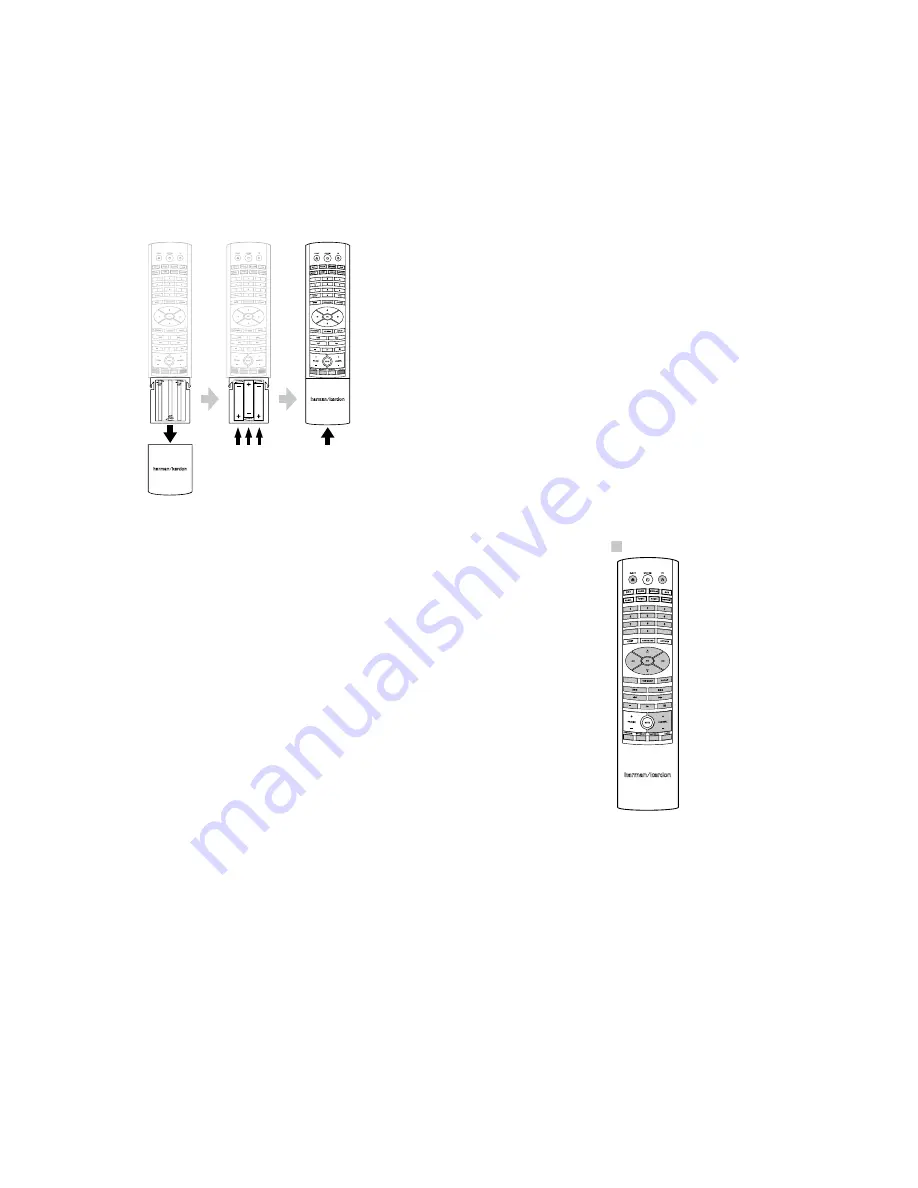
Installing the Batteries

your receiver’s remote control uses three aaa batteries (supplied). Insert the batteries as 

shown in the illustration, making sure to observe the correct polarity.

Using the Remote

When using the remote, remember to aim it toward the receiver’s front panel. Make 

sure that no objects, such as furniture, block the remote’s view of the receiver. Bright 

lights, fluorescent lights, and plasma-video displays may interfere with the function of 

the remote.


• the remote has a range of about 20 feet (6.1m), depending on the lighting conditions. 


• you can use the remote at an angle of up to 30° to either side of the BDS receiver.

If the remote seems to operate intermittently, or if pressing a button on the remote does 

not cause one of the Input buttons to light up, make sure that the batteries are inserted 

correctly. If the remote still operates intermittently, replace all three batteries with new 

ones.

Programming the Remote

In addition to controlling the BDS receiver, you can program the remote to control one 

auxiliary (aux) component. the remote is also capable of learning codes directly from 

other remotes. this ability allows you to combine learned commands with programmed 

codes, making the remote capable of controlling more than one aux component. typical 

aux components would be your tV, a satellite receiver or a cable receiver.
the  remote  will  control  the aux  component(s)  only  when  the aux  source  button  has 

been pressed. pressing any other source button will put the remote back into the BDS 

receiver control mode.

To program the remote to control an Aux component:

1.  Look up the codes for the component type (e.g, tV or cable tV box) and the brand 

name of your source in the 

Aux Component Remote-Control Code List

, on page 28.

2.  turn your auxiliary component on.
3.  press and hold the aux button for three seconds as it turns red, goes dark and turns 

red again. then release the button. 

note: the  remote  will  remain  in  the  programming  mode  for  20  seconds. you  must 

perform Step 4 within 20 seconds.

4.  aim the remote toward the component you just turned on and enter a code number 

from Step 1, above. If the component turns off, check that its own remote-control 

buttons control the component as expected. If they do, press the aux button again 

to save the code. the button will flash three times, and the remote will exit the 

programming mode.

5.  If any of the buttons do not work as expected, or if the component does not turn off 

when you enter the code number, repeat Step 4 with another code number from the 

list for that manufacturer.

6.  If you run out of codes for a component, you can search through all of the codes in 

the remote’s library for that component type.

a) press and hold the aux button for three seconds. the button will turn red, go 

dark and turn red again. then release the button.

b) for a conventional uS tV, enter “0999”; for a conventional eu tV, enter “1999”; 

for an HDtV, enter “2999”; for a uS cable box, enter “3999”; for an eu cable 

box, enter “4999”; for a uS satellite tuner, enter “5999”; for an eu satellite 

tuner, enter “6999.”

c) aim the remote control toward the component and press the remote’s cursor 

up button. each press of the button sends the “power” signal for one setup 

code number. Holding down the cursor up button quickly scans through all of 

the setup code numbers. 

d) release the cursor up button as soon as the component turns off. If you pass 

the correct setup code number, you can return to it by pressing the cursor 

Down button, one setup code number at a time, until the component turns back 

on.

e) check  that  the  other  remote-control  buttons  control  the  component  as 

expected. If they do, press the aux button again to save the code. the button 

will flash three times, and the remote will exit the programming mode.

f)  If the remote does not operate as expected, repeat Steps c – e. note that some 

components may not respond to all of the above commands and may support 

only some of the commands listed.

To teach individual button codes to the remote:

you  can  teach  codes  from  other  component  remotes  onto  the  BDS  receiver  remote 

buttons shown shaded in the following illustration:

REPEAT

DISPLAY

CLEAR/EXIT

CLEAR/EXIT

REPEAT

DISPLAY

= Learning capable

1.  place  the  BDS  receiver  remote  and  the  remote  from  which  you  want  it  to  learn 

codes head-to-head about 1 inch (2.5cm) apart, with their Ir transmitter windows 

facing each other.

2. press and hold the options button on the BDS receiver remote for more than three 

seconds. the remote’s aux button will light up.

3.  press  the  button  on  the  BDS  receiver  remote  to  which  you  want  to  teach  the 

command. the Learn mode will remain active for 20 seconds after the button is 

pushed.

4. press the button on the other remote that you want to “teach” to the BDS receiver 

remote. When the Ir code has been received and stored, the aux button’s LeD will 

flash three times, and the BDS receiver remote will remain in the learning mode, 

ready to learn another code. If no Ir code is received within 20 seconds, the aux 

LeD will flash rapidly several times, and the remote will exit the learning mode. to 

resume programming, return to Step 2.

5. repeat Step 3 and Step 4 for each command you want to teach the BDS receiver 

remote. note: If the aux button’s LeD goes out at any time, you will need to begin 

again from Step 2.

BDS 270/BDS 570

Summary of Contents for BDS 770

Page 1: ...Blu ray Disc receiver BDS 270 BDS 570 Owner s Manual...

Page 2: ...Controls 5 Receiver Rear Panel Connections 6 Remote Control Functions 8 Connections 10 Preparing the Remote Control 14 Setting Up the Receiver 15 Using the Receiver 19 Using the Disc Player 21 Listeni...

Page 3: ...perate the equipment IC Statement and Warning Canada Only This Class B digital apparatus complies with Canadian ICES 003 Cet appareil num rique de la classe B est conforme la norme NMB 003 du Canada F...

Page 4: ...he potential for safety hazards place the unit on a firm and level surface When placing the unit on a shelf be certain that the shelf and any mounting hardware can support the weight of the product Pr...

Page 5: ...s jack NOTE When a plug is inserted into the Headphone jack the BDS receiver s speaker outputs automatically mute the HDMI audio output remains active Volume control Rotate the disc clockwise to raise...

Page 6: ...Connector HDMI Input Connectors HDMI Monitor Out Connector AC Power Connector BD Live Connector FM Antenna Connector Analog Audio Input Connectors The Bridge IIIP Connector Subwoofer Output Connector...

Page 7: ...g a Powered Subwoofer on page 10 for more details about making connections Subwoofer Trigger connector This connector provides 12V DC whenever the receiver is on It can be used to turn on and off othe...

Page 8: ...y mode will switch it on Aux Input button Pressing this button selects the receiver s active rear panel audio input as the system s active audio source Repeatedly pressing the button cycles through al...

Page 9: ...c track For Blu ray Disc recordings and DVDs each press cycles through 2x 4x 8x 16x and 32x normal speed Pressing the button while a Blu ray Disc recording or DVD is paused will play through the chapt...

Page 10: ...fier Miswiring one or more speakers results in thin sound weak bass and a poor stereo image CAUTION Make sure the and bare wires do not touch each other or the other terminal Touching wires can cause...

Page 11: ...ries both digital video and digital audio signals you do not have to make any additional audio connections for devices you connect via an HDMI cable HDMI Equipped Source Device To HDMI Output HDMI Cab...

Page 12: ...up to two source devices that don t have HDMI or digital audio connectors To Stereo Analog Audio Output Stereo Audio Cable not supplied Analog Source Device Connecting Your Analog Recorder Connect an...

Page 13: ...t or in a location that is out of the line of sight of the remote control Connect an external IR receiver such as the optional Harman Kardon HE 1000 to the receiver s Remote IR Input connector BDS Rec...

Page 14: ...er from the list for that manufacturer 6 If you run out of codes for a component you can search through all of the codes in the remote s library for that component type a Press and hold the Aux button...

Page 15: ...e into the auxiliary control mode and it will control the auxiliary component s via the codes you have programmed into it To switch the remote back to the BDS receiver control mode from the auxiliary...

Page 16: ...tion and onto a memory device inserted into the receiver s USB port This option lets you see how much space is available on the memory device and allows you to delete previously stored BD Live content...

Page 17: ...ndard Neutral control settings Vivid For video games Cinema For movies and many television broadcasts Custom This option lets you adjust the picture settings manually The Brightness Saturation color s...

Page 18: ...can calibrate the BDS system and configure the loudspeakers parameters automatically to get the best sound performance Tone Controls Audio Output Speaker Settings EzSet EQ Manual Configuration Off 2...

Page 19: ...ghted Press the OK button The Level and Distance screen will appear 8 Repeat Steps 2 7 for the center speaker surround speakers and subwoofer 9 When you have entered the distances to all of your syste...

Page 20: ...een the front left and front right speakers will still be highlighted To adjust the volume of a different speaker use the cursor buttons to highlight it and press the OK button Repeat Steps 5 6 for th...

Page 21: ...rectional cues allowing you to enjoy an enveloping surround sound experience on any ordinary pair of stereo headphones Headphone Bypass which downmixes surround sound programs into normal stereo This...

Page 22: ...ay the audio by up to 250ms until it is synchronized with the video Press the Clear Exit button when you re finished NOTE This setting will be available only when a Blu ray Disc or DVD has been insert...

Page 23: ...ms Random Play songs Random Off Repeat button Pressing the Repeat button will cycle the iPod iPhone device between Repeat Song Repeat All Repeat Off Receiver Information Display When songs are playing...

Page 24: ...grams with sound playing through one of the receiver s rear panel audio inputs Use the Cursor Up Down buttons to increase or decrease the audio delay until the perceived lip sync errors disappear and...

Page 25: ...button while a photo is displayed shows the Options menu which gives you the following options File Select a file to view Play Mode View files in their normal order in random order until you press th...

Page 26: ...video will automatically play If there are other video files in the folder the BDS receiver will play each one in the order they appear on the on screen menu Use the Play Pause Stop Prev Step Next Ste...

Page 27: ...switch to Off If the hum goes away there is a ground loop between the subwoofer and the receiver Plugging the subwoofer s Power cord into the same AC outlet that the receiver is plugged into should el...

Page 28: ...1023 1088 CITIZEN 0132 0128 0123 0045 COMTEL 1032 CONTEC 0045 CONTINENTAL EDISON 1017 1019 1024 1056 1059 CRAIG 0159 0158 0157 0045 CROSLEY 1023 1088 CROWN 0132 0045 CURTIS MATHES 0128 0123 0132 Manuf...

Page 29: ...65 0132 0128 0122 0059 0008 QUASAR 0087 0032 RADIO SHACK 0197 0196 0180 0132 0128 0045 RCA 0163 0161 0145 0133 0128 0123 0115 0021 2001 2012 REALISTIC 0196 0167 0045 RUNCO 0153 0152 0044 0046 SAMPO 01...

Page 30: ...019 3017 MOVIE TIME 3039 3035 NSC 3190 3035 Manufacturer Code Numbers OAK 3220 3197 PACE 3179 PANASONIC 3214 3189 3177 3176 3053 PANTHER 3114 PHILIPS 3090 3085 3020 3019 3013 4023 PIONEER 3216 3215 32...

Page 31: ...E 6080 FUBA 6014 6021 6047 FUJITSU 5034 5029 5024 GENERAL INSTRUMENT 5074 5068 5054 5003 5065 5023 2011 5003 GOODMANS 6011 GRUNDIG 6015 6038 6053 6067 6090 Manufacturer Code Numbers HITACHI 5055 5004...

Page 32: ...E SERVICE 5088 5035 SCIENTIFIC ATLANTA 5039 5056 SCHNEIDER 6053 SIEMENS 6038 6090 Satellite Tuners Manufacturer Code Numbers SKY 6006 SKY MASTER 6033 SKYLAB 6021 SONY 5005 5062 STAR CHOICE DBS 5059 ST...

Page 33: ...Canada BDT 30 Europe Middle East BDT 30 Korea S E Asia BDT 3 Mexico Latin America BDT 30 Australia New Zeland BDT 30 Russia India BDT 30 China A 1 B 2 A 3 A 4 B 4 C 5 C 6 Audio formats Dolby Digital D...

Page 34: ...LBY DIGITAL PLUS TRUE HD Manufactured under license from Dolby Laboratories Dolby and the double D symbol are registered trademarks of Dolby Laboratories DTS DIGITAL SURROUND Manufactured under licens...

Reviews: