22
Section 8: Hinging the Rudder and Installing
the Tail Wheel
CONTINUED
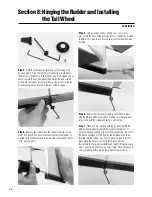
Step 3.
Hold the tail wheel assembly up to the fuselage in a
position where it’s flush with the fuselage bottom. Note where
the wire rests in reference to the rudder. Use a felt- tipped pen or
pencil to mark the position where the hole for the wire is to be
drilled into the rudder. Also mark the position of the slot for the
pivot bushing will be located in the rear of the fuselage.
Step 4.
Remove the rudder from the vertical stabilizer. Use a
3/32” drill bit to drill a hole in the exact center of the rudder as
marked for the tail wheel wire to be inserted in the rudder. Drill a
1/16” pilot hole first.
Step 5.
Using a hobby knife or a Moto-tool, cut a slot or
groove into the back of the fuselage vertical stabilizer as marked
in Step 3. This groove will be used to accept the tail wheel pivot
bushing.
Step 6.
Trial fit the tail wheel assembly and rudder in place
with the hinges. Deflect the rudder, making sure the tail wheel
turns freely with the rudder and there is no binding.
Step 7.
When you are satisfied with the fit, disassemble the
rudder and tail wheel assembly. Mix approximately 1 oz of
30-minute epoxy and apply to both the pivot bearing, the slot for
the pivot bearing and in the hole for the tail wheel wire to be
inserted into the rudder. You can use masking tape to hold in
place while the epoxy cures. With the hinges in place,
reassemble the tail wheel assembly and rudder. Wipe away any
excess epoxy with alcohol and a paper towel. Allow the epoxy to
cure completely before gluing the rudder hinges with CA.
Summary of Contents for EDGE 540
Page 52: ...52 ...
Page 53: ...53 Template Cut Out of Cowl Bottom MDS 1 48 ...
Page 54: ...54 ...
Page 55: ...55 ...
Page 56: ... 2000 Horizon Hobby Inc www horizonhobby com ...
Page 57: ...57 ...
Page 58: ...58 ...
Page 59: ...59 ...

