25
HAN 1/5 Spitfi re Mk IXc 30cc
6
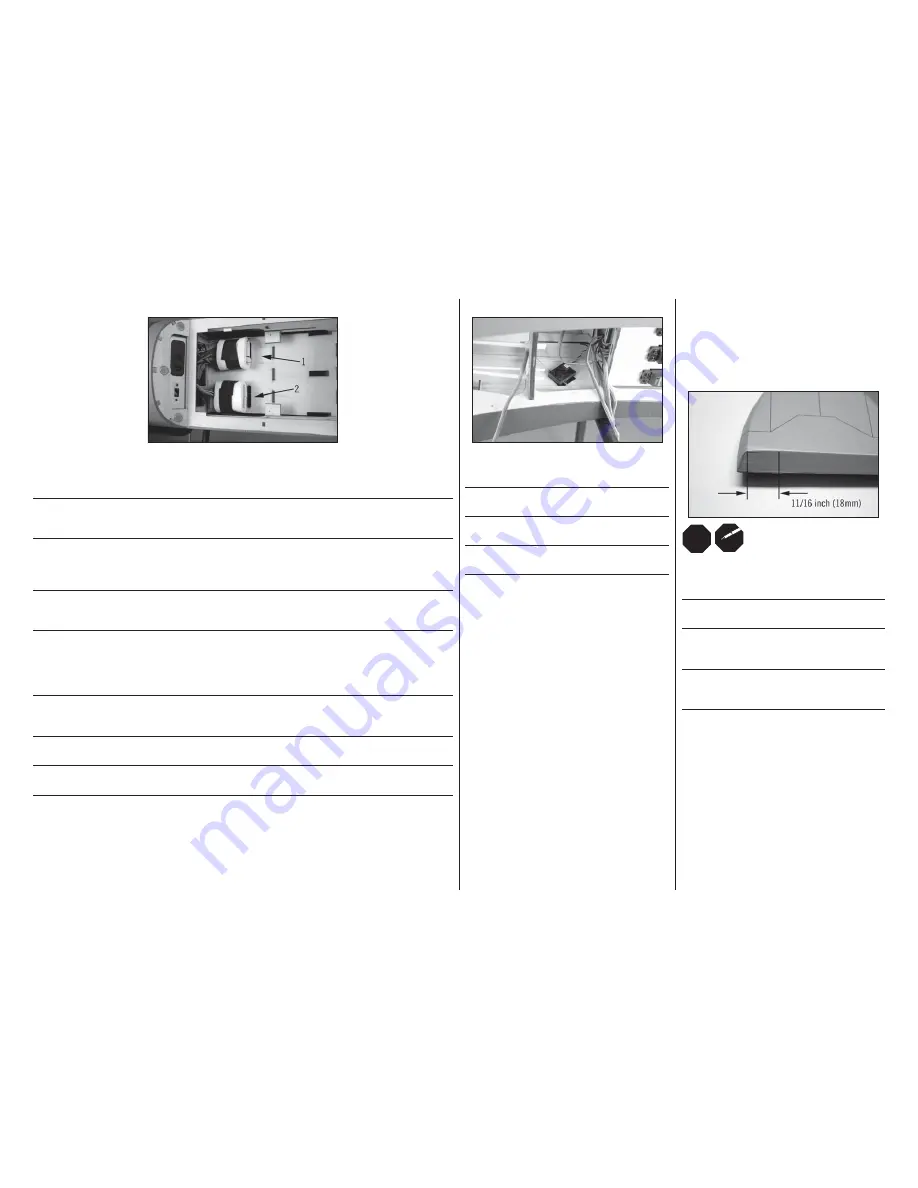
Connect a 12-inch (300mm) extension to the port for the fl aps. Connect a Y-harness to the aileron port of the receiver. Connect
the rudder, elevator servos and switch harness to the appropriate ports of the receiver. When using a glow or gas engine, connect
the throttle servo at this time. Use hook and loop tape to attach the receiver (1) to the receiver tray.
Schließen Sie die 300mm lange Verlängerung an den Klappenanschluss des Empfängers an. Danach das Y-Kabel an den
Querruderanschluss des Empfängers und die Anschlüsse für die Seiten- und Höhenruderservos sowie den Schalter und das
Gasservo (wenn benötigt). Sichern Sie den Empfänger mit Klettband auf dem Halter.
Connectez une rallonge de 300mm au port des volets. Connectez un cordon Y au port des ailerons. Connectez la prise du servo
de dérive, de profondeur et l’interrupteur aux ports appropriés du récepteur. Quand vous utilisez un moteur méthanol ou essence,
veuillez connecter le servo à la voie des gaz durant cette étape. Utilisez de la bande auto-agrippante pour fi xer le récepteur (1) à
la platine.
Collegare una prolunga da 300mm alla presa per i fl ap. Collegare una prolunga ad Y sulla presa del ricevitore per gli alettoni.
Collegare l’interruttore e i servi di timone ed elevatore alle loro prese sul ricevitore. Quando si usa un motore glow o a benzina, a
questo punto collegare il servo del motore. Usare del nastro a strappo per fi ssare il ricevitore (1) al suo supporto.
Î
When using the suggested electric retracts follow the instructions included with the retracts to connect the controller to
the receiver gear channel and to install the retract extensions included with the controller.
Secure the controller in the fuselage next to the receiver.
Î
Wenn Sie das empfohlene Fahrwerk einbauen folgen Sie bitte den Anweisungen wie der Controller
an den Empfänger anzuschließen ist und schließen auch gleich die im Lieferumfang enthaltenen
Verlängerungen an. Sichern Sie den Controller im Rumpf neben dem Empfänger.
Î
Quand vous utilisez le train rentrant préconisé suivez les instructions fournies avec le train pour le
branchement des rallonges au module de commande. Fixez le module de commande à côté du récepteur.
Î
Quando si usano i carrelli retrattili elettrici consigliati, seguire le istruzioni allegate ad essi per collegare il controller
al ricevitore e installare le prolunghe incluse insieme al controller. Dopo, fissarlo alla fusoliera vicino al ricevitore.
7
Secure the remote receiver inside the fuselage using hook and
loop tape.
Befestigen Sie den Satellitenempfänger mit Klettband im
Rumpf.
Fixer le récepteur à distance dans le fuselage à l’aide d’un
morceau de bande auto-agrippante.
Bloccare il ricevitore remoto all’interno della fusoliera usando
il nastro a strappo.
RUDDER INSTALLATION•
EINBAU DES SEITENRUDERS•
INSTALLATION DE LA GOUVERNE
DE DÉRIVE•
INSTALLAZIONE DEL TIMONE
1
L
R
L
R
Measure up 11/16 inch (18mm) from the bottom of the fl at
area on the rudder. The control horn will be centered at this
location when installed.
Messen Sie bitte 18mm auf der Unterseite des Ruders. Das
Ruderhorn wird hier zentriert montiert
Mesurer une distance de 18mm en partant du bas de la zone
plane de la dérive. Le guignol devra être centré sur cette
référence quand il sera installé.
Misurare 18mm a partire dal basso dell’area piana sul
timone. Questo è il punto dove installare la squadretta quando
sarà il momento.


