www.HandiQuilter.com
Design Menu | 5.1
5. Design Menu
The Design menu functions open, modify, position, and save quilting designs. Much of what you will do
with Pro-Stitcher will be from this menu.
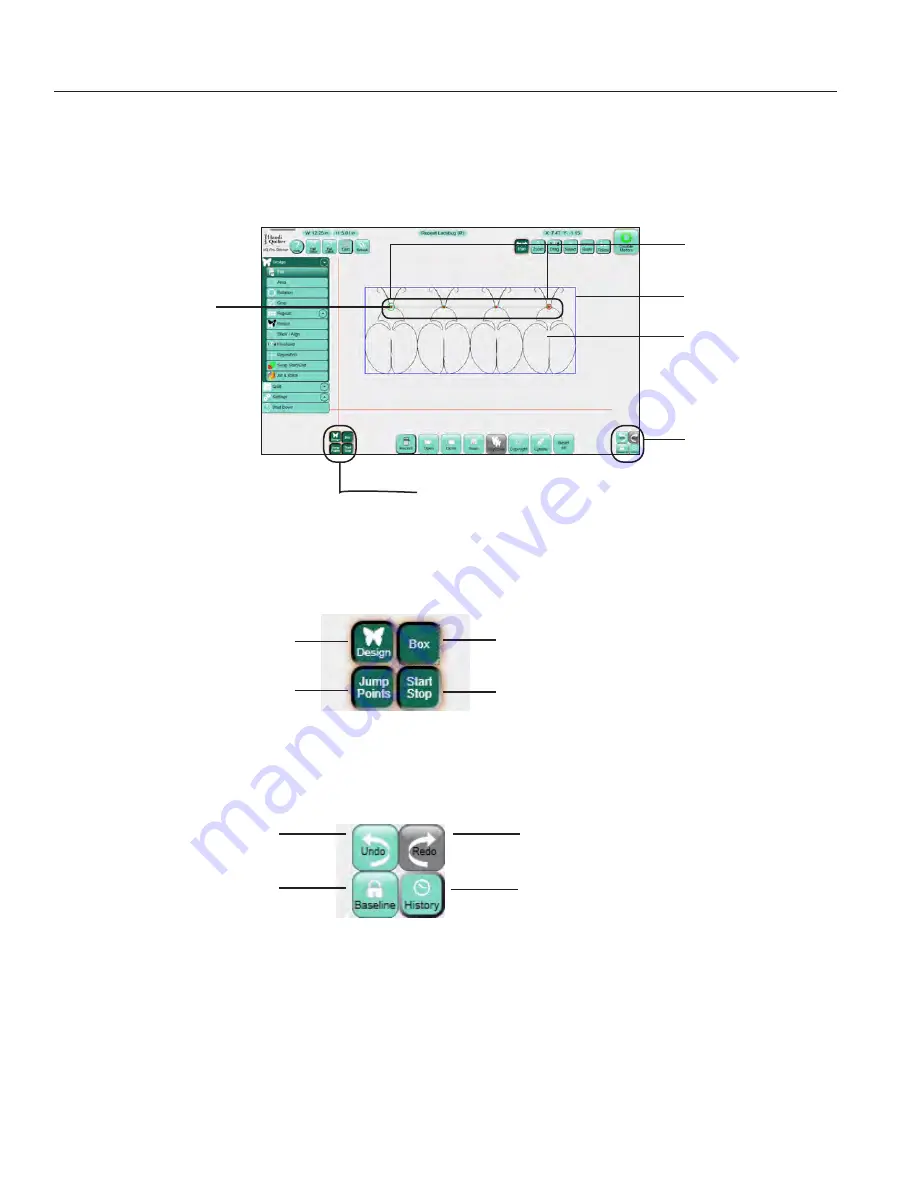
After you select Design, two clusters of buttons appear on the lower-left and lower-right corners of the
screen.
The four buttons in the lower-left corner of the Design screens turn on or off the display of a portion of the
design.
The four buttons in the lower-right corner of the Design screen help to keep track of changes made to the
design.
Design history
• Press
History
to show a list of the functions that have been performed since opening a design.
Red dots mark the start
of a jump, the point
where Pro-Stitcher
stops stitching so you
can tie off the thread.
The purple dashed line
shows the jumps (not
stitched).
Green dots mark the
end of the jump and the
beginning of the next
stitching segment.
Start (red) and stop
(green) points
Bounding box
Design
Use these buttons
to keep track of
changes you make
to the design.
Use these buttons to display
portions of the design.
Select to show or
hide the design.
Select to show or
hide the jump points.
Select to show or hide
the blue bounding box
and the area box.
Select to show or hide
the start and stop
points.
Select to undo the
last function performed.
Select to baseline a
design, or have the
software treat it as
a new design.
Select to redo the last
function that was undone.
Select to see a list of the
functions that have been
performed since opening a
design.
Summary of Contents for Pro-Stitcher QM30010-2
Page 43: ...3 32 Installation www HandiQuilter com...
Page 53: ...4 10 Overview www HandiQuilter com...
Page 57: ...6 4 Art Stitch www HandiQuilter com...
Page 105: ...7 12 Quilt Menu www HandiQuilter com...
Page 131: ...HQ Pro Stitcher User Manual 10 8 Warranty Training Checklist...
Page 133: ...HQ Pro Stitcher User Manual 11 2 HQ Printouts...
Page 135: ...www HandiQuilter com 12 2 Tutorials...


