background image

Dolphin® 9500 Series User’s Guide 

Rev C

8 - 9

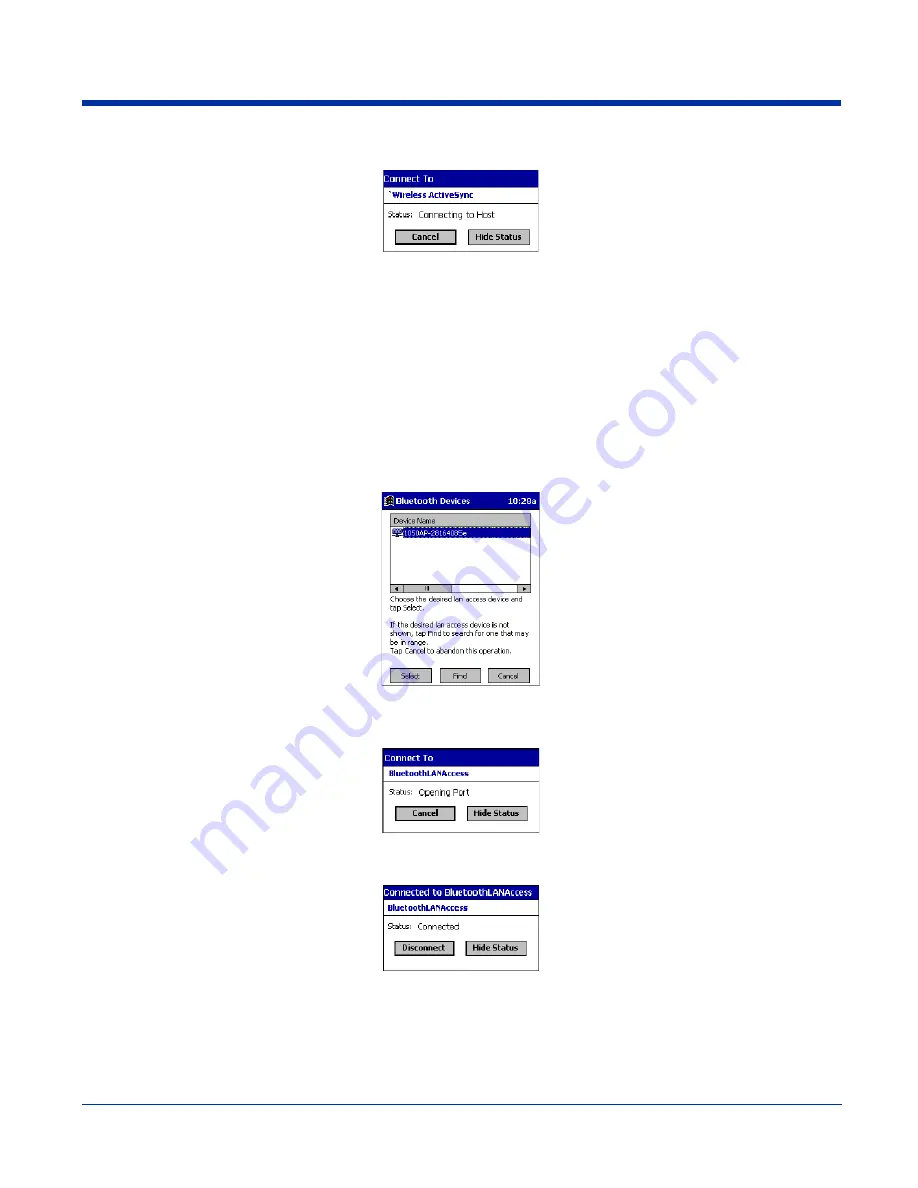
(d) The Connect To screen appears, reporting that it is trying to connect to Wireless ActiveSync.

(e) After a successful connection is made, the status screen reports Connected. Now you are ready to synchronize, if desired.

Bluetooth LAN Access

This section explains how to use the Bluetooth LAN Access feature to quickly and easily connect to a Bluetooth-enabled LAN 
access point.

1. Tap on the 

Bluetooth

 icon. In the pop-up menu, select 

Bluetooth LAN Access

.

2. The next screens varies depending on if your Bluetooth Devices folder contains any access points, and if one is chosen as 

your favorite. Please refer to the appropriate scenario:

SCENARIO #1:

 Your Bluetooth Devices folder contains no favorite access point.

(a) When you tap Bluetooth LAN Access, a screen appears that allows you to choose which access point to connect to in 

your Bluetooth Devices folder. Choose an access point from the list and tap 

Select

Note: If your access point is not listed, tap Find and proceed as described in Scenario #3.

(b) Your device tries to connect to the selected access point.

(c) If your LAN requires a passkey, a screen appears asking for the passkey. Enter the passkey, then tap 

OK

.

(d) After a successful connection is made, the status screen reports Connected.

(e) Now you are ready to access your LAN for Internet access, files, etc.

SCENARIO #2:

 Your Bluetooth Devices folder contains a favorite access point.

Summary of Contents for Dolphin 9500 Series

Page 1: ...Dolphin 9500 Series Microsoft Windows Mobile 2003 Second Edition Software for Pocket PCs User s Guide...

Page 2: ...ss www handheld com Trademarks Dolphin HomeBase Mobile Base and QuadCharger are trademarks or registered trademarks of Hand Held Products Inc Windows Mobile Windows Windows NT Windows 2000 Windows ME...

Page 3: ...Resetting the Terminal 2 11 Soft Reset Warm Boot 2 11 Hard Reset Cold Boot 2 11 Suspend Mode 2 11 Chapter 3 Hardware Overview System Features 3 1 Front Panel Features 3 2 Back Panel Features 3 4 Dolp...

Page 4: ...tions 4 15 Radio Driver Installation 4 15 Using the Radio Manager 4 15 Enabling Radios and Radio Combinations 4 15 Using the Soft Input Panel SIP 4 17 Input Panel Options 4 18 Writing on the Screen 4...

Page 5: ...Computer 6 2 Synchronizing from Your Desktop Computer 6 2 Synchronizing from the Terminal 6 2 Exploring Your Terminal from the Desktop Computer 6 3 Adding Programs to the Terminal Using ActiveSync 6...

Page 6: ...e s 8 3 Set Up Your Favorite Device 8 5 Turn Radio Transmitter ON OFF 8 7 Bluetooth ActiveSync 8 7 Bluetooth LAN Access 8 9 OBEX 8 11 Enable File Sharing 8 18 Using the Dialer 8 18 Get Connected Wizar...

Page 7: ...Overview 11 1 Laser Engine Specifications 11 1 Radio Options 11 2 Keyboard Options 11 2 Peripherals and Accessories 11 2 Front Panel Features 11 2 Bottom Panel Features 11 2 Dolphin 9501 Hardware 11 3...

Page 8: ...7 Mobile Base Serial Connector 13 8 Configuring the Terminal for ActiveSync Communications 13 8 Chapter 14 Dolphin ChargeBase Overview 14 1 Dolphin ChargeBase Parts and Functions 14 1 Front Panel 14 1...

Page 9: ...16 3 Appendix A Keyboard Combinations General Windows Keyboard Shortcuts A 1 43 Key Alpha Numeric Keyboard A 2 Blue Key Combinations A 2 Red Key Combinations A 3 Num Lock Key Combinations A 3 35 Key...

Page 10: ...x Dolphin 9500 Series User s Guide...

Page 11: ...code symbologies see Bar Code Symbologies Supported on page 2 6 Co located and integrated 802 11b GSM GPRS and Bluetooth wireless radios for real time data collection applications Intel X Scale 400MH...

Page 12: ...Dolphin 9500 9550 with 5300SF SR laser aimer Dolphin 9501 9551 with laser engine Safety and radio label Laser safety label Embedded safety information Safety label Laser safety label Embedded safety i...

Page 13: ...by the Federal Communications Commission FCC Dolphin 9500 Dolphin 9550 Dolphin 9501 Dolphin 9551 Parameter Specification U S A Canada European Community FCC Part 15 Class B ICES 003 EN 55022 CISPR 22...

Page 14: ...FH 1R GDWHG XO 6 5 7 2 127 67 5 172 0 P 0 287387 Q0 1 66 6 5 352 8 7 DQDGD 1 DQG HOG 3URGXFWV QF ZZZ KDQGKHOG FRP RPSOLHV ZLWK 5 DQG H FHSW IRU GHYLDWLRQV SXUVXDQW WR DVHU 1RWLFH 1R GDWHG XO 6 5 7 2 1...

Page 15: ...G D Q D X G 0 1 H P U R Q D O D H P U R I Q R F W V H H V V D O F Q V W F X G R U 3 G O H G Q D 6 8 Q L H G D 0 6 8 I R V W U D S G H W U R S P L U H V X R 1 H O E D H F L Y U H V V W U D S V G L R 9...

Page 16: ...o an outlet on a circuit different from that to which the receiver is connected Consult the dealer or an experienced radio TV technician for help If necessary the user should consult the dealer or an...

Page 17: ...ormity with all essential requirements of the R TTE Directive 1999 5 EC This equipment has been assessed to the following standards This product is marked with in accordance with the Class II product...

Page 18: ...nd the LCD display with a clean non abrasive lint free cloth The terminal can be cleaned with a damp cloth For European Community Users Hand Held Products complies with Directive 2002 69 EC OF THE EUR...

Page 19: ...r easy single handed mobile data collection Each mobile computer is equipped with an Intel PXA255 400MHz RISC processor for fast processing built for Windows Mobile based Pocket PCs The Dolphin termin...

Page 20: ...These terminals integrate the functionality of the Batch terminals with an integrated IEEE 802 11b direct sequence radio that enables communication with a host computer through a wireless local area...

Page 21: ...its main battery pack charges in less than four hours The serial connector supports RS 232 communication and power out to peripheral devices such as hand held scanners For more information see Dolphi...

Page 22: ...its are an all in one solution for mobile applications Each cable kit powers the terminal charges its main battery and communicates with host or peripheral devices without the need for a cradle Cable...

Page 23: ...engines For details see Laser Engine Specifications on page 11 1 5100 Standard Range 5100SR 5300 Standard Range 5300SR Code 8 mil Linear 10 mil PDF417 13 mil UPC 15 mil QR 15 mil Data Matrix 35 mil Ma...

Page 24: ...or 5 Matrix 2 of 5 Plessey PosiCode RSS Straight 2 of 5 IATA Straight 2 of 5 Industrial Telepen Trioptic Code UCC EAN 128 UPC and UPC A 2D Symbologies Aztec Code 16K Composite Data Matrix MaxiCode OC...

Page 25: ...nd strap slide the clip back into place on the bottom panel The Dolphin 9501 has a special hand strap see Dolphin 9501 Hand Strap and Stylus on page 11 5 Step 2 Install the Main Battery Pack Use only...

Page 26: ...llowing peripherals to charge the main battery pack Dolphin HomeBase see page 12 1 Dolphin Mobile Base see page 13 1 Dolphin ChargeBase see page 14 1 Dolphin Net Base Dolphin Charging Communication Ca...

Page 27: ...the Dolphin terminal install Demos and Power Tools If the terminal is configured with a wireless radio the appropriate radio drivers and utilities for each radio install After Autoinstall is complete...

Page 28: ...demo For more information about taking an image see Using the Image Engine on page 4 4 Verify Decoding The Scan Demo enables you to decode a sample bar code 1 Tap Start Demos Scan Demo 2 Aim the term...

Page 29: ...et Cold Boot A hard reset resets the operating system restores the terminal back to factory defaults and resets the terminal after a bootloader keyboard and kernel upgrade A hard reset erases all of t...

Page 30: ...2 12 Rev C Dolphin 9500 Series User s Guide...

Page 31: ...ons for energy efficient data collection devices like the Dolphin terminal Memory There are two kinds of memory Main Board IPSM The standard memory configuration is 64MB RAM and 32MB non volatile Flas...

Page 32: ...n 9500 Series User s Guide Front Panel Features This section describes features on the front panel on Dolphin 9500 Series terminals SP Decode LED Scan LED Display Navigation keys SCAN key Keyboard Mag...

Page 33: ...light on page 4 13 SCAN Key The SCAN key is centrally located for easy access with the right or left hand When pressed the SCAN key activates the scanner imager The SCAN key also functions as an on or...

Page 34: ...Dolphin 9550 are different each is featured in its own section Dolphin 9500 The following graphic describes features on the back panel of the Dolphin 9500 terminal Battery Well underneath the battery...

Page 35: ...use see Audio Modes on page 9 3 Hand Strap Attachment The Dolphin 9500 and Dolphin 9551 have an adjustable elastic hand strap to provide a comfortable secure grip on the terminal It is attached to th...

Page 36: ...Engine Window This is the front view of the window For more information see Image Engine Window on page 3 5 Scan Trigger The scan trigger provides ergonomic scan activation for scan intensive applicat...

Page 37: ...following graphic shows the Dolphin 9550 in a nose down position resting on its rubber bumpers Stylus The stylus is used to operate the touch screen display The Dolphin 9550 stores the stylus inside t...

Page 38: ...interface You can open the access door manually to gain access to the SD to custom configure the terminal with SD memory upgrades of 64MB 128MB or 256MB When the access door is fastened securely and p...

Page 39: ...the maximum communication speed is 115 Kbps with seven baud rate settings For USB the communication speed is up to 12 Mbps If the peripheral unit is connected to a PC this connector also transmits da...

Page 40: ...rging Time The Li ion battery pack requires four hours to charge completely Internal Backup Battery Located inside the terminal the backup battery is a 3 6 Volt nickel metal hydride NiMH battery The i...

Page 41: ...w battery points There are two DWORD value registry entries HKEY_LOCAL_MACHINE System CurrentControlSet Control Power that allow these warning points to be customized CriticalBatt a 10 This sets the C...

Page 42: ...The following are general guidelines for the safe use and disposal of batteries Use only the battery supplied recommended or approved by Hand Held Products Replace defective batteries immediately usi...

Page 43: ...ee 1D Symbologies on page 2 6 2D Symbologies See 2D Symbologies on page 2 6 Composite Codes See Composite Codes on page 2 6 OCR Fonts See OCR Codes on page 2 6 Keyboard Options See Using the Keyboards...

Page 44: ...o 80 C Humidity 95 humidity non condensing Electrical Static Discharge 15 KVA on all surfaces Impact Resistance Withstands multiple 5ft 1 5m drops onto concrete Environmental Resistance Independently...

Page 45: ...en used with applications that require high volume interfacing with the touch screen Screen protectors help prevent damage to the touch screen display and are easily installed Screen protectors can be...

Page 46: ...rams and access system setting Command Bar Use the command bar at the bottom of the screen to perform tasks in programs The command bar includes menu names buttons and the Input Panel button To create...

Page 47: ...ou want to perform the action When the menu appears lift the stylus and tap the action you want to perform Or tap anywhere outside the menu to close the menu without performing an action Selecting Pro...

Page 48: ...fast reading of linear and stacked linear bar codes To achieve a positive read when reading linear 1D and PDF417 bar codes the green aiming beam should be centered horizontally across the bar code Whe...

Page 49: ...size should be read closer to the unit whereas symbologies with larger bars or elements mil size should be read farther from the unit 5100 Green Aiming Beam 5300 Red High Vis Aiming Pattern If your Do...

Page 50: ...ize of the image file is approximately 4 8K However the size of the image depends on the content of the image the more complex the content the larger the file size For the highest quality image take g...

Page 51: ...ys for both right and left hand operation The silver background of both the keys and the overlay enhances readability The overlay of each keyboard is color coded to indicate the functions performed or...

Page 52: ...ted function press Red SP to backspace To delete a single character press Red SP To delete multiple characters press Red SP and hold the SP key Delete DEL This key appears on both the 35 and 56 keyboa...

Page 53: ...ff by double tapping it or by pressing SFT the Red modifier key When Caps Lock is toggled on characters are uppercase when toggled off characters are lowercase CTRL and ALT Functions of the ALT and CT...

Page 54: ...faults to numeric mode On the overlay there are Alpha Lock Indicators above number keys 2 9 that specify the letter that will be typed when you press that number key in alpha mode Please note that whe...

Page 55: ...type letters with the letter keys Numeric mode is when you type numbers with the letter keys On the 43 key keyboard alpha mode is the default The Number Lock Indicators above the letter keys in the Nu...

Page 56: ...Key Combinations There are keyboard combinations for specific functions and special characters on each keyboard For charts of the key combinations associated with each keyboard layout see Keyboard Co...

Page 57: ...ngs when the terminal is running on battery power The External tab determines display backlight settings when the terminal is powered by an external source such as a Hand Held Products cable Field Des...

Page 58: ...olphin terminals to transmit data via pulses of light to and from other IrDA compliant devices such as printers and PCs or to other Dolphin terminals For more information see Using Infrared on page 6...

Page 59: ...reset When more than one radio driver installs the terminal generally enables the 802 11b radio However if a GSM radio is installed the terminal enables the GSM radio Using the Radio Manager The Radio...

Page 60: ...mbination 3 When enabled the Status field reads Success Radio Manager Window Radio Modes The Radio Modes section displays the radio hardware modules currently installed on the terminal Status field Th...

Page 61: ...anticipate To change word suggestion options such as the number of words suggested at one time tap Start Settings Personal tab Input Word Completion tab Using the SIP Keyboard 1 Tap the arrow next to...

Page 62: ...mark next to the writing area Selecting Text To edit or format typed text select it by dragging the stylus across the text Then use the commands on the pop up menu to cut copy and paste the selected...

Page 63: ...point appears 2 Without lifting drag the stylus across the text you want to select If you accidentally write on the screen tap Tools then Undo and try again You can also select text by tapping the Pe...

Page 64: ...o select the drawings you want You can cut copy and paste selected drawings by tapping and holding the selected drawing and then tapping an editing command on the pop up menu or by tapping the command...

Page 65: ...ou ve set up an appointment in Calendar a task with a due date in Tasks or an alarm in Clock you ll be notified in any of the following ways A message box appears on the screen A sound which you can s...

Page 66: ...d select a data type and then tap Go to start the search To quickly find information that is taking up storage space select Larger than 64 KB in Type You can also use the File Explorer to find files a...

Page 67: ...d settings screen opens Settings consists of three tabs Personal Customize buttons set SIP options and adjust headset settings see Personal Tab on page 5 2 System Adjust system settings see System Tab...

Page 68: ...rm functions Buttons on page 5 3 Headset Adjust audio settings for headset use Headset Control on page 5 4 Input Customize the SIP Input Panel Options on page 4 18 Menus Customize the Start and New me...

Page 69: ...onal tab Buttons Note The buttons that appear on this window are the only buttons that can be programmed via the Buttons setting You cannot add buttons to this window 2 To change button assignment tap...

Page 70: ...ust the audio level of the microphone Normal is the default setting These settings apply to the selected Headset Type Stereo headphone Adjusts the volume on the terminal s microphone Microphone page 3...

Page 71: ...you do not alter your program configurations by accident If you Cut and Paste the program itself you will be removing the program from its proper location which means that the program might not run pr...

Page 72: ...d select Create Shortcut 4 Select the shortcut right click and select Cut 5 Navigate to the Start Menu folder Windows Start Menu 6 Right click on an empty area and select Paste 7 On the terminal tap t...

Page 73: ...Sync Description Displays the description of the device ID Copyrights Tab Displays important copyright information Backlight The Backlight system setting enables you to customize backlight functionali...

Page 74: ...board volatile RAM memory Open the Memory setting whenever you receive system messages about memory There are three tabs Main Storage Card and Running Programs Main Tab This tab displays the availabl...

Page 75: ...ta or programs stored in IPSM are not affected when power is removed Autoinstall programs for example are stored in IPSM so that they are always installed during startup When IPSM is selected in the d...

Page 76: ...unsaved data in that program is lost To free up memory without risking data loss return to the running program save your data and close the application Links at the Bottom of the Memory Tabs At the bo...

Page 77: ...to pass before the terminal powers off when running on external power Options below the tabs Adjust backlight opens the Backlight settings so that you can make adjustments to conserve power usage see...

Page 78: ...on selected in the drop down list at the top The terminal is loaded with a number of pre programmed regional settings Select one from the list The results appear on the screen To see specific settings...

Page 79: ...l re install after the next hard reset For information about the Autoinstall process see Let Autoinstall Run on page 2 9 For information about the hard reset process see Hard Reset Cold Boot on page 2...

Page 80: ...screen at bootup Re align the screen again if tapping buttons or icons with the stylus no longer seems to work appropriately For more information see Align the Screen on page 2 9 ClearType Tab The dis...

Page 81: ...ont on application windows This is the default font size setting To change the font size move the slider toward Smallest or Largest The Example text changes to reflect the font change Tap OK to save t...

Page 82: ...eless LAN WLAN Communications with 802 11b page 7 1 Beam Verifies and adjusts infrared settings of the IrDA port Using Infrared page 6 5 Connections Configures network connections this is the Connec t...

Page 83: ...ons icon The Connections Manager opens displaying the Tasks tab The Connections Manager consists of two tabs Tasks and Advanced Task Tab The Task tab configures and manages your My Work Network settin...

Page 84: ...n COM1 7 Tap Next The My Connection screen appears 8 Enter the number that should be dialed when connecting to your ISP Include any special digits such as or see Establishing Dialing Rules on page 5 2...

Page 85: ...dial tone before dialing then wait for credit card add dial string modem commands or cancel call after a set number of seconds Port Settings Tab The Port Settings tab has options that should be left a...

Page 86: ...l Modem Connection to Your Work Follow the instructions for Connecting to Your ISP page 5 20 but select Add a new modem connection under My Work Network Establishing Exceptions for Work URLs Some comp...

Page 87: ...k your ISP or network administrator for the proxy sever name server type port type of Socks protocol used and your user name and password 1 Tap Start Settings Connections tab Connections 2 Under the M...

Page 88: ...IP settings and host name or IP address of the VPN server 1 Tap Start Settings Connections tab Connections 2 Under the My Work Network heading tap Add a new VPN server connection 3 Enter the requeste...

Page 89: ...5 23 Enter TCP IP settings in the first tab server assigned IP addresses use DHCP Enter Server DNS WINS information in the Servers tab Connecting to a VPN Server 1 Tap Start Settings Connections tab C...

Page 90: ...isplays the following bubble Establishing Dialing Rules 1 Tap Start System Connections tab Connections Advanced tab see page 5 17 2 Tap Select Location 3 Select Use dialing rules By default two dialin...

Page 91: ...information on the next screen 6 Tap Dialing Patterns to change how dialing occurs 7 Following the format of e represents country code f represents area code and g represents the number enter how loc...

Page 92: ...you make any changes on these tabs you must tap OK to save the changes then perform a soft reset to update the registry After you tap OK the following message appears Tap OK again to save any changes...

Page 93: ...rocessor You can verify your processor by tapping Start Settings System tab About Version tab Make a note of the information in the Processor field You can install additional software via ActiveSync s...

Page 94: ...terminal to your desktop computer set up a partnership so you can synchronize information and customize your synchronization settings Synchronizing from Your Desktop Computer Because ActiveSync is alr...

Page 95: ...ile and your processor You can verify your processor by tapping Start Settings System tab About Version tab Make a note of the information in the Processor field Depending on the application the softw...

Page 96: ...files to the Program Files folder on the terminal If you want the program to be part of the Autoinstall that occurs after every hard reset place the program file in the Autoinstall folder My Pocket PC...

Page 97: ...By default the IrDA port is assigned to Com port 6 and is enabled When a Bluetooth radio is installed the IrDA port can be disabled to free up a Com port for Bluetooth devices To verify that the IrDA...

Page 98: ...s 115 Kbps 1 Align the IrDA ports 2 Open the program where you created the item you want to send and locate the item in the list You can also beam files but not folders from File Explorer 3 Tap and ho...

Page 99: ...Dolphin 9500 Series User s Guide Rev C 6 7 If the terminal cannot find the sending device the following message appears...

Page 100: ...ssor by tapping Start Settings System tab About Version tab Make a note of the information in the Processor field 1 Determine your device and processor type so that you know which version of the softw...

Page 101: ...he radio driver for 802 11b is installed The terminal defaults to the 802 11b radio during initialization unless a GSM radio is installed in which case the terminal defaults to the GSM radio The 802 1...

Page 102: ...sts of four tabs Status Config Advanced and About Each tab is described in its own section in this chapter Status Icons This configuration utility contains icons that indicate the status of the networ...

Page 103: ...tio Strength Displays the signal strength at the receiver IP Address Displays the IP address of the radio Verify configuration information with your network administrator Renew IP Tap this button to r...

Page 104: ...is blank after the initial installation and each hard reset This section remains blank if there no automatic association preference selected Field Description IP Address Displays the current IP addres...

Page 105: ...he Active SSID list and tap Add The SSID moves to the Preferred Profile list If the SSID has the WEP Key turned on the Settings window displays and prompts you to enter the WEP Method Encryption Key a...

Page 106: ...5 MB 11 MB or Fully Auto The transmit rate is set to Fully Auto by default Type From the drop down list select Peer to Peer This mode used for communication between two or more radio stations cards wi...

Page 107: ...decimal 128 bit ASCII uses 13 characters in ASCII HEX Hexadecimal is a set of 16 characters from 0 9 and from A a F f ASCII Any printable ASCII character can be typed Key ID Choose from the available...

Page 108: ...nable Automatically enables the Power Save mode when the terminal is running on battery power and automatically disables Power Save mode when the terminal is running on external power Slider The slide...

Page 109: ...n and the Link Icon displays with signal strength Wireless Radio Off Turns off the radio A pop up window will ask for your confirmation If confirmed the LED will be off and the Status icon will change...

Page 110: ...7 10 Rev C Dolphin 9500 Series User s Guide Note The Status Icon changes to a crossed lock as a warning that you may have entered a wrong key WEP Key mismatch for the WEP On AP or a station...

Page 111: ...Edition Software Pocket PC 2002 OS version Pocket PC Version 3 0 11171 Build 11178 or later CE NET 4 1 OS version CE NET Version 4 10 Build 908 or later CE NET 4 2 OS version CE NET Version 4 20 Build...

Page 112: ...___________________________ LEAP Worksheet To configure AEGIS Client to use LEAP authentication you need to know 1 Will you use your Windows user name and password for network authentication Applies o...

Page 113: ...nstalled on your machine by your network administrator 4 What is the user name identity and password for the tunnel authentication User name _______________________________________ Password __________...

Page 114: ...network administrator 4 What is the user name identity and password for the tunnel authentication User name _______________________________________ Password ________________________________________ 5...

Page 115: ...lled by 802 1X or there is no authentication activity on the controlled ports The absence of yellow red or green may also indicate that the network access server is not an 802 1X aware device Gray The...

Page 116: ...icon changes as the port starts authentication negotiates with the AP and or authentication server and then joins the network As the network interface starts or stops the color of the port icon and th...

Page 117: ...nfiguration screen displaying the User tab Install Protocol Selecting this option binds the 802 1X protocol to the WLAN adapter currently installed on the device The WLAN adapter then appears in the p...

Page 118: ...bottom of the main screen indicates the connection status between the network card and the AP The status bar displays one of the following depending on the status of connectivity Not Associated AP Nam...

Page 119: ...al wireless networks and is accessed from the Port menu Menu Item Description Enable and Disable These commands enable or disable 802 1X authentication on the port The port should be enabled before th...

Page 120: ...n multiple networks or if different users share the computer Note Fields are be grayed out if not relevant to the selected protocol Accessing the Client Configuration Area On the main screen tap Clien...

Page 121: ...S and PEAP this identity called the Phase 1 identity is sent outside the protection of the encrypted tunnel Therefore it is recommended that this field not contain a true identity but instead the iden...

Page 122: ...is used Tunneled authentication area Tunneled authentication parameters are used by only by TLS TTLS and PEAP protocols in Phase 2 of authentication and after the secure tunnel has been established T...

Page 123: ...ickly if the Debugging level is chosen Do not use the Debugging option for a significant length of time because most internal operations generate messages Defaults Tap this button to return log settin...

Page 124: ...authorities whose certificates exist in the system store are available for selection in the drop down list Allow intermediate certificates This option is selected by default and enables unspecified ce...

Page 125: ...ng to be in a location with only one AP or more than one AP that attaches to the same network the default profile may be sufficient for you needs without necessitating the selection of a specific netw...

Page 126: ...lient restarts before giving up At that point the Client then defaults to the authenticated state but there will be no network connectivity because the protocol exchange was never completed Display EA...

Page 127: ...e AP If the AP broadcasts its SSID then this value may be derived from the Avail able Networks list If the SSID does not broadcast then you must manually enter the value here Peer to Peer Group Select...

Page 128: ...you need to con nect to the AP without username and password authentication The key entered below is used to authenticate instead Key In this field enter the WEP key ASCII 5 or 13 characters Hexadeci...

Page 129: ...deleted If you wish to start with a blank file exit from the Client so the icon no longer appears at the lower right of the screen and delete the log file log8021x in File Explorer see Using Find on...

Page 130: ...d installed on a Windows Mobile device Installing Certificates Client or CA certificates can be imported from cer same as der p7b or pfx files 1 Download the certificate file to the My Documents folde...

Page 131: ...ress through DHCP On the main screen tap and hold on your AP tap Configure on the popup menu and select the Protocol tab Verify that Renew IP Address is selected see Renew IP address on page 7 26 I ca...

Page 132: ...graphic displays the typical message exchange when the device and the AP support 802 1X When an AP acting as an authenticator detects a wireless station on the LAN it sends an EAP Request for the use...

Page 133: ...apV2 and EAP TLS SmartCard Like TTLS the use of a client certificate is optional if one is used the same certificate is used for Phase 1 and Phase 2 The client certificate is optional for both phases...

Page 134: ...server certificate TTLS and PEAP require only that a single server certificate be created for the server to present to the client and that the client have a CA certificate to verify the server Becaus...

Page 135: ...No No No Server side certificate required No Yes No Yes No Dynamic WEP Re keying No Yes Yes Yes Yes Mutual or One way Authentication One way Mutual Mutual Mutual Mutual Support of non EAP protocols wi...

Page 136: ...7 36 Rev C Dolphin 9500 Series User s Guide...

Page 137: ...sary This step would be used to change the friendly name of your device 1 Tap the Bluetooth icon that appears in the task tray on the Today screen 2 In the pop up menu select Advanced Features then My...

Page 138: ...rDA Port Note The Bluetooth Phone port cannot be disabled Discover Bluetooth Device s Follow these steps to discover other Bluetooth devices nearby including non phone devices The Device Discovery Wiz...

Page 139: ...ext screen tap Finish Bond With Discovered Device s Follow these steps to bond with an already discovered Bluetooth device In most cases bonding is for establishing secure communications with a Blueto...

Page 140: ...n the pop up menu select Bond 3 Alternatively after selecting a device tap on the Bond icon Or tap on Device then select Bond 4 The Bluetooth Device Bonding Wizard launches Follow the wizard to bond w...

Page 141: ...ct a device Tap on the Properties icon or tap on Device then select Properties Alternatively you can tap and hold your stylus on the Bluetooth device you want to view information about In the pop up m...

Page 142: ...evice Tap OK 4 After setting a device as your favorite its icon appears in the Bluetooth Devices folder with a heart next to it Change Views You can switch between the Large Icons or Details views for...

Page 143: ...his section explains how to quickly and easily ActiveSync to a notebook or desktop computer with Microsoft ActiveSync 1 Tap on the Bluetooth icon In the pop up menu select Bluetooth ActiveSync 2 The n...

Page 144: ...to your selected computer c After a successful connection is made the status screen reports Connected Now you are ready to synchronize files if desired SCENARIO 3 Your Bluetooth Devices folder contai...

Page 145: ...osen as your favorite Please refer to the appropriate scenario SCENARIO 1 Your Bluetooth Devices folder contains no favorite access point a When you tap Bluetooth LAN Access a screen appears that allo...

Page 146: ...nts a When you tap Bluetooth LAN Access the device automatically begins to search for new Bluetooth devices Note You can also start the device search by tapping Find in the Bluetooth Devices screen Se...

Page 147: ...h device Exchange Business Cards 1 Make sure both Bluetooth devices have a business card assigned to them If each device does not have a business card assigned to it you cannot exchange business cards...

Page 148: ...fter the exchange the new business card should appear in your Contacts Send a Contact 1 Make sure the other Bluetooth device is set up to receive a contact It must support the OBEX Object Push server...

Page 149: ...he other Bluetooth device can receive a file that device must support the OBEX Object Push server profile Note If the other device is also using the Bluetooth Connection Kit you can set it up to recei...

Page 150: ...he OBEX File Transfer server profile This section covers the following file transfer operations Prepare for file transfer Send receive file s or folder s Create a folder Delete file s or folder s Refr...

Page 151: ...ansfer then it begins to search for Bluetooth devices nearby 4 Select the Bluetooth device you wish to browse If the desired device is not listed tap Find 5 Your device begins to establish a file shar...

Page 152: ...con or Get from remote icon as applicable The inappropriate icon should be gray 3 A screen reports the status of the transfer 4 After the transfer a copy of each selected item should appear in the oth...

Page 153: ...te view 2 Your local device begins to read the contents of the remote device 3 After a few seconds the contents view of the remote device is refreshed Connect Disconnect To connect to the remote devic...

Page 154: ...1 Tap on the Bluetooth icon In the pop up menu tap Transfer via Bluetooth Enable File Sharing 2 The Enable File Sharing status screen appears Your device waits two minutes for the remote device to co...

Page 155: ...device must already be connected to the Bluetooth phone You can use the Get Connected Wizard to do this Also the Bluetooth phone must be selected as your favorite 2 Tap Start Contacts 3 Tap and hold y...

Page 156: ...ected Wizard guides you through a one time setup process that prepares the device and phone for Bluetooth connections The wizard varies depending on what phone you want to connect to Ericcson Nokia 62...

Page 157: ...on the mobile computer Note Ericsson T68 T68i only When the phone asks you if you want to bond select 2 Add to paired devices Do not tap ACCEPT 8 Tap Finish After successfully connecting the phone app...

Page 158: ...res until you exit the wizard Bonding with your phone This must be completed to establish the Bluetooth connection and involves dial up networking Automatic Connections This procedure is optional but...

Page 159: ...ings tap Connect In Network Log On verify the dialing settings Tap OK Automatic Connections for Motorola Timeport 270C On the phone press MENU Scroll to Settings then press SELECT Scroll to Connection...

Page 160: ...8910i On the phone press MENU Scroll to 10 Bluetooth then press SELECT Scroll to 4 View Paired Devices then press SELECT Highlight the Dolphin terminal then press OPTIONS Scroll to 3 Request Connectio...

Page 161: ...etwork subscription to a GSM GPRS network you need to know what service providers are in your geographic area and SIM card that has been activated by the network service provider installed on the term...

Page 162: ...emergency phone calls such as 9 1 1 for example To Install a SIM Card On the Dolphin 9500 terminal access to the SIM card is located under the battery well which enables easy access to the SIM card w...

Page 163: ...t mode is when you plug a headset into the audio jack and speak into the microphone You must use a 2 5mm plug no other audio plug will fit Hands Free Hands free mode is when you use the back panel of...

Page 164: ...ays a bubble window that lets you know what is happening Icons and Bubble Messages Icon Description Tap this icon to display Bubble Options The phone is off Tap Power Phone On to turn the phone on and...

Page 165: ...l the Answerphone service and retrieve voicemail messages Tap Hide to close the bubble There is a call in progress to the name or number shown in the bubble Tap Hide to close the bubble Tap End to end...

Page 166: ...or number in the list and tap OK you can also tap and hold on the entry The number is automatically entered in the Dialler and appears on the screen Use speed dial Tap and hold on the list to see a p...

Page 167: ...is not visible at the time of the incoming call a Navigation Bar notification appears When a call is coming in the ringtone sounds and the three information lines on the Dialler screen display the fol...

Page 168: ...second call place the current call on hold then dial the second number When there are two calls one active and one held the status line displays In Call Call on Hold Switching Between Calls To switch...

Page 169: ...Opens application settings 3 Help Opens the About screen Tools Menu The Tools menu provides the following options End Held Drops the held call and continues with the currently active call Hide Closes...

Page 170: ...g is set in the SIM then only those numbers in the fixed dialing list are shown in the Phonebook and only these numbers can be called from the Dialler You can access the Phonebook manually by opening...

Page 171: ...d tap Tools Ringtones The Ringtones screen opens displaying the current settings Select the desired ringtone for each type of tone in the drop down lists Tapping OK saves any changes Opening another s...

Page 172: ...o date Maximum available Displays the maximum number of units available from the subscriber Refresh Updates the Current call and Accumulated calls fields with the number of charge units used read from...

Page 173: ...ive applications are generally shorter for USSD than SMS USSD is not currently available on all carrier networks USSD communicates with a USSD application portal a news portal or a chat session with a...

Page 174: ...g The Call Log opens displaying the last few Voice Calls In the most recent call always appears at the top Name The phone number or the name if the call was from or to a matching entry in the Phoneboo...

Page 175: ...configuration tools Accessing uPhone Configuration You can access uPhone Settings two ways 1 Tap Start Settings System tab uPhone icon 2 In the Dialler application selecting Tools Configuration An ani...

Page 176: ...er the digits Call waiting Select On or Off to enable or disable call waiting functionality Call waiting must be set to On for conference calls PIN protection Select On or Off to enable or disable PIN...

Page 177: ...when you are unavailable to answer e g when the phone is off you are out of network coverage busy or not able to answer All Calls diverts all incoming calls automatically Unavailable diverts incoming...

Page 178: ...numbers appear as asterisks to hide the number from observation by third parties To save the barring options tap OK The system displays a dialog requesting the barring password before sending the upd...

Page 179: ...ch SMS message has been sent These confirmation reports can take up valuable space and memory Therefore you can cancel these reports on this tab by selecting Off and tapping OK SMS number of retries T...

Page 180: ...ools SMS Manager The SMS Manager opens to the Inbox which displays a list of your most recent text messages There are three folders Inbox Sent and Outbox Tap the Inbox folder to see all three folders...

Page 181: ...e country you are dialing However you can dial a local number without the country code Destination numbers can start with a sign 3 Tap inside the text area To write a message you can use the SIP or th...

Page 182: ...message section Clear Selection De selects all text in the active message section Icons at the Top of the Message Screen Icon Description At the top of the window Copy selected text Cut selected text...

Page 183: ...he connection settings Service Provider Information You need the APN Number and User name and Password from your network service provider Configuring the GPRS Connection The GSM driver installs pre co...

Page 184: ...e A modem connection is the default connection type If you want to create a VPN connection for example you need to create a GPRS profile on the VPN tab using the parameters in the following steps 7 Ma...

Page 185: ...ve Tap Next 11 Enter the User name and Password provided by your ISP Tap Finish Entering your user name and password here in the connection manager profile means that you don t have to enter them ever...

Page 186: ...9 26 Rev C Dolphin 9500 Series User s Guide 14 To verify your connection tap Start Programs Internet Explorer Your homepage should appear...

Page 187: ...lphin terminals when shipped but may be installed from the Microsoft Companion CD Calendar Use Calendar to schedule appointments including meetings and other events You can check your appointments in...

Page 188: ...Note If you select Remind me in an appointment you will be reminded according to the options set in Start Settings Personal tab Sounds Reminders Using the Summary Screen When you tap an appointment i...

Page 189: ...atically and placed in the Outbox folder For more information on sending and receiving meeting requests see Calendar Help and Inbox Help Contacts Contacts maintains the contact information phone numbe...

Page 190: ...n clear text from the box or tap the button to the right of the box In the contact list tap the category list labeled All Contacts by default and select the type of contact that you want displayed To...

Page 191: ...the task 4 To assign the task to a category tap Categories and select a category from the list In the task list you can display tasks by category 5 To add notes tap the Notes tab For more information...

Page 192: ...nd and receive e mail messages by connecting directly to an e mail server through an ISP or a network Synchronizing E mail Messages E mail messages can be synchronized as part of the general synchroni...

Page 193: ...message headers or partial messages you can disconnect from the e mail server and then decide which messages to download completely The next time you connect Inbox downloads the complete messages you...

Page 194: ...der contains messages that have been deleted on the device The behavior of the Deleted and Sent Items folders depends on the selected options To select these options tap Tools Options Message tab To m...

Page 195: ...to an ISP or network and browse the Web When connected to an ISP or network you can also download files and programs from the Internet or intranet Accessing Pocket Internet Explorer To switch to Pock...

Page 196: ...in Internet Explorer on your desktop computer are synchronized with the Mobile Favorites folder on your terminal Note Unless you mark a Favorite Link as a mobile favorite only the link downloads to yo...

Page 197: ...me you synchronized with your desktop computer If the page is not on the terminal the favorite will be dimmed You will need to synchronize with your desktop computer again to download the page to the...

Page 198: ...Rich Text Format rtf and Plain Text txt Using Pocket Word Pocket Word contains a list of the files stored on the terminal Tap a file in the list to open it To delete make copies of and send files tap...

Page 199: ...ugh the text you want to select You can search a document to find text by tapping Edit and then Find Replace Drawing Mode In drawing mode use your stylus to draw on the screen Gridlines appear as a gu...

Page 200: ...box that template appears with appropriate text and formatting already provided If your workbook contains sensitive information you can protect it with a password To do so open the workbook tap Edit a...

Page 201: ...rosoft Windows Media Player WMP for Pocket PC to play digital audio and video files stored on the terminal To switch to Windows Media Player for Pocket PC tap Start Windows Media After a media file ha...

Page 202: ...r is an instant messaging program that lets you See who is online Send and receive instant messages Have instant message conversations with groups of contacts Note To use MSN Messenger you must have a...

Page 203: ...r Exchange account information Be sure to indicate the service you re using to connect Messenger or Exchange 4 When complete tap OK You are returned to the sign in screen 5 To sign in tap the sign in...

Page 204: ...stored on the terminal or storage card To begin tap Start Programs Pictures Choose to view main memory or storage card contents By tapping and holding on an image you can create a clone of that file...

Page 205: ...coded laser engines Note Dolphin 9501 9551 terminals do not support image capture Supported Bar Code Symbologies Laser engines support only the decoding of linear bar codes see 1D Symbologies on page...

Page 206: ...s have the same Mechanical Connector see page 3 9 they are compatible with all Dolphin 9500 Series Peripherals see page 2 3 and Dolphin 9500 Series Accessories see page 2 4 However due to their differ...

Page 207: ...lphin 9501 Hardware Dolphin 9501 Side Panel The Dolphin 9501 contains a powerful laser engine inside a solid flashlight form factor Like the Dolphin 9551 the front end of the bottom housing accommodat...

Page 208: ...4 Rev C Dolphin 9500 Series User s Guide Dolphin 9501 Back Panel For secure handling in the field the back panel of the Dolphin 9501 contains a finger saddle Speaker Laser Engine Microphone Finger Sad...

Page 209: ...Dolphin 9500 Series User s Guide Rev C 11 5 Dolphin 9501 Hand Strap and Stylus The hand strap is attached to the finger saddle and contains two stylus loops on either side Stylus...

Page 210: ...p as the Dolphin 9550 for secure and versatile handling in scan intensive applications The front end of the bottom housing accommodates the laser engine Dolphin 9551 Side Panel The following graphic s...

Page 211: ...Dolphin 9500 Series User s Guide Rev C 11 7 Dolphin 9551 Back Panel Speaker Laser Engine Microphone Pistol Grip Handle...

Page 212: ...11 8 Rev C Dolphin 9500 Series User s Guide...

Page 213: ...sion rate goes up to 12 Mbps HomeBases cannot be physically connected to each other sometimes referred to as daisy chained but can be networked together via a serial or USB hub Convenient Storage Inte...

Page 214: ...the Dolphin terminal is properly seated in the Dolphin HomeBase When this light is on the terminal is connected to the base AUX Battery LED Indicates status of the battery charging in the auxiliary ba...

Page 215: ...d to the peripheral device via the HomeBase The USB port on the HomeBase requires that you use ActiveSync 3 7 or higher RS 232 Port Use a 9 pin RS 232 cable from Hand Held Products to connect this por...

Page 216: ...olphin HomeBase connected to its power source at all times so that it is always ready to use 1 Connect the Hand Held Products power cable to the DC jack on the rear panel of the HomeBase 2 Connect the...

Page 217: ...inal and Charge its Main Battery 1 Install the battery pack in the terminal see Install the Main Battery Pack on page 2 7 1 Connect the HomeBase to the power supply provided by Hand Held Products 2 Sl...

Page 218: ...S 232 Equipment Requirements To use the HomeBase for communications you need the following equipment A HomeBase powered by a power cable and power adapter cable from Hand Held Products For RS 232 comm...

Page 219: ...nchronization is run from the terminal 4 Tap Options 5 Select Enable PC sync using this connection then select USB Connection from the drop down list 6 Tap OK 7 Place the Dolphin terminal in the HomeB...

Page 220: ...inal Equipment DTE device The HomeBase Communication Port is configured as a DCE device To communicate with a DCE device use either a null modem adapter in line with a standard RS 232 cable or a null...

Page 221: ...nization is run from the terminal 4 Tap Options 5 Under When cradled select Enable PC sync using this connection and select 115200 Default from the drop down list 115200 baud is recommended for RS 232...

Page 222: ...terminal activates if the power is off the terminal automatically powers on If the terminal does not power on verify that the Hand Held Products power supply is properly connected to the cradle and p...

Page 223: ...o the Auxiliary Battery Well and the serial and USB ports as well as the power jack face straight out of the rear panel and you will most likely want easy access to them in the future Desk Mounting Do...

Page 224: ...s ports For more details on both ports see Rear Panel on page 12 3 Turn the secured HomeBase right side up Attach the bottom panel to the mounting bracket match the holes to the secured screws 4 2 Bac...

Page 225: ...our hours The Mobile Base also provides power to the intelligent battery charging system in all Dolphin terminals that senses when a full charge has been achieved and switches to a trickle charge to m...

Page 226: ...y pack Mounting Brackets Use these to mount the Mobile Base to a fixed location DOCK LED Illuminates solid green when the Dolphin terminal is properly seated in the terminal well COMM LED Indicates th...

Page 227: ...appropriate cable comes with the kit you ordered The 12 VDC cable can be used with a cigarette lighter outlet The 24 VDC pigtail cable can be used to hard wire into the vehicle power bus Verify that t...

Page 228: ...le Base supplies charging power to the Dolphin terminal so that the terminal can monitor the charging of its battery pack This charging method protects the battery from being damaged by overcharging T...

Page 229: ...s 5 Secure the mounting bracket to the appropriate location Back Panel Latch The latch sits on top of the spring arm assembly and holds the back of the terminal securely in place The graphic above dis...

Page 230: ...ed into each slot and secured with the turnscrew Turnscrew The turnscrew is located on the top of the bracket Rotate the turnscrew to secure or loosen the ball joint slots Mounting Bracket The mountin...

Page 231: ...le depends on whether the other device is set up as a Data Communications Equipment DCE or Data Terminal Equipment DTE device The Mobile Base Communication Port is configured as a DCE device To commun...

Page 232: ...ral device such as a mobile printer as long as that peripheral device can accept 500mA at 5V Configuring the Terminal for ActiveSync Communications 1 On the terminal tap Start ActiveSync Tools Options...

Page 233: ...ing this connection then select 115200 Default from the drop down list 115200 baud is recommended for RS 232 communication 6 Tap OK 7 Place the Dolphin terminal in the Mobile Base The Dolphin terminal...

Page 234: ...13 10 Rev C Dolphin 9500 Series User s Guide...

Page 235: ...our Dolphin terminals Each charging slot charges each terminal independently of the other slots Use only Dolphin 9500 Series peripherals power cables and power adapters Use of peripherals cables or po...

Page 236: ...ply Connector This connector receives input from the power adapter Plug the power connector cable from the power adapter into this connector There is no ON OFF switch on the back panel of the ChargeBa...

Page 237: ...panel of the ChargeBase 4 Plug the power cord into a standard wall outlet 5 On the power adapter turn the power switch to the ON position The LEDs illuminate as the ChargeBase powers up 6 The ChargeBa...

Page 238: ...page 14 3 2 Insert a terminal into a terminal well see Inserting and Removing Terminals on page 14 3 3 The Charge LED lights green to indicate that the terminal is powered and charging Mounting the Ch...

Page 239: ...rging communication cradles have a DIN rail 7 5 X 35 mm slot on the bottom panel to enable secure mounting 1 Slide the DIN Rail into the DIN Rail slot on the bottom panel 2 Turn the ChargeBase and DIN...

Page 240: ...pen slot in the back to accommodate the connector cables Each mounting bracket contains an open slot in the back to accommodate the connector cables 1 Insert the head of each screw into the round end...

Page 241: ...Dolphin 9500 Series User s Guide Rev C 14 7 4 Using the remaining washer and nut sets secure the mounting brackets to the bottom panel 5 Secure the mounting brackets to an appropriate vertical surface...

Page 242: ...14 8 Rev C Dolphin 9500 Series User s Guide...

Page 243: ...r three As battery packs charge the charging circuitry follows the two step charging process CC CV that is recommended for Li Ion batteries The process monitors changes in temperature current and volt...

Page 244: ...page 15 5 Battery Capacity Indicator LEDs These LEDs give a readout of the remaining battery capacity after it has run through a complete analyze cycle For more information see Battery Capacity Indic...

Page 245: ...r source via the Hand Held Products power adapter cable so that voltage is adjusted appropriately 1 Locate the AC power adapter cable and plug it into the power source 2 Connect the power cable to the...

Page 246: ...e guidelines Avoid storing batteries outside of the specified temperature range of 4 to 104 F 20 to 40 C or in extremely high humidity For prolonged storage do not keep batteries stored in a charger t...

Page 247: ...he end of the Analyze cycle Battery capacity is displayed as a percentage of measured capacity rated capacity Status LED The Charge Analyze slot also contains a standard status LED in the upper left c...

Page 248: ...users easy access to power switch and power connector the QuadCharger should be oriented so that users can easily insert and remove battery packs and read the labels especially for the Battery Analyz...

Page 249: ...Dolphin 9500 Series User s Guide Rev C 15 7 Wall Mounting The following graphic displays how mount a QuadCharger to a wall...

Page 250: ...e battery pack is properly seated The Status LED lights red during charging Try to charge the battery in one of the other charging slots If the red Status LED comes on again then the problem is associ...

Page 251: ...Tel fono 800 782 4263 opci n 8 opci n 4 Tel fono 704 998 3998 opci n 8 opci n 4 Fax 239 263 9689 E mail laservice handheld com Brasil Hand Held Products S o Paulo Tel fono Int 55 11 2178 0500 Fax Int...

Page 252: ...3 Tel fono 704 998 3998 opci n 8 opci n 3 E mail latechsupport handheld com Brasil S o Paulo Tel fono Int 55 11 2178 0500 Fax Int 55 11 2178 0502 Rio de Janeiro Tel fono Int 55 21 2178 0500 Fax Int 5...

Page 253: ...HELD PRODUCTS ARISING IN CONNECTION WITH ANY PRODUCT SOLD HEREUNDER WHETHER SUCH LIABILITY ARISES FROM A CLAIM BASED ON CONTRACT WARRANTY TORT OR OTHERWISE EXCEED THE ACTUAL AMOUNT PAID TO HAND HELD...

Page 254: ...16 4 Rev C Dolphin 9500 Series User s Guide...

Page 255: ...oint to the beginning of the previous paragraph SHIFT with any of the arrow keys Select more than one item in a window or on the desktop or select text within a document CTRL A Select all ALT ENTER Vi...

Page 256: ...Rev C A 2 43 Key Alpha Numeric Keyboard Blue Key Combinations Key Combination Function Special Character Blue key D Blue key H _ Blue key L Blue key P Blue key Q Blue key R Blue key S Blue key T Blue...

Page 257: ...ation Function Special Character Red key ESC Lightens Contrast Red key TAB Darkens Contrast Red key SFT Toggles on Caps Lock Red key Q F1 Red key R F2 Red key S F3 Red key T F4 Red key U F5 Red key V...

Page 258: ...s User s Guide 35 Key Numeric Alpha Keyboard Blue Key Combinations Key Combination Function Special Character Blue key SP Blue key DEL Blue key F1 Blue key F2 Blue key F3 Blue key F4 Blue key BKSP STA...

Page 259: ...you must use the same multi press method you would use when typing letters on a phone keypad Each key press will type the next letter in the sequence as displayed by the alpha lock indicators over the...

Page 260: ...A 6 Rev C Dolphin 9500 Series User s Guide 56 Key Full Alpha Numeric Blue Key Combinations Key Combination Function Special Character Blue key Blue key Blue key A Blue key B Blue key E _ Blue key F...

Page 261: ...key SFT Toggles on Caps Lock Red key A F1 Red key B F2 Red key C F3 Red key D F4 Red key E F5 Red key F F6 Red key G F7 Red key H F8 Red key I F9 Red key J F10 Red key K F11 Red key L F12 Red key M F...

Page 262: ...anel of Dolphin terminals Com Port 2 Bluetooth Module If there is no Bluetooth hardware installed on the terminal this com port is unassigned Com Port 3 Raw Infrared Com Port 4 Com Port 5 USB virtual...

Page 263: ......

Page 264: ...Hand Held Products Inc 700 Visions Drive P O Box 208 Skaneateles Falls NY 13153 0208 95 UG Rev C 2 2 06...

Reviews: