background image

Page 2 of 92

520008300  08/14

SmartServe™ Drink Mixers Service Manual

© Hamilton Beach Brands, 2014

TABLE OF CONTENTS

GENERAL

Safety Information ..................................................................................................................4
Technical Services .................................................................................................................5
Introduction ............................................................................................................................5
Tools and Materials ................................................................................................................6

PREVENTATIVE MAINTENANCE

Preventative Maintenance......................................................................................................7

General Cleaning ..............................................................................................................7
Sanitizing ..........................................................................................................................8
Inspection Checklist ..........................................................................................................8

TROUBLESHOOTING

Component Functions ............................................................................................................9
Control Board Connections ..................................................................................................10
Interface Display Board Connections ...................................................................................14
Power Supply Connections ..................................................................................................15
Wiring Diagrams ...................................................................................................................16

MIC2000 .........................................................................................................................16
BIC2000 ..........................................................................................................................17

Water and Valve Diagrams...................................................................................................18

MIC2000 .........................................................................................................................18
BIC2000 ..........................................................................................................................18

Component Testing ..............................................................................................................19
Troubleshooting Guide .........................................................................................................19
Error Code Troubleshooting .................................................................................................22

REMOVAL AND REPLACEMENT

Safety Shield Assembly........................................................................................................26
Top Cover .............................................................................................................................28
Operator Interface Panel Assembly .....................................................................................30
Breaker Switch .....................................................................................................................32
Interface Display Board ........................................................................................................33
Touch Pad ............................................................................................................................34
Cup Guard & Shield Assembly .............................................................................................35
Motor Assembly....................................................................................................................38
Linear Actuator Assembly.....................................................................................................41
48VDC Power Supply ..........................................................................................................44
Control Board Assembly.......................................................................................................47
Sensor Assembly (Home Position).......................................................................................50
Sensor Assembly (Cup Present) ..........................................................................................52
Cup-In-Place Sensor (Infrared) ............................................................................................55
Shield Door Sensor ..............................................................................................................60
Wash Chamber Assembly ....................................................................................................65

Summary of Contents for SmartServe BIC2000

Page 1: ...hould read in its entirety the repair procedure you wish to perform to determine if you have the necessary tools instruments and skills required to perform the procedure Procedures for which you do not have the necessary tools instruments and skills should be performed by a trained Service Technician Reproduction or other use of this Manual without the express written consent of Hamilton Beach is ...

Page 2: ...wer Supply Connections 15 Wiring Diagrams 16 MIC2000 16 BIC2000 17 Water and Valve Diagrams 18 MIC2000 18 BIC2000 18 Component Testing 19 Troubleshooting Guide 19 Error Code Troubleshooting 22 REMOVAL AND REPLACEMENT Safety Shield Assembly 26 Top Cover 28 Operator Interface Panel Assembly 30 Breaker Switch 32 Interface Display Board 33 Touch Pad 34 Cup Guard Shield Assembly 35 Motor Assembly 38 Li...

Page 3: ...Only 74 Cup Shield Gasket 75 REPLACEMENT PARTS LIST SHIELD DOOR ASSEMBLY PANELS 76 OPERATOR INTERFACE PANEL ASSEMBLY 78 CONTROL BOARD ASSEMBLY AND SENSORS 80 LINEAR ACTUATOR MOTOR CUP GUARD BIC2000 82 LINEAR ACTUATOR MOTOR CUP GUARD MIC2000 84 MOTOR ASSEMBLY 86 WASH CHAMBER WATER LINES BIC2000 88 WASH CHAMBER WATER LINES MIC2000 90 ...

Page 4: ...pped with the proper tools parts testing instruments and the appropriate service manual Safety Information We have provided many important safety messages in this manual and on the appliance ALWAYS read and obey all safety messages This is the safety alert symbol This symbol alerts you to hazards that can kill or hurt you and others All safety messages will be preceded by the safety alert symbol a...

Page 5: ...rty damage that may result Technical Services Visit www commercial hamiltonbeach com for technical service information To change your program or create a new one contact your salesperson For assistance copy of an existing program or replacement parts call our Technical Services phone number 866 285 1087 or 910 693 4277 8 a m 5 p m EST Monday Friday Introduction This manual covers the MIC2000 and B...

Page 6: ...erials CAUTION Do not use power tools to remove hardware Damage to the hardware or the machine may occur Do not lose hardware Standard set of hand tools VOM with AC current tester any quality VOM with a sensitivity of at least 20 000 ohms per volt can be used Loctite No 242 Adhesive remover ...

Page 7: ...b on the front of the cup guard assembly while turning the splash shield to the left Let splash shield rest in the wash chamber 8 Lift the cup guard assembly upward approximately 3 to allow room to remove the splash shield CAUTION Blades are sharp 9 Wipe the wash chamber cup lid and upper part of cup guard assembly with a soft cloth bottle brush or sponge dampened with the cleaning solution 10 Imm...

Page 8: ...IC models use the sanitizing syringe to inject at least 50 mL of sanitizing solution into the sanitizing port Remove syringe and set aside 7 Remove the two thumbscrews from the door assembly and pull off the door assembly to allow the equipment to dry overnight If equipment is needed immediately press FLUSH button before programming equipment for a drink Inspection Checklist Whenever service is pe...

Page 9: ...s an infrared sensor designed to determine the presence of a cup in the mixing chamber Wash Chamber Sensors The wash chamber sensors are embedded in the wash chamber assembly They are designed to sense when the cup guard is in the wash chamber These sensors are not present on all models Shield Sensor The shield sensor is located under the wash chamber area A magnet in the safety shield assembly in...

Page 10: ... Control Board 2 Linear Motor Control Board 3 Command Logic Control Board 4 Motor Power Control Board Assembly Jumper To Board 2 2 Pin From Power Supply V V V1 Black To Solenoid V2 Black To Solenoid V1 White To Solenoid V2 White To Solenoid To Shield Door Sensor To Interface Display Board To Cup In Place Sensor Control Board 1 Solenoid and Sensor ...

Page 11: ...Service Manual Troubleshooting Control Board 3 Command Logic Control Board 4 Motor Power Control Board Assembly Jumper From Board 1 2 Pin To Linear Actuator Motor Control Board 2 Linear Motor Control Board 1 Solenoid and Sensor Control Board 2 Linear Motor ...

Page 12: ...d Sensor Control Board 2 Linear Motor Control Board 3 Command Logic Control Board 4 Motor Power Control Board Assembly Jumper From Board 4 8 Pin To Wash Chamber Sensor To second Shield Door Sensor and Jumper OR To Cup Present Sensor To Interface Display Board To Home Sensor To Motor Control Board 3 Command Logic ...

Page 13: ...shooting Jumper To Board 3 8 Pin M1 Black Motor N White M2 White Motor L Black From Main Breaker Switch Control Board 4 Motor Power Control Board 1 Solenoid and Sensor Control Board 2 Linear Motor Control Board 3 Command Logic Control Board 4 Motor Power Control Board Assembly ...

Page 14: ...age 14 of 92 520008300 08 14 SmartServe Drink Mixers Service Manual Troubleshooting Interface Display Board Connections USB Port To Control Board 1 6 Pin To Control Board 3 5 Pin Lock Tab Breaker Switch ...

Page 15: ...Page 15 of 92 520008300 08 14 SmartServe Drink Mixers Service Manual Troubleshooting Power Supply Connections L Black N White V Black Red V Red 48 VDC POWER SUPPLY ...

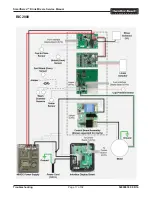
Page 16: ...Page 16 of 92 520008300 08 14 SmartServe Drink Mixers Service Manual Troubleshooting Wiring Diagrams MIC2000 ...

Page 17: ...Page 17 of 92 520008300 08 14 SmartServe Drink Mixers Service Manual Troubleshooting BIC2000 ...

Page 18: ... Troubleshooting Water and Valve Diagrams MIC2000 BIC2000 Black 2 White 1 Valve OUT To Wash Chamber WATER INLET 4 Black 1 4 OD TUBE 3 16 OD TUBE 3 White Valve Water Delivery to Cup Stem Tee Black 2 White 1 Valve Check Valve Sanitize Port OUT To Wash Chamber WATER INLET ...

Page 19: ...nough water pressure less than 45 psi Ensure location has sufficient water pressure Obstruction in water supply line Repair kinks or replace line Clogged water filter if ap plicable Check in store water filtration system Improperly calibrated water Use operator interface panel to check WATER SCALE percent age Record reading Contact Technical Services Check if SmartServe is using factory settings o...

Page 20: ...ter solenoid valve malfunction stuck open Test water solenoid valve Re place as necessary Cup holder is loose or missing Failed cup holder Replace cup holder Water leaking from bot tom of SmartServe Loose or damaged water lines Repair or replace water lines Leaking water solenoid valve Replace water solenoid valve Leaking water delivery manifold assembly MIC only Replace water delivery manifold as...

Page 21: ...Loose connection at control board Check connections at control board Failed touch pad Replace touch pad Wash chamber filling up with water during rinse and or flush cycles Obstructed drain line Clear drain line Check drain line to ensure it is pitched and vented correctly if applicable Too much soap suds in wash chamber Use less soap SmartServe isn t level Ensure SmartServe is mount ed on a level ...

Page 22: ...e safety shield pre venting machine from rinsing or flushing Disrupted blend rinse flush wash or sanitize cycles Ensure there were no dis ruptions during blend rinse flush wash or sanitize cy cles SmartServe needs to be rebooted Press STOP button repeat edly until error code mes sages clear or power down SmartServe and turn back on to reboot Loose connection or failed shield sensor Check connectio...

Page 23: ...ailed home sensor Check connection on home sensor Test home sensor if connection is good Repair or replace as necessary Loose connection or failed cup present sensor Check connection on cup present sensor Test cup present sensor if connection is good Repair or replace as necessary Failed control board Test control board Replace as necessary SmartServe needs to be rebooted Press STOP button repeat ...

Page 24: ...n or failed wash chamber sensor Check connection on wash chamber sensor Test wash chamber sensor if connection is good Repair or replace as necessary SmartServe needs to be rebooted Press STOP button repeat edly until error code mes sages clear or power down SmartServe and turn back on to reboot Shield Obstruction Error Obstruction in safety shield Ensure there are no obstruc tions inside safety s...

Page 25: ...sor is disabled Use operator interface panel to see if cup sensor is en abled If disabled set to enabled Loose connection or failed cup sensor Check connection on con trol board Test cup sensor if connection is good Repair or replace as necessary SmartServe needs to be rebooted Press STOP button repeat edly until error code mes sages clear or power down SmartServe and turn back on to reboot Hamilt...

Page 26: ...f the safety shield assembly is not installed and the door is not closed properly WARNING To avoid risk of serious injury or death disconnect power to the machine before cleaning servicing or removing parts CAUTION Do not use power tools to remove hardware Damage to the hardware or the machine may occur Do not lose hardware To remove the safety shield assembly 1 Ensure the control panel power swit...

Page 27: ...install the safety shield assembly 1 Slide the safety shield assembly 3 onto the machine 4 2 Install a thumb screw 2 on each side of the safety shield assembly 3 2 3 4 3 Plug in the power cord to the machine turn the control panel power switch 1 to the RESET position and verify machine operates 1 ...

Page 28: ...id risk of serious injury or death disconnect power to the machine before cleaning servicing or removing parts CAUTION Do not use power tools to remove hardware Damage to the hardware or the machine may occur Do not lose hardware To remove the top cover 1 Ensure the control panel power switch 1 is in the OFF position and unplug the machine 1 2 Remove two screws 2 from each side of the machine 3 3 ...

Page 29: ...nd Replacement To install the top cover 1 Place the top cover 4 onto the machine 3 as shown 2 Install two screws 2 on each side of the machine 3 2 4 3 3 Plug in the power cord to the machine turn the control panel power switch 1 to the RESET position and verify machine operates 1 ...

Page 30: ...ch pad and access door that are serviceable WARNING To avoid risk of serious injury or death disconnect power to the machine before cleaning servicing or removing parts CAUTION Do not use power tools to remove hardware Damage to the hardware or the machine may occur Do not lose hardware To remove the operator interface panel assembly 1 Ensure the control panel power switch 1 is in the OFF position...

Page 31: ... switch 9 4 5 9 8 6 7 10 To install the operator interface panel assembly 1 Ensure the panel gasket 10 is on the machine 2 Connect three wires 8 to the breaker switch 9 3 Connect two connectors 6 to the interface control panel 7 4 Position the panel 5 on the machine and ensure the gasket 10 is seated properly 5 Install four screws 4 on the panel 5 6 Close the access door 3 7 Plug in the power cord...

Page 32: ...aker switch 1 Remove the operator interface panel assembly 1 as outlined in this manual 2 Depress the tabs 2 on the switch 3 and remove the switch from the operator interface panel assembly 1 3 2 1 To install the breaker switch 1 Push the switch 3 into the operator interface panel assembly 1 until the tabs 2 lock the switch 3 in place 2 Install the operator interface panel assembly 1 as outlined i...

Page 33: ...upper boards from lower board CAUTION Use care when removing the upper boards from the lower board to avoid damage to the pins 4 Remove three screws 5 and lower board from panel 5 4 4 2 1 3 To install the interface display board 1 Separate the display board assembly 2 Install the lower board with three screws 5 to the operator interface panel assembly 1 CAUTION Use care when installing the upper b...

Page 34: ...ad 1 Clean the surface thoroughly to remove any adhesive residue 2 Clean the LCD screen to remove any smudges or fingerprints 3 Insert the ribbon cable 2 through the slot of the operator interface panel assembly 1 NOTE The adhesive on the touch pad will adhere to the plastic instantly It will be very difficult to reposition the touch pad if not aligned properly Be careful to avoid air pockets bubb...

Page 35: ...N 9900167800 The threads are right hand and it may be necessary to strike the tool with a hammer to loosen the blades 4 Remove three screws 1 from each side of the machine 5 Lift the front panel wrap 2 from the machine NOTE Avoid overextending the wire harness attached to the interface panel on the wrap NOTE Cover front panel wrap to avoid scratches damage from contact with side of machine 6 Using...

Page 36: ...mbly 7 from the motor assembly 11 7 11 8 11 10 9 To install the cup guard shield assembly 1 Install the cup guard and shield assembly 7 with two flange nuts 10 and shield block 9 on the motor assembly 11 NOTE Take care to align motor shaft with shaft seal so bearing grommet and shaft seal are not pushed out of place by motor shaft during installation 2 Install the cup shield 5 on the cup guard and...

Page 37: ...to avoid interference with the movement of the cup guard and shield assembly 4 3 2 2 1 5 Install the blade assembly It is not necessary to tighten the blades with a tool The operation of the machine will tighten the bladed assembly sufficiently 6 Install the top cover as outlined in this manual 7 Install the safety shield assembly as outlined in this manual 8 Plug in the power cord to the machine ...

Page 38: ...ay be necessary to strike the tool with a hammer to loosen the blades 2 Remove the shield assembly as outlined in this manual 3 Pull up on the motor cord 1 just under the top pulley 2 This will raise the lower pulley 3 Position a punch or screwdriver through the hole in the upper portion of the festoon sheet metal 4 and one of the holes in the lower pulley 3 This will hold the spring force and cre...

Page 39: ...bly 6 8 Pull six wires 7 from the motor assembly 6 10 10 6 7 11 To install the motor assembly 1 Feed six wires 7 into the motor assembly 6 2 Secure the wire harness in place with the harness cover 11 and four screws 10 3 Install the motor assembly 6 on the linear actuator assembly 9 with two screws 8 4 Connect six wires 7 7 8 9 6 MOTOR MOTOR CORD Ground ...

Page 40: ...pulley 2 This will raise the lower pulley 3 Remove the punch or screwdriver holding the lower pulley 3 and gently lower the motor cord 1 into place 3 2 4 1 6 5 7 Install the shield assembly as outlined in this manual 8 Install the blade assembly It is not necessary to tighten the blades with a tool The operation of the machine will tighten the bladed assembly sufficiently 9 Plug in the power cord ...

Page 41: ...hine 4 Lift the front panel wrap 2 from the machine NOTE Avoid overextending the wire harness attached to the interface panel on the wrap NOTE Cover front panel wrap to avoid scratches damage from contact with side of machine 5 Using a large wire tie 3 secure the wrap 2 to the machine using the hole in the top of the side panel 4 4 3 2 2 1 6 Remove six screws 5 and back cover 6 from machine NOTE R...

Page 42: ...13 Allow the motor assembly to hang by the motor cord 10 Position the motor mount 14 so that all eight screws 15 are accessible 11 Remove eight screws 15 and linear motor assembly 13 from machine NOTE Motor shown removed for clarity 15 15 14 15 15 13 11 13 12 To install the linear actuator assembly 1 Install the linear motor assembly 13 on the machine with eight screws 15 2 Place the motor assembl...

Page 43: ... 5 Install six screws 5 and back cover 6 on the machine 5 6 5 8 7 9 9 10 6 Remove the wire tie 3 holding the wrap 2 to the side panel 4 7 Position the wrap 2 on the machine and secure the wrap with six screws 1 NOTE Ensure the wire harness is positioned in a way to avoid interference with the movement of the cup guard and shield assembly 4 3 2 2 1 8 Install the top cover as outlined in this manual...

Page 44: ... To avoid risk of serious injury or death disconnect power to the machine before cleaning servicing or removing parts CAUTION Do not use power tools to remove hardware Damage to the hardware or the machine may occur Do not lose hardware To remove the power supply 1 Ensure the control panel power switch 1 is in the OFF position and unplug the machine 1 2 Remove six screws 2 and back cover 3 from ma...

Page 45: ...e power supply 7 6 Remove four screws 8 washers 9 and power supply 7 from the power control assembly 5 6 5 7 7 8 9 L Black N White V Black Red V Red 7 Remove four screws 10 and power supply 7 from the isolation panel 11 7 10 11 To install the power supply 1 Install four screws 10 and power supply 7 on the isolation panel 11 2 Install the power supply 7 on the power control assembly 5 with four was...

Page 46: ...n the four knobs 4 NOTE Ensure all connections on the power supply and control board are secure Replace any wire ties as required 5 Hand tighten the four knobs 4 6 Install the back cover 3 with six screws 2 2 3 2 4 4 7 Plug in the power cord to the machine turn the control panel power switch 1 to the RESET position and verify machine operates 1 ...

Page 47: ... disconnect power to the machine before cleaning servicing or removing parts CAUTION Do not use power tools to remove hardware Damage to the hardware or the machine may occur Do not lose hardware To remove the control board assembly 1 Ensure the control panel power switch 1 is in the OFF position and unplug the machine 1 2 Remove six screws 2 and back cover 3 from machine NOTE Remove any wire ties...

Page 48: ...nuts 5 6 5 7 7 8 9 7 Lift and rotate clockwise the power control assembly 10 until you are able to access the rear of the power control assembly 10 8 Mark and disconnect all wires 11 and connectors 12 from the control board 7 9 Remove four screws 13 and control board 7 from the power control assembly 10 13 10 11 11 12 12 12 7 To install the control board assembly 1 Install the control board 7 on t...

Page 49: ... on the standoffs 9 and install lockwashers 6 and nuts 5 6 5 7 7 8 9 6 Carefully position the power control assembly 10 on the four knobs 4 NOTE Ensure all connections on the power supply and control board are secure Replace any wire ties as required 7 Hand tighten the four knobs 4 8 Install the back cover 3 with six screws 2 2 3 2 4 4 9 Plug in the power cord to the machine turn the control panel...

Page 50: ...mbly home position 1 Remove the top cover as outlined in this manual 2 Remove six screws 1 and back cover 2 from machine NOTE Remove any wire ties as required Note the routing of the sensor wiring being replaced 3 Disconnect sensor connector 3 from control board 4 1 2 1 4 3 4 Use a screwdriver to depress the tabs on the side of the sensor assembly 5 and push the sensor assembly 5 through the hole ...

Page 51: ...s for the sensor to the control board in a way that will avoid any chance of pinching or fraying of the wires Replace any wire ties as required 2 Connect sensor connector 3 to the control board 4 3 Install the back cover 2 with six screws 1 1 2 1 4 3 4 Install the top cover as outlined in this manual 5 Plug in the power cord to the machine turn the control panel power switch to the RESET position ...

Page 52: ...utlined in this manual 3 Remove three screws 1 from each side of the machine 4 Lift the front panel wrap 2 from the machine NOTE Avoid overextending the wire harness attached to the interface panel on the wrap NOTE Cover front panel wrap to avoid scratches damage from contact with side of machine 5 Using a large wire tie 3 secure the wrap 2 to the machine using the hole in the top of the side pane...

Page 53: ...or assembly 9 The black plastic housing is part of the sensor assembly 10 9 To install the sensor assembly cup present 1 Push the sensor assembly 9 into the hole in the frame 10 NOTE Route the wire harness for the sensor to the control board in a way that will avoid any chance of pinching or fraying of the wires Replace any wire ties as required 2 Connect sensor connector 7 to the control board 8 ...

Page 54: ...he wrap 2 with six screws 1 NOTE Ensure the wire harness is positioned in a way to avoid interference with the movement of the cup guard and shield assembly 4 3 2 2 1 6 Install the top cover as outlined in this manual 7 Install the safety shield assembly as outlined in this manual 8 Plug in the power cord to the machine turn the control panel power switch to the RESET position and verify machine o...

Page 55: ...ver as outlined in this manual 3 Remove three screws 1 from each side of the machine 4 Lift the front panel wrap 2 from the machine NOTE Avoid overextending the wire harness attached to the interface panel on the wrap NOTE Cover front panel wrap to avoid scratches damage from contact with side of machine 5 Using a large wire tie 3 secure the wrap 2 to the machine using the hole in the top of the s...

Page 56: ...f the wash chamber cover 12 9 Remove six screws 13 from each side of the wash chamber cover 12 10 Remove two screws 14 from the back of the machine 14 13 13 12 8 9 10 11 11 Remove six screws 15 and back cover 16 from machine NOTE Remove any wire ties as required Note the routing of the sensor wiring being replaced 12 Disconnect sensor connector 17 from control board 18 15 16 15 18 17 ...

Page 57: ...in place sensor 1 Install the sensor 19 on the wash chamber cover 12 with two screws 20 2 Slide the wash chamber cover 12 onto the machine and make sure the tab ends wrap around the back of the machine NOTE Use food grade grease to ease the wash chamber cover back onto machine Cover back sides of wash chamber cover to avoid scratches damage to side of machine NOTE Route the wire harness for the se...

Page 58: ... 10 on the wash chamber cover 12 6 Install two screws 11 on the top of the wash chamber cover 12 7 Install six screws 13 on each side of the wash chamber cover 12 8 Install two screws 14 on the back of the machine 14 13 13 12 8 9 10 11 9 Raise the cup guard and shield assembly 5 and remove the support block 6 from under the shield block 7 6 5 7 ...

Page 59: ...he wrap with six screws 1 NOTE Ensure the wire harness is positioned in a way to avoid interference with the movement of the cup guard and shield assembly 4 3 2 2 1 12 Install the top cover as outlined in this manual 13 Install the safety shield assembly as outlined in this manual 14 Plug in the power cord to the machine turn the control panel power switch to the RESET position and verify machine ...

Page 60: ... Remove the safety shield assembly as outlined in this manual 2 Remove the top cover as outlined in this manual 3 Remove three screws 1 from each side of the machine 4 Lift the front panel wrap 2 from the machine NOTE Avoid overextending the wire harness attached to the interface panel on the wrap NOTE Cover front panel wrap to avoid scratches damage from contact with side of machine 5 Using a lar...

Page 61: ...move six screws 13 from each side of the wash chamber cover 12 10 Remove two screws 14 from the back of the machine 14 13 13 12 8 9 10 11 11 Remove six screws 15 and back cover 16 from machine NOTE Remove any wire ties as required Note the routing of the sensor wiring being replaced 12 Disconnect sensor connector 17 from control board 18 NOTE See wiring diagram for models with two shield door sens...

Page 62: ... the sensor 19 on the wash chamber cover 12 with two screws 20 2 Slide the wash chamber cover 12 onto the machine and make sure the tab ends wrap around the back of the machine NOTE Use food grade grease to ease the wash chamber cover back onto machine Cover back sides of wash chamber cover to avoid scratches damage to side of machine NOTE Route the wire harness for the sensor to the control board...

Page 63: ...ers 10 on the wash chamber cover 12 6 Install two screws 11 on the top of the wash chamber cover 12 7 Install six screws 13 on each side of the wash chamber cover 12 8 Install two screws 14 on the back of the machine 14 13 13 12 8 9 10 11 9 Install the cup shield 5 on the cup guard and shield assembly 7 until the tab 6 locks into place 6 5 7 ...

Page 64: ...he wrap with six screws 1 NOTE Ensure the wire harness is positioned in a way to avoid interference with the movement of the cup guard and shield assembly 4 3 2 2 1 12 Install the top cover as outlined in this manual 13 Install the safety shield assembly as outlined in this manual 14 Plug in the power cord to the machine turn the control panel power switch to the RESET position and verify machine ...

Page 65: ...this manual 3 Remove the top cover as outlined in this manual 4 Remove three screws 1 from each side of the machine 5 Lift the front panel wrap 2 from the machine NOTE Avoid overextending the wire harness attached to the interface panel on the wrap NOTE Cover front panel wrap to avoid scratches damage from contact with side of machine 6 Using a large wire tie 3 secure the wrap 2 to the machine usi...

Page 66: ...he wash chamber cover 12 10 Remove six screws 13 from each side of the wash chamber cover 12 11 Remove two screws 14 from the back of the machine 14 13 13 12 8 9 10 11 12 Remove six screws 15 and back cover 16 from machine NOTE Remove any wire ties as required Note the routing of the sensor wiring being replaced 13 Disconnect two sensor connectors 17 from control board 18 15 16 15 18 17 ...

Page 67: ...ash chamber assembly 20 from the machine and pull the sensor harness 23 and water line 21 through the frame cavity 21 22 23 21 20 To install the wash chamber assembly 1 Feed the sensor harness 23 and water line 21 through the frame cavity and position the wash chamber assembly 20 on the frame 2 Connect water line 21 to the solenoid 22 3 Install the wash chamber assembly 20 with four screws 19 4 Sl...

Page 68: ...lace any wire ties as required 5 Connect sensor connector 17 to the control board 18 6 Install the back cover 16 with six screws 15 15 16 15 18 17 7 Install two screws 8 washer 9 and plastic spacers 10 on the wash chamber cover 12 8 Install two screws 11 on the top of the wash chamber cover 12 9 Install six screws 13 on each side of the wash chamber cover 12 10 Install two screws 14 on the back of...

Page 69: ...2 on the machine and secure the wrap with six screws 1 NOTE Ensure the wire harness is positioned in a way to avoid interference with the movement of the cup guard and shield assembly 4 3 2 2 1 14 Install the top cover as outlined in this manual 15 Install the safety shield assembly as outlined in this manual 16 Reconnect the main water line to the machine 17 Plug in the power cord to the machine ...

Page 70: ...n solenoid support IN OUT and REAR stamped into metal to indicate flow direction and solenoid support orientation to install new solenoid and water lines in correctly WARNING To avoid risk of serious injury or death disconnect power to the machine before cleaning servicing or removing parts CAUTION Do not use power tools to remove hardware Damage to the hardware or the machine may occur Do not los...

Page 71: ...ed 2 3 2 8 10 5 9 7 6 4 7 Mark and disconnect two wires 11 from the solenoid 5 8 Remove two screws 12 and solenoid 5 from solenoid support 10 11 5 12 5 10 To install the water solenoid 1 Install solenoid 5 on the solenoid support 10 with two screws 12 2 Connect two wires 11 to the solenoid 5 NOTE Replace any wire ties as required 3 Position the solenoid support 10 on the frame and install two nuts...

Page 72: ...t The wash chamber gasket provides a seal to prevent water from leaking from the wash chamber To replace the wash chamber gasket 1 Remove the wash chamber assembly as outlined in this manual 2 Place the wash chamber on a suitable work surface 3 Remove nine screws 1 screw 2 screw 3 and gasket cover 4 from wash chamber assembly 5 4 Remove gasket 6 from gasket cover 4 and wash chamber assembly 5 NOTE...

Page 73: ... the wash chamber assembly 5 2 Place the gasket cover 4 on the gasket 6 and wash chamber assembly 5 3 Install screw 2 and screw 3 DO NOT TIGHTEN 4 Install nine screws 1 DO NOT TIGHTEN 5 Using an alternating pattern tighten screw 2 screw 3 and nine screws 1 to ensure the gasket 6 is sealed evenly between the gasket cover 4 and wash chamber assembly 5 6 Install the wash chamber assembly as outlined ...

Page 74: ...onnect the spiral water line 1 from the manifold 2 4 Disconnect the supply water line 3 from the manifold 2 5 Remove two screws 4 and manifold 2 from the frame 1 2 3 4 To install the water manifold 1 Install manifold 2 on the frame with two screws 4 2 Connect the spiral water line 1 to the manifold 2 3 Connect the supply water line 3 to the manifold 2 4 Reconnect the main water line to the machine...

Page 75: ...e shaft seal 2 through the cup gasket 3 4 Pull the cup gasket 3 from the shield assembly 1 1 2 2 3 3 To install the cup shield gasket 1 From the bottom place the cup gasket 3 into the shield assembly 1 Make sure the cup gasket is seated properly 2 From the bottom push the shaft seal 2 through the cup gasket 3 Make sure the shaft seal is seated properly 3 Install the shield assembly as outlined in ...

Page 76: ...Page 76 of 92 520008300 08 14 SmartServe Drink Mixers Service Manual Replacement Parts List SHIELD DOOR ASSEMBLY PANELS fig_1_HB 1 2 3 4 5 6 7 8 9 10 11 14 12 13 15 16 17 18 19 20 ...

Page 77: ...ight Side Painted 1 4 Bracket Hold Down 2 5 Screw AR 6 Standoff 2 7 Screw 4 8 Cover Top 1 9 Panel Left Side Painted 1 10 Screw AR 11 990153230 Front Shield Door Assembly Includes Item 12 1 12 990153240 Door Shield 1 13 990172300 Thumb Screw 2 14 Screw 4 15 Cover Wash Chamber 1 16 Reinforcement 1 17 Seal Wash Chamber 1 18 Screw 2 19 Washer 2 20 Grommet Plastic 2 Reference Fastener Kit Cladding Asse...

Page 78: ...Page 78 of 92 520008300 08 14 SmartServe Drink Mixers Service Manual Replacement Parts List OPERATOR INTERFACE PANEL ASSEMBLY fig_2_HB 1 2 3 8 9 10 4 7 5 6 11 ...

Page 79: ...tor Interface Assembly 1 2 990153290 Display Board Interface 1 3 990153280 Switch Breaker Control Panel 1 4 990153210 Touch Pad Generic 1 5 990153270 Door Interface Generic 1 6 990153220 Door Interface 1 7 Logo 1 8 Gasket Operator Interface Assembly 1 9 Housing Operator Interface 1 10 Front Panel Wrap Stainless Steel 1 11 Screw 4 Reference Fastener Kit User Interface GM43 990178500 ...

Page 80: ...Page 80 of 92 520008300 08 14 SmartServe Drink Mixers Service Manual Replacement Parts List CONTROL BOARD ASSEMBLY AND SENSORS fig_3_HB 1 2 3 4 17 5 6 7 8 9 10 11 12 13 14 15 16 ...

Page 81: ...ard Assembly 230V 1 5 Knob 4 6 Nut Jam 8 7 990149400 Carriage Sensor Assembly Home Position 1 8 Screw 4 9 990149900 Power Supply 1 10 Washer 4 11 Screw 4 12 990149400 Carriage Sensor Assembly Cup In Place 1 13 990153250 Sensor Assembly Infrared Cup In Place 1 14 Screw 2 15 990172900 Sensor Assembly Shield Some units have quantity of 2 1 16 Screw 2 17 Mount Control Board Power Supply 1 Reference Fa...

Page 82: ...20008300 08 14 SmartServe Drink Mixers Service Manual Replacement Parts List LINEAR ACTUATOR MOTOR CUP GUARD BIC2000 fig_4_HB 2 1 3 4 5 7 6 8 9 10 11 12 15 16 13 14 17 See MOTOR ASSEMBLY 120V 990148700 230V 990148800 ...

Page 83: ...otor 1 6 Screw 2 7 Nut Lock 2 8 Block 1 9 990149300 Linear Actuator Assembly 1 10 Screw 8 11 990149100 Blade Assembly Double Flat BIC2000 1 12 990148900 Blade Assembly V Flat BIC2000 1 13 990148200 Cup Guard Shield Assembly BIC2000 Includes Items 7 8 14 15 16 1 14 990171600 Bearing Grommet BIC2000 1 15 990152000 Shield Cup 1 16 990167000 Seal Shaft 1 17 990149700 Holder Cup 1 Reference Fastener Ki...

Page 84: ... 520008300 08 14 SmartServe Drink Mixers Service Manual Replacement Parts List LINEAR ACTUATOR MOTOR CUP GUARD MIC2000 fig_8_HB 2 1 3 4 5 7 6 8 9 10 11 14 15 See MOTOR ASSEMBLY 120V 990148700 230V 990148800 12 13 16 ...

Page 85: ... 1 5 990149600 Cord Motor 1 6 Screw 2 7 Nut Lock 2 8 Block 1 9 990149300 Linear Actuator Assembly 1 10 Screw 8 11 990149200 Blade Assembly Dual Ice Cream MIC2000 1 12 990148300 Cup Guard Shield Assembly MIC2000 Includes Items 7 8 13 14 15 1 13 990171500 Bearing Grommet MIC2000 1 14 990152000 Shield Cup 1 15 990167000 Seal Shaft 1 16 990149800 Holder Cup 1 Reference Fastener Kit Linear Actuator Ass...

Page 86: ...Page 86 of 92 520008300 08 14 SmartServe Drink Mixers Service Manual Replacement Parts List MOTOR ASSEMBLY fig_5_HB 1 2 8 3 4 9 6 7 5 10 11 12 ...

Page 87: ...ART NO NAME OF PART AMT 1 Motor Housing 1 2 990171000 Bushing Rod Lower 2 3 990171200 Pad Motor Mount Lower 1 4 990170900 Bushing Rod Upper 2 5 990171100 Pad Motor Mount Upper 1 6 990171300 Motor 120V 1 7 990171400 Motor 230V 1 8 Screw 4 9 Screw 4 10 Bracket 1 11 Shield 1 12 Screw 4 Reference Fastener Kit Motor Can Assembly GM42 GM43 990173100 ...

Page 88: ...Page 88 of 92 520008300 08 14 SmartServe Drink Mixers Service Manual Replacement Parts List WASH CHAMBER WATER LINES BIC2000 fig_7_HB 2 3 1 4 5 6 10 9 11 12 7 8 ...

Page 89: ...udes Items 2 3 Sensors 1 2 990152600 Adapter Drain 1 3 990152500 Gasket Wash Chamber Manifold 1 4 Screw 4 5 Tubing Cut To Length Valve to Wash Chamber 1 6 Tube Drain Long 1 7 Tubing Cut To Length Inlet to Valve 1 8 Connector Water Line 1 9 Plate Solenoid Mounting 1 10 Nut 2 11 Screw 2 12 990153260 Valve Water For Wash Chamber 1 Reference Fastener Kit Wash Chamber Assembly GM42 GM43 990173100 ...

Page 90: ...Page 90 of 92 520008300 08 14 SmartServe Drink Mixers Service Manual Replacement Parts List WASH CHAMBER WATER LINES MIC2000 fig_6_HB 23 24 25 7 8 22 21 20 19 9 10 11 12 13 14 15 16 17 18 6 5 1 2 3 4 ...

Page 91: ...e 1 9 Plate Solenoid Mounting 1 10 Nut 2 11 Screw 2 12 990153260 Valve Water For Wash Chamber 1 13 Tubing Cut To Length Tee to Valve 1 14 Connector Water Line 1 15 Tubing Cut To Length Inlet to Tee 1 16 Tee 1 17 Tubing Cut To Length Tee to Valve 1 18 990153260 Valve Water Water Delivery 1 19 Tee 1 20 Tubing Cut To Length Check Valve to Tee 1 21 Check Valve 1 22 Tubing Cut To Length Sanitize Port t...

Page 92: ...www commercial hamiltonbeach com 520008300 08 14 ...

Reviews: