background image

16

4.7.3 Integrating devices into the Hama Smart

Solution app

Connect the WiFi controller to an LED light strip. Make

sure that the polarity is correct: The arrow on the plug

indicates that the contact that must be connected to the

12 V contact of the LED light strip. Please also refer to

the operating instructions for the LED light strip used.

Then connect the controller to a properly installed and

easily accessible power socket via a power supply unit.

Please refer to the operating instructions for the power

supply unit used.

The LED light strip begins to flash quickly. If this does

not happen, quickly disconnect and reconnect the power

supply unit three times.

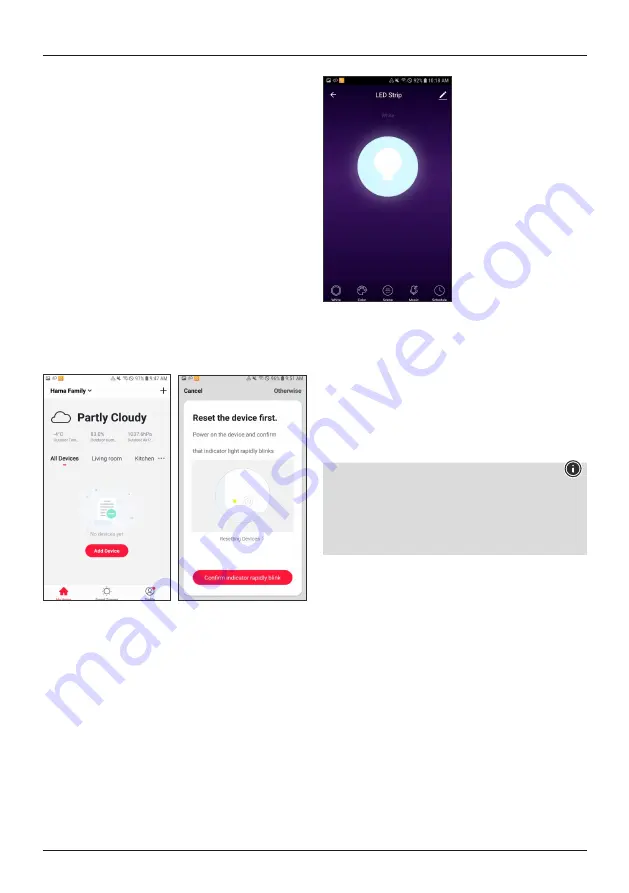
Open the Hama Smart Solution app and tap ‘My home’

at the lower-left edge of the screen.

Then tap ‘

+

’ at the upper-right edge of the screen.

Select the ‘

Lights

’ category.

Tap ‘

OK

’ to confirm that the LED light strip is flashing

quickly.

Then enter the name of your WiFi network and the

password. Tap ‘

OK

’ to confirm your entries.

The WiFi controller is now connected to the app. Once

the connection has been established, the LED light strip

stops flashing. You can now give the controller a name.

Click ‘Finish’ to complete the process.

You can now set up, control and configure the WiFi

controller using the app.

White

’ allows you to specify that white light should be

emitted.

Color

’ allows you to change the colour, brightness and

saturation of the light strip.

Scene

’ allows you to set up automated colour changes.

Music

’ allows you to make the LED controller react to

background music.

Schedule

’ allows you to schedule when the light strip

automatically switches on.

Note

If the colours blue and green are displayed in the

opposite sequence to in the app, disconnect the

controller from the power, and connect the supplied

adapter cable between the controller and the LED light

strip.

5. Timer, automation and 1-click control
5.1. Timer*

To access the Timer area, click the

Schedule

button.

Here you can program the device to switch on or off at

particular times.

Press

Add Timing

.

In the upper area, select the desired time; then select

whether you would like to execute the command

repeatedly and, lastly, whether the smart product should

switch on or off at this time.

Confirm your programming by pressing

Save

in the

upper-right area.

You can also add a comment and have an execution

message output on your mobile phone.

* Does not apply to the window/door contact 00176553,

the motion detector 00176554 or the camera 00176566

Summary of Contents for 00176547

Page 1: ...550 00176551 00176552 00176553 00176554 00176555 00176556 00176558 00176559 00176565 00176566 00176567 00176568 00176570 00176571 00176573 00176574 00176575 00176576 00176577 00176578 00176579 0017658...

Page 2: ...iFi Door Window Contact 9 4 4 1 Product features 9 4 4 2 Mounting 9 4 4 3 Integrating devices in the Hama Smart Solution app 10 4 5 WiFi Motion Detector 11 4 5 1 Product features 11 4 5 2 Mounting 12...

Page 3: ...ng site Do not modify the product in any way Doing so voids the warranty Children are not permitted to play with the device Children may not clean the product or perform user maintenance without super...

Page 4: ...terminal devices that do not support 5 GHz Please note that our smart products currently only support 2 4 GHz If you use a dual band router and this results in connection problems there are three poss...

Page 5: ...ts or fittings carries the risk of electric shocks This WiFi LED lamp is used for indoor home lighting effect lighting or for creating personalised lighting atmospheres Depending on the model you can...

Page 6: ...ive your lamp a name Click Finish Pic 4 to complete the process Now you can control the lamp Various options are available to you see Pic 5 White Mode Pic 6 Setting the brightness Colour Mode Pic 7 Co...

Page 7: ...duct if it is damaged which may be indicated by smoke odour or loud noises Immediately contact your dealer or our service department see item Service and Support This WiFi wall switch controls up to t...

Page 8: ...lti socket power strip make sure that the sum power draw of all the connected devices does not exceed its maximum throughput rating If you will not be using the product for a long period of time disco...

Page 9: ...sh message to smartphone on triggering and querying the status of windows and doors open closed The following voice command is available Status query Alexa OK Google is my window door open closed Batt...

Page 10: ...nd insert the batteries accordingly Failure to do so could result in the batteries leaking or exploding Only use batteries or rechargeable batteries that match the specified type Before you insert the...

Page 11: ...that your sensor was connected You can now give it a name Click Finish to complete the process You can now fit the sensor and then configure it 4 5 WiFi Motion Detector 4 5 1 Product features This Wi...

Page 12: ...d observing correct polarity Warning Batteries When inserting batteries note the correct polarity and markings and insert the batteries accordingly Failure to do so could result in the batteries leaki...

Page 13: ...s in the list Now confirm that the LED flashes quickly Next enter your WiFi password and confirm with OK Your sensor will now be connected Once the connection has been established the LED stops flashi...

Page 14: ...et must be installed close to the product and must be easily accessible When powering the device using a USB power supply make sure there are no batteries inside the device Warning Installation with a...

Page 15: ...of electric shock Do not use damaged or unsuitable power supply units or LED light strips When changing LED light strips always ensure that the LED light strip in question is current free Switch off t...

Page 16: ...controller a name Click Finish to complete the process You can now set up control and configure the WiFi controller using the app White allows you to specify that white light should be emitted Color a...

Page 17: ...is detected The tasks for 1 click control and automation are set up in exactly the same way Here you can select between three possibilities for 1 click control and four for automation Run the Device a...

Page 18: ...mart Solution app you might not be able to use them in the Alexa app It is only possible to group lamps with the Alexa app scenes are not possible 7 Integration in Google Home Install the Google Home...

Page 19: ...power and is switched on 2 Make sure that the device is in network state 3 Make sure that the device smartphone and router are close together 4 Make sure that the router and smartphone have a network...

Page 20: ...s possible that the device status cannot be immediately synchronised through opening of the app Open the app again The device status should now update in operation After the power supply of the lamp h...

Page 21: ...K warm white to cold white Multicolor P Lamp Current 42 mA 80 mA Frequency band frequency bands 2 4 GHz 2 4 GHz WiFi Touch Wall Switch 176551 Input voltage 230 V 50 Hz Output voltage 230 V 50 Hz Maxim...

Page 22: ...roller 176568 Power supply 12V max 5A Maximum connected load 60W Frequency band frequency bands 2 4 GHz Maximum emitted transmitting power 0 08 W Outdoor WiFi socket 176570 Input output voltage 220 24...

Page 23: ...m Output 5 5 W Light colour 16 million different colours 2700 K 6500 K warm white to cold white Multicolor P Lamp Current 48 mA Frequency band frequency bands 2 4 GHz WiFi Lights 176584 Light output 8...

Page 24: ...KG declares that the radio equipment type 00176547 00176548 00176549 00176550 00176551 00176552 00176553 00176554 00176555 00176556 00176558 00176559 00176565 00176566 00176567 00176568 00176570 00176...

Page 25: ...e Support www hama com 49 9091 502 0 DG 00176547 00176548 00176549 00176550 00176551 00176552 00176553 00176554 00176555 00176556 00176558 00176559 00176565 00176566 00176567 00176568 00176570 0017657...

Reviews: