4
5. Operation
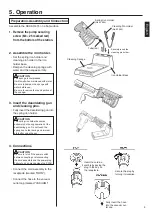
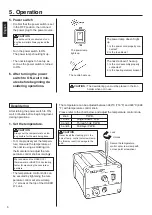
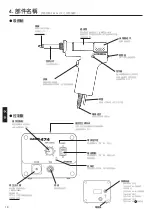
Spring Iron Holder
(No.B1094)
Cleaning Pin Holder
(No.B1095)
Tube(red)
Cleaning Sponge
Securely insert the
cleaning pin holder.
Iron Holder Base
Preparation-Assembly and Connection
Assemble the HAKKO 474 on a flat surface.
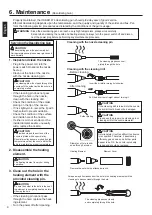
1. Remove the pump securing
screw (M4
×
25 marked red)
from the bottom of the station.
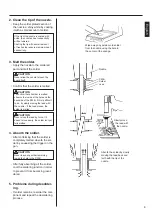
2. Assemble the iron holder.
• Set the spring iron holder and
cleaning pin holder in the iron
holder base.
• Dampen the cleaning sponge with
water and then squeeze it dry.
CAUTION
The sponge is compressed.
It will swell when moistened with water.
Be sure to dampen the sponge with
water before use.
Be sure to remove the round portion of
the sponge.
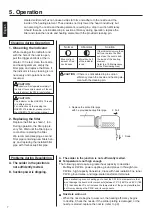
3. Insert the desoldering gun
and cleaning pins.
• Fully insert the desoldering gun into
the spring iron holder.
CAUTION
The spring iron holder becomes
extremely hot during operation of the
desoldering gun. Do not touch the
spring iron holder during and immedi-
ately after using the gun.
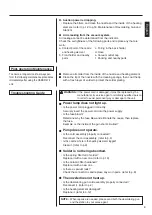
4. Connections
CAUTION
Be sure to turn off the power switch
before connecting or disconnecting
the cord assembly and the power plug.
Failure to do so may damage the P.W.B.
• Connect the cord assembly to the
receptacle (marked “IRON”).
• Connect the hose to the vacuum
outlet cap (marked “VACUUM”).
Insert the cord as-
sembly by keying the
plug to the key on
the receptacle.
Secure the plug by
turning it clockwise.
Fully insert the hose
into the vacuum out-
let cap.
English
Summary of Contents for 474
Page 19: ...3 18 1 2 M4 25 380 480 HAKKO...
Page 21: ...20 5 B1094 B1095 HAKKO 474 1 M4 25 2 3 4 IRON VACUUM...
Page 22: ...21 1 2 1 2 5 6 3 5 3 1 HAKKO 191 HAKKO 192 HAKKO 474 380 480 1 2 3 4 5 6...
Page 23: ...22 2 3 4 5...
Page 24: ...23 1 HAKKO 475 HAKKO 475 HAKKO 475 2 1 3 3 2 1 A B A 70 80 25 25 5 25...
Page 25: ...24 HAKKO 474 B 25_26 20 25 26 24 20 28 a b c d e f...
Page 26: ...6 25 HAKKO 474 1 2 3...
Page 27: ...26 6 A1033 A1033 4 A1033 5...
Page 28: ...27 1 A1009 2 1 2 3 A1009 S20 6 VACUUM...
Page 29: ...28 7 23 2 4 1 2 3 4 24V 50W 5 1 3 CAL 380 CAL...


