12
7. Replacement Parts
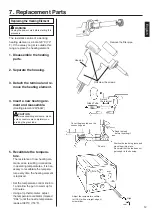
Replacing the Heating Element
WARNING
Unplug the power cord before starting this
procedure.
The resistance value of a working
heating element is 2-4
Ω
at 23°C (73°
F). If the value you get is outside this
range, replace the heating element.
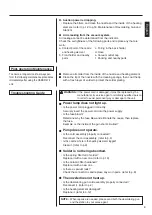
1. Disassemble the heating
parts.
2. Separate the housing.
3. Detach the terminal and re-
move the heating element.
4. Insert a new heating ele-
ment and reassemble.
(Heating element 24V-50W)
CAUTION
Before reassembling enclosure, make
sure connectors are completely cov-
ered by the glass tube.
5. Recalibrate the tempera-
ture.
The resistance of new heating ele-
ment varies, resulting in variations
in operating temperatures. It is nec-
essary to recalibrate the tempera-
ture every time the heating element
is replaced.
• Set the temperature control knob to
1 and allow the gun to warm up for
3 minutes.
• Using a tip thermometer, adjust
the temperature calibrator (marked
“CAL”) until the nozzle temperature
reads at 380°C (716°F).
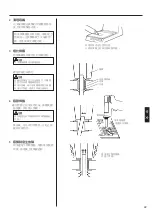
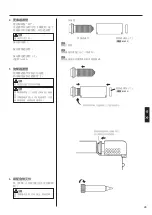
Housing
Remove the filter pipe.
Unscrew the screws.
Detach
the terminal.
Glass Tube
Cover the glass tube on the
connecting part.
Push in.
Position the leads in groove and
press them into place.
Be careful that the leads do not
get caught in the housing.
Bend the lead
before inserting it.
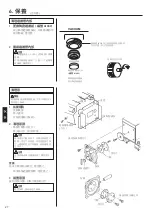
High
Low
Adjust the temperature calibra-
tor (CAL) with a straight-edge (–)
screwdriver.
English
Summary of Contents for 474
Page 19: ...3 18 1 2 M4 25 380 480 HAKKO...
Page 21: ...20 5 B1094 B1095 HAKKO 474 1 M4 25 2 3 4 IRON VACUUM...
Page 22: ...21 1 2 1 2 5 6 3 5 3 1 HAKKO 191 HAKKO 192 HAKKO 474 380 480 1 2 3 4 5 6...
Page 23: ...22 2 3 4 5...
Page 24: ...23 1 HAKKO 475 HAKKO 475 HAKKO 475 2 1 3 3 2 1 A B A 70 80 25 25 5 25...
Page 25: ...24 HAKKO 474 B 25_26 20 25 26 24 20 28 a b c d e f...
Page 26: ...6 25 HAKKO 474 1 2 3...
Page 27: ...26 6 A1033 A1033 4 A1033 5...
Page 28: ...27 1 A1009 2 1 2 3 A1009 S20 6 VACUUM...
Page 29: ...28 7 23 2 4 1 2 3 4 24V 50W 5 1 3 CAL 380 CAL...


