Note
: The diagram wiring of the fan motor maybe have some difference from the real parts due to
different types of fan motor ,the detailed information can refer to the fan motor nameplate.
47
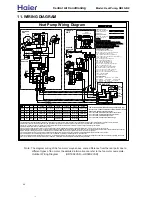
11. WIRING DIAGRAM
40
BK
OPTIONAL
TL
RD
TL
BK
RD
RD
RD
L1
BRK
INDOOR
UNIT
BK
RD
L2
BK
ELECTRIC HEATER KIT
FL
RD
FL
OFM
6
BR
BR
R
M
S
5
RCAP
C
H
C
RD
S
YL
STRLY
H
Heat Pump Wiring Diagram
LINE VOLTAGE
FACTORY STANDARD
FIELD INSTALLED
OPTIONAL
LOW VOLTAGE
FACTORY STANDARD
FIELD INSTALLED
OPTIONAL
SW
-1
HA
TS
CA
FA
N
ON
RH
S
-1
AUTO
HEAT
OFF
OFF
COOL
HEAT
RHS-2
LED
COOL
OD
A
SW
-2
5 6
WH
PU
BL
4
3
BR
6
6
WH
3
3
5
5
4
4
2
2
1
1
PU BL
BK RD
BR
9
1
BK
208/230V
BK
L1
60Hz 1PH
BCR
GND
IBM
WH
L2
2
BL
S
R
PU
BR
BCAP
230
TRAN
208
BK
BK
L1
BK-HI
3
RD
BR
M
STCAP
RD
CC
RD
PU
4
RD
RD
YL
LPS
PIPE SENSER
VS
PS
VS
CN7
VENT SENSER
PU
F
CN5
YL/GR
HR60D1VAR
HR48D1VAR
HR42D1VAR
HR18D1VAR
HR24D1VAR
HR30D1VAR
HR36D1VAR
RD
C1
C2
C3
P3
P2
P1
GR
OUTDOOR TEMPERATURE
XT
PS
CT
1
JK3
LED
CN8
A
ODS
V
CN4
V
CN3
F
JK4
CN6
PU
RD
RD-LO
GR
BL
W
Y
O
W2
C
G
HEAT CONTROL
RESISTANCE
WH
BR
BL
L2
OR
RD
R
8
7
T
G
C
R
INDOOR FAN CONTROL
HR18E1VAR
14SEER
loop CT twice
HR42E1VAR
loop CT once
W
YL
HPS
COMPRESSOR
REVERSING VALUE
A
JK2
GY
YL OR WH
V
C
F/H
S
CN1
C
RD
RD
CN2
RD
N
L
JK1
BL
T
O
Y
W
C
R
8
7
13SEER
13SEER
HR18D2VAR
loop CT twice
13SEER
loop CT twice
OFF
OFF
Dip 3
Dip 4
loop CT once
24VAC POWER
24VAC COMMON
HR42D2VAR
loop CT once
13SEER
C
2
RD
COM
LED Flash Codes(LED illuminates during unit operation only )
COMPONENT CODES
BCR - BLOWER CONTROL RELAY
BCAP - RUN CAPACITOR BLOWER MOTOR
CC - COMPRESSOR CONTACTOR
CCH - CRANKCASE HEATER (OPTIONAL)
CHS - CRANKCASE HEATER SWITCH (OPTIONAL)
CMPR - COMPRESSOR
DFC - DEFROST CONTROL BOARD
HPS - HIGH PRESSURE SWITCH
LPS - LOW PRESSURE SWITCH
IBM - INDOOR BLOWER MOTOR
ODS - OUTDOOR TEMPERATURE SENSOR
OFM - OUTDOOR FAN MOTOR
RCAP - RUN CAPACITOR COMPRESSOR
RVS - REVERSING VALVE SOLENOID
STCAP - START CAPACITOR (OPTIONAL)
STRLY - START RELAY (OPTIONAL)
STRTH - START THERMISTOR (OPTIONAL)
TRAN - TRANSFORMER
230/208 SELECTABLE
COLOR CODES
BK - BLACK BL - BLUE GY - GRAY
BR - BROWN GR- GREEN OR - ORANGE
PU - PURPLE RD - RED VI - VIOLET
WH - WHITE YL - YELLOW
THERMOSTAT
BK
PU
RD
USE COPPER CONDUCTORS ONLY
WARNING CABINET MUST BE PERMANENTLY GROUNDED
AND ALL WIRING TO CONFORM TO I.E.C.,N.E.C.,C.E.C.,
C.L.C. AND LOCAL CODES AS APPLICABLE.
REPLACEMENT WIRE MUST BE THE SAME GAGE AND
INSULATION TYPE AS ORIGINAL WIRE.
CMPR
UNIT
OUTDOOR
6
C
BK
CCH
L1
GND
L2
208/230V
RVS
60Hz 1PH
1
OFF
OFF
Dip 1
Dip 2
R
WH
BK
M
HR36E1VAR
HR30E1VAR
HR60E1VAR
HR36D2VAR
HR30D2VAR
OFF
ON
ON
ON
HR60D2VAR
OFF
OFF
OFF
OFF
1)Confirm defrost control board (DFC) dip switch settings and CT application for system selection as shown in adjacent table. Optional components may be field or factory installed.
2)If LPS and/or HPS not installed or removed, a jumper wire must be present across connector CN8 of the defrost control board (DFC) for system to operate.
3)For proper system operation, consult indoor unit and outdoor unit installation instructions to confirm system match up and blower speed selection.
4)Alternate double pole contactor used on some systems.
5)Only one start assist method to be used at a time, consult outdoor unit installation instructions for application information. Use only factory approved accessories.
6)Optional OFM components may connect capacitor common and motor common, for reciprocating compressor there may have crankcase heater consult outdoor unit installation instructions for
details. Select the running capacitor(one or dual)and connect. If IFM or OFM only have one capacitor wire, connect Com wire to capacitor.
7)To protect equipment from operation at low outside ambient temperatures,connect outdoor unit terminal T and equipped indoor thermostat terminal T as shown.
8)To activate electric heat circuit during defrost cycle, connect outdoor W terminal to available indoor heat circuit W or W2 .
power connections directly to electric heater kit power terminals. Consult heater kit installation instructions for complete details.
HR48E1VAR
OFF
OFF
OFF
ON
HR48D2VAR
HR24D2VAR
HR24E1VAR
continuous on - 24VAC supplied to Y terminal of defrost control.
Flash on/off - System in defrost operation.
Outdoor Wiring Diagram (HR18D2VAR—HR36D2VAR)
Central Air Conditi
oning
Model: Heat Pump,
HR13-D2
1/2 + 1/2 1 flash - Pipe/coil sensor open or short circuit.
1/2 + 1/2 4 flash - CT sensor out of max range.
1/2 + 1/2 2 flash - Vent/suction sensor short circuit.
14SEER
1/2 + 1/2 3 flash - LPS & HPS open circuit.
9)Indoor unit shipped without optional electric heater kit. To install optional heater kit, remove power pig tail up to 9 pin plug. Install heater kit and connect with mating 9 pin plug. Run system

