


Model T31634/T31635 (Mfd. Since 8/19)
-35-
SECTION 5: SHOP-MADE
ACCESSORIES
Zero-Clearance
Insert
The table insert on the Model T31634/T31635 has
an opening to allow for various bevel cuts without
contact with the blade. This clearance can be big
enough for smaller cutoffs to fall into it.
When making cuts with a 0
˚ bevel, using a zero-
clearance insert will leave little space for cutoffs
to fall into while also minimizing tearout and splin-
ters. This makes them perfect for simple miter
cuts.
Material Needed for Zero-Clearance Table
Insert
T31634 ....................Hardwood
3
⁄
8
" x 2
1
⁄
4
" x 17
1
⁄
16
"
T31635 ..................... Hardwood
3
⁄
8
" x 1
7
⁄
8
" x 15
1
⁄
4
"
To make a zero-clearance table insert:
1. Cut
3
⁄
8
" thick hardwood board to above
dimensions.
2. DISCONNECT MACHINE FROM POWER!
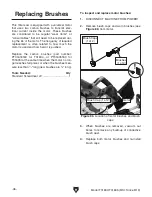
5. Place straightedge across insert and check
to make sure insert is flush with table at front
and back of throat.
— If insert is flush with table, no adjustments
are necessary. Proceed to
Step 7.
— If insert is not flush with table, proceed to
Step 6.
6. Use planer to remove any extra thickness,
one pass at a time. Re-install insert after
each pass to check flushness. Repeat
Steps
5–6 until insert is perfectly flush with surface
of table.
4. Secure board in place of original inserts with
the same (6) M4-.7 x 8 Phillips head screws
(see
Figure 64).
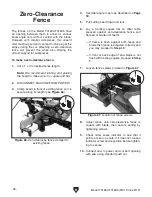
Figure 63. Table insert mounting screws.
7. Connect saw to power and cut kerf open-
ing with saw using standard push cut (see
Figure 65).
Figure 64. Zero-clearance insert mounted.
3. Remove existing inserts, place them over
board from
Step 1, and mark and drill holes
for mounting screws (see
Figure 63).
Figure 65. Finished zero-clearance insert.
Summary of Contents for T31634
Page 64: ......


