


-18-
Model T31634/T31635 (Mfd. Since 8/19)
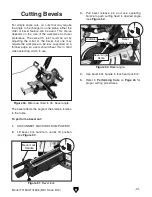
Bench Mounting
Figure 12. "Direct Mount" setup.
Machine Base
Workbench
Lag Screw
Flat Washer
Another option is a "direct mount" (see example
below) where the machine is secured directly to
the workbench with lag screws and washers.
The base of this machine has mounting holes
that allow it to be fastened to a workbench or
other mounting surface to prevent it from moving
during operation and causing accidental injury or
damage.
The strongest mounting option is a "Through
Mount" (see example below) where holes are
drilled all the way through the workbench—and
hex bolts, washers, and hex nuts are used to
secure the machine in place.
Machine Base
Workbench
Hex
Bolt
Flat Washer
Flat Washer
Lock Washer
Hex Nut
Figure 11. "Through Mount" setup.
Number of Mounting Holes ............................ 4
Dia. of Mounting Hardware Needed ..........
5
⁄
16
"
Assembly
Assembly of Model T31634/T31635 consists
of adjusting the miter and bevel angles to 0˚,
unlocking the cutting head, and attaching a dust
collection system.
1. Lift miter lock handle to unlock table position
(see
Figure 13).
Figure 13. Miter lock handle in unlocked
position.
Miter Release
Button
Miter Lock
Handle
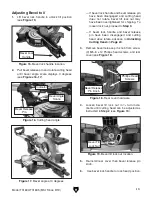
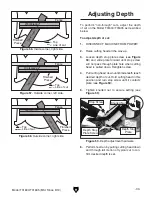
Adjusting Miter to 0˚
2. Press and hold miter release button (see
Figure 13) and use miter lock handle to push
cutting arm until miter angle indicator displays
0 degrees (see
Figure 14).
3. Use miter lock handle to lock table position.
Figure 14. Miter angle adjusted to 0˚.
Miter Angle
Scale
Indicator
Cutting Arm
Summary of Contents for T31634
Page 64: ......


