


-68-
Model G0899 (Mfd. Since 10/20)
6. Loosen (4) table mounting bolts securing
table top to base (see
Figure 119), and lightly
tap table in direction needed to square table
to blade.
8. Tilt blade to 45° and recheck miter slot-to-
blade parallelism.
— If blade is still parallel with miter slot, no
additional adjustments need to be made.
— If blade is parallel with miter slot at 0° but
not at 45°, one end of table will need to
be shimmed higher with metal shim stock.
Continue to
Step 9.
9. Loosen (4) table mounting bolts from Step 6.
Mounting
Bolts
Figure 119. Location of table mounting bolts
(table omitted for clarity).
7. Repeat Steps 2–6 until blade and miter slot
are parallel, then retighten table mounting
bolts.
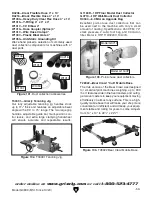
10. Refer to Figures 120–121 for shim place-
ment. If distance A is shorter than B, shim(s)
will need to be placed under corners #1 and
#2. If distance of B is shorter than A, shim(s)
will need to be placed under corners #3 and
#4. Very thin shim stock works well.
Figure 120. Shim procedure diagram A.
STEP A
Front
#1
#2
#3
#4
Figure 121. Shim procedure diagram B.
#1
#2
#3
Front
STEP B
#4
Summary of Contents for G0899
Page 92: ......