


-34-
Model G0899 (Mfd. Since 10/20)
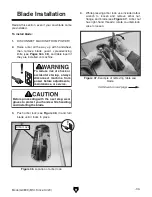
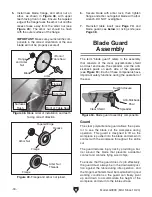
5. Install new blade, flange, and arbor nut on
arbor, as shown in
Figure 48, with upper
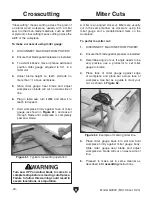
teeth facing front of saw. Ensure the tapered
edge of the flange faces the arbor nut and the
recess faces away from the arbor nut (see
Figure 49). The arbor nut should be flush
with the outer surface of the flange.
IMPORTANT: Make sure you install the com-
ponents in the correct orientation or the saw
blade will not be properly secured!
Figure 48. Blade order of installation and teeth
facing correct direction.
Arbor Nut
Arbor Nut
Threads
Flange
Recess
Tapered Edge
Flange
Flange
and Arbor
Nut
Arbor
Blade
Front of
Table Saw
(Front of
Table Saw)
Figure 49. Flange and arbor nut joined.
Arbor Nut
Arbor Nut
Threads
Flange
Recess
Tapered Edge
Flange
Flange
and Arbor
Nut
Arbor
Blade
Front of
Table Saw
(Front of
Table Saw)
Arbor Nut
Arbor Nut
Threads
Flange
Recess
Tapered Edge
Flange
Flange
and Arbor
Nut
Arbor
Blade
Front of
Table Saw
(Front of
Table Saw)
Flange
6. Secure blade with arbor lock, then tighten
flange and arbor nut against blade with arbor
wrench. DO NOT overtighten.
7. Re-install table insert (see Page 74) and
blade guard (see
below) or riving knife (see
Page 38).
Blade Guard
Assembly
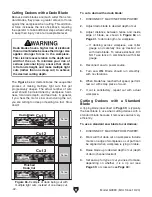
The term "blade guard" refers to the assembly
that consists of the clear polycarbonate shield
and dust enclosure, the spreader, and the anti-
kickback pawls on each side of the spreader
(see
Figure 50). Each of these components have
important safety functions during the operation of
the saw.
Figure 50. Blade guard assembly components.
Clear Shield
Spreader
Dust Enclosure
Anti-Kickback
Pawl
Guard
The clear polycarbonate guard allows the opera-
tor to see the blade cut the workpiece during
operation. This guard is designed to lift as the
workpiece is pushed into the blade and remain in
contact with the workpiece throughout the entire
cut.
The guard reduces injury risk by providing a bar-
rier around the blade that prevents accidental
contact and contains flying wood chips.
To ensure that the guard does its job effectively,
the guard must always be in the downward posi-
tion against the table during idle operation, and
the hinge mechanism must be maintained in good
working condition so the guard can freely pivot
up and down to accommodate the height of the
workpiece and return to the table surface.
Surfaces
Flush
Front of Table Saw
Arbor Nut
Summary of Contents for G0899
Page 92: ......