


-54-
Model G0699 (Mfd. Since 5/15)
Rip Cutting
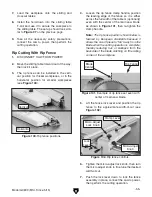
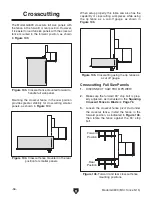
The Model G0699 has the capability of rip cutting
full-size panels, as shown in
Figure 97. The slid-
ing table saves time and increases accuracy by
removing the burden of sliding a large and heavy
panel over a stationary table surface.
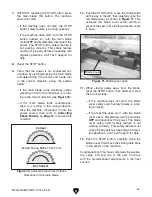
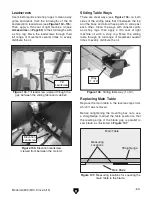
Figure 97. Example of full panel rip cutting.
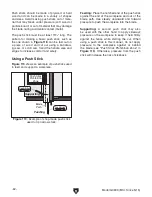
This saw also has the capability of rip cutting
smaller workpieces, using the machine as a tradi-
tional table saw, as shown in
Figure 98. Smaller,
lighter boards are easier to slide across the sta-
tionary cast iron table surface to the right of the
saw blade with the use of the rip fence.
Rip
Fence
Figure 98. Example of using the rip fence with
smaller workpieces.
Rip Cutting With Sliding Table
1. DISCONNECT SAW FROM POWER!
2. Make sure the 90° stop bolt is properly adjust-
ed, as instructed in the
Squaring Crosscut
Fence to Blade on Page 76.
3. Loosen the crosscut fence pivot stud under
the crosscut fence, insert it into its hole in the
crosscut table, then rotate the fence against
the 90° stop bolt.
Note: The fence can be mounted in the for-
ward or rear position, depending on the size
of the workpiece and which position will pro-
vide the safest operation.
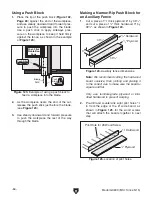
4. Use a precision ruler against a tooth of the
blade, then adjust the fence so that the 2"
mark on the fence scale is exactly 2" from the
blade tooth, as shown in
Figure 99.
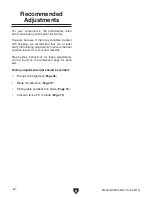
Figure 99. Setting the correct space between
the crosscut fence and blade for rip cutting.
2" Mark
End
Block
5. Carefully lift the crosscut fence up, fully tight-
en the pivot stud, then re-insert the stud into
the hole. Re-check the spacing between the
end block and blade—if necessary, loosen
the stud and repeat
Steps 3–5 until the spac-
ing is correct.
6. Set a flip stop to the desired width-of-cut.
Use hold-down and end shoe to hold down
workpiece ends to prevent it from raising
up, which could cause kickback.
Summary of Contents for G0699
Page 21: ...Model G0699 Mfd Since 5 15 19 5mm Hardware Recognition Chart...
Page 108: ......