


Model G0699 (Mfd. Since 5/15)
-33-
52. To install the bottom T-slot components of
the crosscut fence, lay the fence across the
left side of the crosscut table with the polyure-
thane end block facing the main blade, then
do the following:
a) Insert and align an M8-1.25 T-nut with
the hole in the slot that is farthest from
the saw blade, then thread (1) M8-1.25 x
25 knob with the nylon end through the
T-nut and into the fence hole, as shown
in
Figure 46. This will secure the fence
extension in place when fully tightened.
b) Align an M8-1.25 T-nut with the 90°
stop bolt shown in
Figure 46, insert (1)
M8-1.25 x 35 cap screw with a 8mm
lock washer through the stop block, then
thread the cap screw into the T-nut.
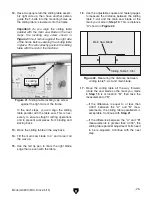
c) Align the M8-1.25 x 60 T-bolt with the
placement position shown in
Figure 47.
d) Align (1) M8-1.25 T-nut with the pivot stud
placement position, then hand-tighten
the M8-1.25 x 10 pivot stud with the 8mm
fiber flat washer into the T-nut, as shown
in
Figure 47.
53. Turn the crosscut fence over, insert the pivot
stud in its placement hole (see
Figure 47),
then slide the fence up to the main saw blade
so that polyurethane end block is against the
blade.
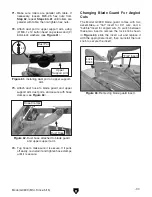
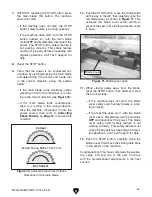
54. Using the precision ruler against a tooth of
the blade, adjust the fence so that the 2"
mark on the fence scale is exactly 2" from a
blade tooth, as shown in
Figure 48.
55. Carefully lift the crosscut fence up, fully
tighten the pivot stud, then re-insert the stud
into the hole. Re-check the distance between
the scale and blade—if necessary, loosen
the stud and repeat
Steps 54–55 until the
distance is correct.
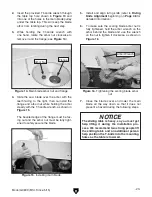
Figure 46. Front end crosscut T-slot
components.
M8-1.25 x 25 Knob
Stop Block
90° Stop Bolt
Figure 47. Back end crosscut T-slot
components.
T-Bolt
Figure 48. Setting the correct space between
the crosscut fence and blade.
2" Mark
End
Block
Pivot Stud
T-Nut
Block
8mm
Fender
Washer
8mm
Fender
Washer
M8-1.25 Knob
M8-1.25 Knob
Summary of Contents for G0699
Page 21: ...Model G0699 Mfd Since 5 15 19 5mm Hardware Recognition Chart...
Page 108: ......