background image

 EVO205D SAFE / SURE-Trak    5. OPERATION 

  5-3 

©GreenMech

Ltd


5-3 

03/22 


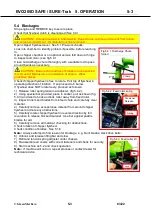
5.4  Blockages


Stop engine and REMOVE key to secure place. 
Check that flywheel clutch is disengaged (See 5.9). 


CAUTION!  Chipped material is inflammable.  Expect large volume and prevent from falling 

into engine compartment.  All material must be removed. 

Open chipper flywheel cover. See 5.1 Pre-work checks. 
Look into chamber to identify problem if possible, before reaching 
in. 
Open chipper chamber or on optional version fold down at hinge 
to inspect and clear. (see fig 5.4.1 
Clean out discharge chute thoroughly with a suitable rod to pass 
around bends as necessary. 


CAUTION!


Beware sharp edges of blades and unexpected 

movement of flywheel due to resistance of engine.  Wear 
protective gloves.   

Check if chipper flywheel is free to rotate.  Pull top of flywheel in 
operating direction


of rotation.  If so proceed to 6 below. 

If flywheel does NOT rotate freely, proceed as follows: 
1)  Release roller spring tension at adjuster. (fig 5.4.2). 
2)  Using special bar provided, place in socket, pull as shown (fig 
5.4.3) and twist to hook and lock roller away from fixed roller. 
3)  Inspect rollers and blades from infeed chute and carefully clear 
material. 
4)  Carefully remove excess loose material from around chipper 
flywheel and note any obstructions. 
5)  Carefully rotate chipper flywheel in reverse direction by full 
revolution to release blocked material.  Use bar against paddle 
blades for aid. 
6)  Carefully remove all material, checking for obstructions. 
Check rotation of chipper flywheel. 
Check condition of blades.  See 5.1.6 

Note: 

 Always attempt to find reason for blockage.  e.g. blunt blades, slack drive belts. 

6)  Unhook and release lifting bar and stow. 
7)  Refit and tension spring adjuster under chassis  
8)  Re-assemble all covers with correct fasteners and check for security. 
9)  Start machine as 5.2 and check operation. 

Note:

  If machine will not run, repeat process or contact dealer for 

technical advice. 


Fig 5.4.3  Feed roller lift 


Bar 

Lock 

Fig 5.4.2  Feed roller spring 


Tensioner 
Release 

Spring


Fig 5.4.1  Discharge Chute 
folded 


Clamp 

Summary of Contents for EVO205D SAFE-Trak

Page 1: ...www greenmech co uk OPERATOR S MANUAL 2 0 5 D SURE Trak 2 0 5 D SAFE Trak...

Page 2: ...3 8 Symbols on machines 4 Machine Preparation 4 1 Fuelling and parking 4 2 Infeed chute 4 3 Discharge chute 4 4 Discharge chute optional 4 5 Work Position 4 6 Smart Sense controller 5 Operation 5 1 Pr...

Page 3: ...ots 6 15 Spare Number Not Used 6 16 Bearings Pivots 6 17 Track Removal 6 18 Hydraulic Connections 6 19 Mountings 6 20 Hydraulic Return Filter 6 21 Hydraulic Oil Change 6 22 Fuses and No Stress System...

Page 4: ...appendices for supplements EVO205D SAFE SURE Trak tracked chipper diesel engine stage 5 Smart Sense controller Options in Manual Folding discharge chute Emergency Recovery Kit Emergency traction driv...

Page 5: ...tronic Feed Roller Controller Fuel Capacity 50Lt diesel Tonnes per Hour 7 tonne hr Discharge Rotation 280 deg Hydraulic Capacity 50Lt Length 3860mm 3020mm infeed flap and platform up Width working 235...

Page 6: ...y from proximity of machine TECHNICAL SPECIFICATIONS EVO205D SURE Trak model EVO205D SURE Trak Infeed Throat Aperture 205mm x 270mm Max Timber Dia 205mm Throughput 22cu mt hr Power Unit Kubota Diesel...

Page 7: ...machine may tilt because the single lifting point may not be directly over the centre of gravity Factory fitted Options Consult GreenMech Folding Discharge Chute Section 4 4 Tool Box Fig 2 2 on this...

Page 8: ...loves Work under a raised component without adequate safety support Operate machine with untrained personnel or with individuals present who are not involved in chipping work operation Leave machine u...

Page 9: ...utton 3 4 2 Engine Stop fig 3 4 2 To stop engine turn key anticlockwise to 0 position To restart turn key clockwise to Start To disable machine remove key CAUTION Do not restart engine until hazard ha...

Page 10: ...r tracking motion Fig 3 7 1 Lever controls operate drives to tracks Push for forward motion Pull for reverse motion Use Idle Run on control panel or press and hold toggle switch to right hand side of...

Page 11: ...azard Brakes off incorrect Read instruction manual Wear helmet visor Wear ear protectors Wear proper clothes Brakes on correct Machine not level incorrect Beware flying object hazard Beware flying obj...

Page 12: ...of infeed chute NOT in centre Lift Point Ear defenders must be worn Face shield must be worn Caution Infeed chute trapping hazards Keep hands clear Do not climb in Caution Beware Crushing hazard Do N...

Page 13: ...weekly High temperature Grease 40 hours Chipper Flywheel cleaning Caution Read Manual Remove key Caution Sharp edges 1 Wear protective gloves 2 Release cover bolts 3 Open chipper covers 4 Lock Block f...

Page 14: ...hip Track Pitch control Motion levers Emergency drive Winch Idle Run Left leg extend retract Right Leg extend retract Discharge chute control Green UP Blue DOWN Feed Roller controls Left hand shown Ye...

Page 15: ...chute for safe working height fig 3 4 3 CAUTION Infeed chute must not be used at less than 600mm from ground fig 3 4 3 Adjust drawbar of Road tow models as necessary CAUTION Before travelling always f...

Page 16: ...follow 4 3 to set direction and flap height CAUTION Travel with discharge chute down is not recommended unless restraint is provided 4 5 Work Position Typical Typical work position fig 4 5 shown with...

Page 17: ...ack by roller reversal Diesel Particulate Filter DPF regeneration is normally automatic To force DPF press menu 2 to select DPF screen and press button 1 Button 5 can be used to inhibit regeneration i...

Page 18: ...h a mating boss 2 and release pin into boss to prevent flywheel from turning 5 Remove any loose wood material 6 Retract locking pin and carefully rotate chipper flywheel to check tightness of blade bo...

Page 19: ...re button 5 on controller until engine reaches preset operating speed 4 Press green FEED IN button when ready to start loading chipper 5 3 Stopping Machine 1 Push stop bar to STOP position or press do...

Page 20: ...Release roller spring tension at adjuster fig 5 4 2 2 Using special bar provided place in socket pull as shown fig 5 4 3 and twist to hook and lock roller away from fixed roller 3 Inspect rollers and...

Page 21: ...TION Do not leave machine parked directly up or down slope CAUTION When extending legs do not force track against solid objects This may dislodge track CAUTION Avoid static turns on hard surfaces This...

Page 22: ...n chipping is in progress Elevation of discharge is altered by means of adjustable flap fig 4 4 CAUTION Keep working area around the machine clear at all times and check only authorised personnel are...

Page 23: ...y away from hazards e g railway track by means of dedicated electric motor driven pump supplied directly from battery Depending on battery state and ground conditions up to about 15 minutes operation...

Page 24: ...to track manual First 50 hours Check drive belt tensions and clutch rod adjustment 6 6 6 9 6 3 6 5 Check battery levels 6 13 6 6 Check hydraulic connections 6 18 6 7 Check all mountings 6 19 6 7 Check...

Page 25: ...1 nipple on remote manifold 6 1 4 Chipper flywheel rear bearing 1 nipple on remote manifold 6 1 5 Feed roller bearing 1 nipple on remote manifold 6 1 6 Feed roller pivot 1 nipple on remote manifold 6...

Page 26: ...fill to correct level 1000 hours Change oil see 6 21 Replace filter 6 20 6 5 Fuel Level Section 4 1 Check daily before work and fill as required CAUTION Use clean fuel only If in doubt use a funnel wi...

Page 27: ...ing pin engages hole 2 positions in flywheel to prevent movement 5 Thoroughly clean debris from nut faces and bolt head socket 6 Using socket tool loosen nut anticlockwise Support blade bolt with hexa...

Page 28: ...ment and tension before starting chipper 6 10 Steam Cleaning Weekly and every 250 hours or 12 months 1 Check all covers are fitted and closed 2 Steam clean machine surfaces 3 Clean electrical componen...

Page 29: ...ired 6 15 Number not used 6 16 Bearings and Pivots weekly See paragraph 6 1 for routine lubrication 250 hours or 12 months Check rotating components for excessive movement and noise in operation Repla...

Page 30: ...ic Return Filter 250 hours or 12 months Fig 6 20 1 Check oil is cool 2 Unscrew canister and discard safely fig 6 20 3 Fit new filter canister CAUTION Do not overtighten 6 21 Hydraulic Oil Change 1000...

Page 31: ...eck 6 7 Engine not at correct speed Engine control Refer to dealer or GreenMech 4 3 Chipper flywheel will not start Drive belts Replace 6 6 Chipper clutch disengaged Engage clutch 5 5 Feed rollers do...

Page 32: ...grinding breaks into 90mm diameter area blade must be scrapped After re grinding weight of blades within a set must not vary by more than 1gm 0 03oz Weight of each blade must not be less than 560gm 2...

Page 33: ...from wheels Fold down discharge chute if necessary 7 2 Removal from Storage Service engine Refer to engine manual Charge battery and refit Refer to 6 13 Service tracks Refer to track manual Carry out...

Page 34: ...Operation see Figs 2 1 2 2 and 2 3 Follow instructions on lighting tower decal To Raise 1 Check air release knob at bottom of hand pump is tight clockwise to seal Fig 2 3 2 Using hand pump raise press...

Page 35: ...e machine competent 5 2 10 STABBING AND PUNCTURE by projectiles from cutter Wood stones nails rebound back out of infeed chute OPERATOR Injuries to face eyes head and hands 3 QUITE POSSIBLE 4 12 Train...

Page 36: ...ground 3 2 6 STABBING PUNCTURE When operating handle to raise engine residue from exhaust chute OPERATOR THIRD PARTY EYE INJURIES CUTS TO FACE 2 POSSIBLE 3 6 Cordon off collection point Operator to we...

Page 37: ...ste OPERATOR THIRD PARTY EYE INJURIES CUTS TO FACE 1 POSSIBLE 3 3 Trained operator Lock off exhaust chute Cordon off collection point 1 1 2 STABBING AND PUNCTURE Handling branches OPERATOR CUTS TO HAN...

Page 38: ...brake is applied and wheels are chocked Support front of engine section with jack or similar 3 1 3 ENTANGLEMENT Unguarded end of cutter spindle OPERATOR LOSS OF FINGERS 3 POSSIBLE 3 9 Cover end of sp...

Page 39: ...on wheel cover when rotated from locked position OPERATOR THIRD PARTY Cuts and bruises to legs 2 POSSIBLE 3 6 As above Position bollards or similar adjacent to sharp corners 2 1 2 Key Consequence Scor...

Page 40: ...Machines incorrectly assembled or adjusted 10 Damage caused by improper use of the machine 11 Items parts that are not normally covered by the warranty including but not limited to Blade and Blade Ass...

Page 41: ...exceeds 85 dB A see HSE pocket card INDG363 Protect your hearing or lose it Gloves with long close fitting cuffs that can be tucked into sleeves Safety Boots with good grip and ankle support complying...

Page 42: ...harge chute is positioned to prevent chips being blown onto the highway during roadside operations or in any direction where they can affect colleagues or members of the public 17 Position the chipper...

Page 43: ...35 Keep fuel from contacting the skin If fuel gets into the eyes wash out with sterile water immediately and seek medical advise Maintenance 36 Ensure the machine is carried out in accordance with th...

Page 44: ...The Health and Safety Safety Signs and Signals Regulations 1996 Guidance on Regulations L64 Second edition HSE Books 2009 ISBN 978 0 7176 6359 0 www hse gov uk pubns books 164 htm Power fed mobile wo...

Page 45: ...e Warranty Installation Certificate should be retained by the purchaser and the second copy to be retained by the dealer and attached to the PDI record and safely filed for future reference and inspec...

Page 46: ...duct should not be used further if other consequential damage could occur or if a safety concern exists b Make the product available for inspection by a Dealer Technician c Make all maintenance record...

Page 47: ...or contaminated as a consequence of a warrantable failure and repair Only the specified Kubota lubricants should be used and will be accepted Injection equipment warranty claim will only be accepted...

Page 48: ...www greenmech co uk 01789 400 044 support greenmech co uk www greenmech co uk GreenMech Ltd The Mill Industrial Park Kings Coughton Alcester Warwickshire B49 5QG...

Reviews: