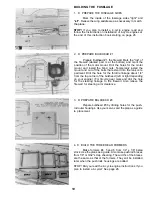
13. D GLUE IN BULKHEAD #1
Realign the fuselage over the plans and glue the
fuse sides to bulkhead #1. Make sure the top of the
bulkhead is flat on the building board and that the front of
the bulkhead is facing forward.
14. D ADD THE 1/4" BRACING BEHIND THE FIREWALL
Add three pieces of 1/4" triangle stock along the
back side of the firewall. Extend the throttle linkage holes
(and nosegear steering if used) through the tri stock.
* The 20 size model has 1/4" x 1/4" stock behind bulkhead
#1 and in front of bulkhead #2. Glue these pieces in now.
15. D GLUE FORMERS TO THE DECK BASE
Notch the deck base at the corners to clear the
doubler as shown on the plans. The deck base should butt
up to bulkhead #3. Mark the location of formers #4, 5 and 6
and pin the deck base to the plans. Check the fit of the
formers and glue them to the deck base making sure they
are 90 degrees to the base.
*The 20 size deck base is razor cut and has precut
notches.
16. D PREPARE FORMER BRACES FOR PUSHROD
HOUSINGS
Temporarily put the fuselage/bulkhead assembly
over the deck base. Use a pushrod housing and mark the
locations of the housing holes in the former braces. Make
sure the housing follows as straight a path as possible
from bulkhead #3 to the exit. Drill the holes in the braces.
Temporarily install the housings to check your work.
Remove the housings. Tube in a tube style pushrods are
shown here but other types may be used.
13
Summary of Contents for Super Sportster 20
Page 33: ...33...
Page 34: ...34...
Page 35: ...35...
Page 36: ...36...
Page 37: ...37...
Page 41: ...Use trim MonoKote and these letters to create your trim scheme on your Sportster 41...
Page 43: ...PUSHROD LINKAGES 43...

