


4.
Navigate to the network directory where you saved the installer and configuration
file and double-click
SetupAuroraPlayout.exe
.
a)
b) Click
Next
until you reach the Select Components screen.
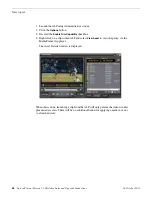
c) At the Select Components screen, check the
Assignment List Plugin
checkbox
and click
Next
.
d) Select
Configure Assignment List Plugin using setup.ini
and click
Next
.
e) Click
Next
.
f) Click
Finish
to complete the installation.
The installer uses the setup.ini file to configure the Assignment List Plug-in.
Installing ALP using a Batch File
You can also create a batch file to automatically install the Assignment List Plug-in
using the setup.ini file.
1. Create a text file named
setupALP.bat
.
2. In the file, put this text:
.\AuroraPlayout\FILEPATH1\DotNetInstall.EXE
.\AuroraPlayout\FILEPATH2\AuroraIngestPlayoutPrereq.EXE
msiexec.exe /package "AuroraPlayout.msi" /QB
ALP_INSTALL=1
3. Save the file into the same directory as the Aurora Playout installer and your
setup.ini file.
4. From each computer on which you are installing the plug-in; double-click
setupALP.bat
.
The batch file runs and installs the plug-in.
Setting up ENPS
To set up ENPS for use with Aurora Playout, you need to modify your ENPS
configuration.
1. On the ENPS servers, find the nom.ini file and add the following section:
[MOS]
Inport=10540
Outport=10541
LogIn=1
LogOut=1
Version=2.6
NumberROConstruction=0
NOTE: Key-in
Version=2.8.2
if you are using MOS version 2.8.2.
32
Aurora Playout Version 7.1.0 Release Notes and Upgrade Instructions
18 October 2010
Additional notes