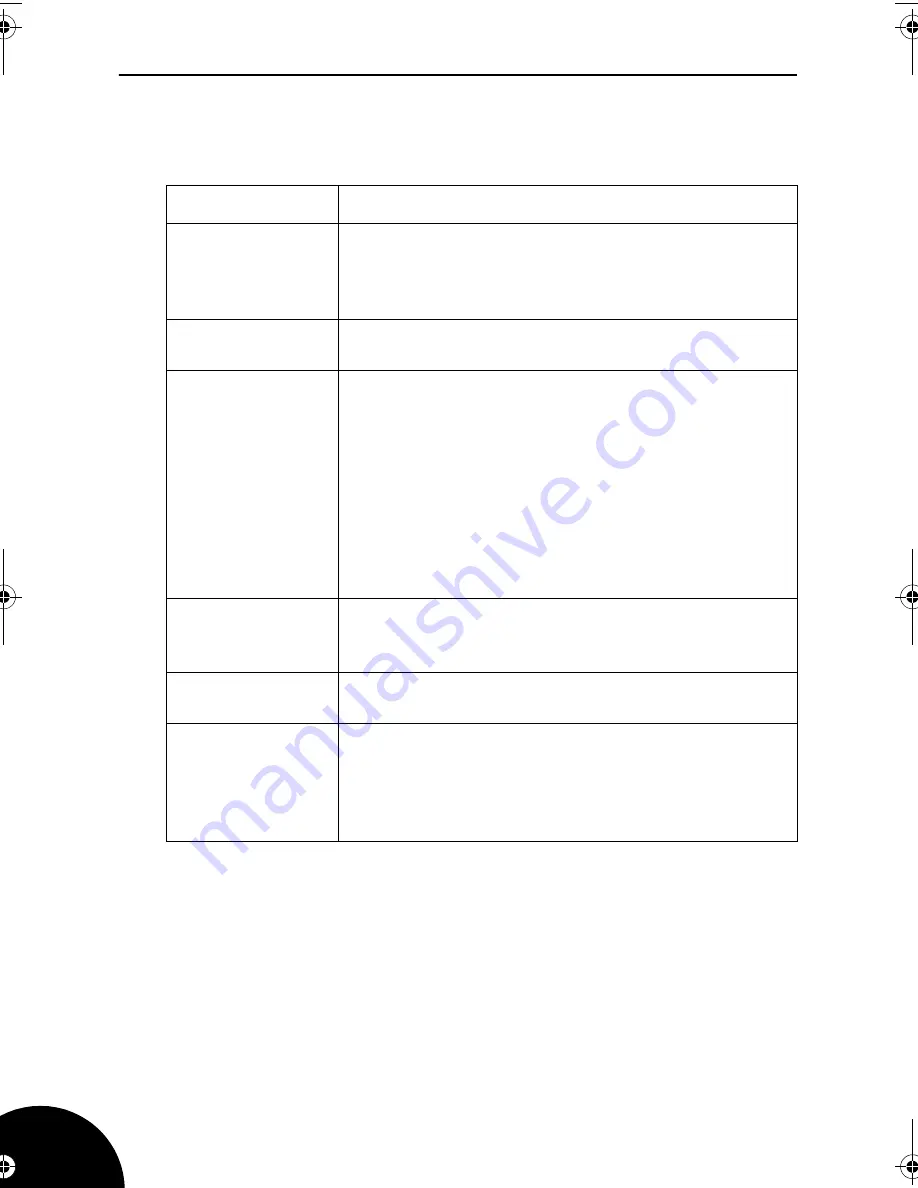
Goodmans GTVL19WDVD User Manual Download Page 56

GTVL19WDVD

56

Troubleshooting 

General

Problem

Possible Cause

The TV does not 
work.

Make sure that the power supply is connected and that 
the mains supply is switched on.
If the green LED on the power supply adapter is not on 
check the fuse in the mains plug.

No TV picture.

Is the aerial plugged in?
Is the TV in the correct input signal mode?

Poor picture 
reception.

Is the aerial plugged in?
Is the aerial lead damaged?
Are all connections made properly?
Check that the channel is tuned properly.
Try adjusting the picture settings; brightness, colour, 
sharpness.
Make sure the TV is not located close to electrical 
appliances that may emit radio frequency interference.
If using an indoor aerial try adjusting its position or 
change to an outdoor aerial.

No colour.

Adjust the colour setting.
Check that the programme is broadcast in colour.
Check the channel is tuned properly.

No sound.

Is the sound muted? Press the Mute button.
Is the volume turned down?

No response to 
the remote 
control.

Is the TV in the correct mode?
Is there an obstruction between the remote control and 
the sensor on the TV?
Try changing the batteries.
Avoid direct sunlight on the remote control sensor.

ALCD19DVD1.book  Page 56  Wednesday, August 2, 2006  7:34 AM

Summary of Contents for GTVL19WDVD

Page 1: ...User Guide GTVL19WDVD 19 LCD Television with DVD Player...

Page 2: ...CONTROLS ADJUSTMENTS OR PROCEDURES NOT LISTED IN THIS USER GUIDE MAY RESULT IN HAZARDOUS RADIATION EXPOSURE NOTE This product incorporates copyright protection technology that is protected by method c...

Page 3: ...nd Switching On 12 Selecting the Input Signal 13 Tuning the TV Channels 14 Channel Naming 15 Re organizing Channels 16 Skipping Channels 17 Manual Tuning 17 Fine Tuning 18 Colour System 19 Basic Opera...

Page 4: ...Password Setup Page 50 Exit Setup 50 Using the Card Readers and USB Connection 51 Using Your TV as a PC Monitor 52 PC Monitor Setup menus 52 Connecting External Equipment 55 Input Signals 55 Output Si...

Page 5: ...s on the LCD TV as this may cause the LCD TV to overheat Never allow children to insert foreign objects into holes or slots on the LCD TV Cleaning Disconnect the LCD TV from the mains supply before cl...

Page 6: ...low the appropriate wiring instructions given below In both cases ensure that the outer sheath of the cable is firmly held by the cable clamp 2 CORE 3 CORE BLUE Neutral BROWN Live GREEN and Earth This...

Page 7: ...the Controls Front and Right Side Controls Channel Up Channel Down Volume Up Volume Down Signal Source Menu Play Stop Eject Power On Off Headphones SD MS MMC Memory Card USB Socket DVD CD Slot Power...

Page 8: ...Input Pr Y Scart Aerial RF IN VGA Input PC Audio Input Right Left Audio Left S Video Input Audio right Video 12V DC Input Component Video Inputs Component Audio Inputs Composite Video Outputs Composit...

Page 9: ......

Page 10: ......

Page 11: ...ive the best video quality as it uses separate signals for the video RGB components The RCA video connection carries the video components on a single composite signal S video is a compromise between c...

Page 12: ...supply into the LCD TV as shown on page 11 Plug the mains cable into the AC to DC power supply and plug into the mains supply The green indicator on the power supply and the red indicator on the front...

Page 13: ...rce name is displayed briefly in the top left corner of the screen Alternatively you can use the four buttons on the top of the remote control to switch to TV DVD SCART or PC directly S Video TV SCART...

Page 14: ...s the MENU button The menu shown opposite will be displayed 4 Press the S button to highlight Setup and press ENTER The menu opposite will be displayed with Tuner Channel highlighted 5 Press ENTER to...

Page 15: ...you name the channels first then re organize them as described in the following sections Channel Naming Using a published TV programme listing and the CH CH buttons identify the channels found To nam...

Page 16: ...enter the channel number you wish to move 3 Press the T button to highlight Swap to Ch 4 Press ENTER and use the numeric buttons to enter the channel number you wish move the channel to 5 Press the T...

Page 17: ...enu as previously described and press the T button to highlight Skip 3 Press ENTER A tick will appear to the left of Skip 4 Press EXIT to exit the system When the CH CH buttons are used the skipped ch...

Page 18: ...enter the channel position number you wish to use 7 Press ENTER and the T button to highlight Store then ENTER again 8 Press EXIT to exit the menu system Fine Tuning The auto and manual searches will...

Page 19: ...are a number of TV colour signal systems used by different countries The system used in the UK is PAL and this is the default setting for your TV If you change the country setting the default system w...

Page 20: ...channel that you wish to designate as your favourite and press the SET FAV button When you wish to return to this channel you can do so by pressing the FAV button Swapping Channels You can switch back...

Page 21: ...the environment i e if the TV is in either a darkened room or a light room To change the mode repeatedly press the PICTURE button to cycle through the available settings as listed below The User sett...

Page 22: ...audio setting channel number and name Sleep Function You can set your TV to switch off automatically after a set period 1 Press the SLEEP button The Sleep Time window will appear in the top left of th...

Page 23: ...se three digits and all three must be entered As you enter the number it will appear in the top left corner of the screen The system searches for the page During this process the page number counter a...

Page 24: ...yed in the top left hand corner of the screen To view the teletext page press the button again Fast Text At the bottom of the teletext screen is a row of subject headings coloured red green yellow and...

Page 25: ...broadcast with subtitles for the hearing impaired The subtitles are on teletext page 888 To view the subtitles enter the teletext mode and search for page 888 When the page is found the television wi...

Page 26: ...of programme being viewed i e Normal Vivid Sports or Nature 1 Press the MENU button to open the menu system 2 Press ENTER twice to display the Scheme options as shown opposite 3 Use the T and S button...

Page 27: ...g between 0 and 100 3 Similarly use the T button and then the W and X buttons to adjust the Contrast Hue if applicable Saturation and Sharpness They all range from 0 to 100 apart from the Sharpness wh...

Page 28: ...shown opposite 3 Use the arrow buttons to adjust the position of the image The ranges are between 10 and 10 in both the horizontal and vertical axes with zero being the mid position 4 Press MENU to re...

Page 29: ...em Auto Volume The volume level between programmes and commercials and between different channels can vary Auto volume limits this volume difference It can be set to On or Off 1 In the Audio menu use...

Page 30: ...guage and press ENTER The Language menu will be displayed as shown opposite 2 English will be ticked as the default language If you wish to select a different language use the T and S buttons to highl...

Page 31: ...o either automatically switch to the SCART input when a signal is detected or to require the SCART input to be manually selected 1 In the Setup menu press the T button to highlight SCART Mode and pres...

Page 32: ...ny selections Audio CD If an audio CD has been inserted after the screen loading message the screen will display CD and start to play the first audio track on the disc The track number total number of...

Page 33: ...When you load a DVD it will start to play automatically Most will stop at the DVD menu on the disc This enables you to select from various play options such as different titles Trailer Language Option...

Page 34: ...during fast mode operation to return to normal playing speed is briefly displayed on the TV screen Skip to the Next Previous Chapter To skip to the next chapter during play press the skip forward butt...

Page 35: ...the Title menu is displayed Make your selections and press either ENTER or the play X button as required Subtitles Some DVD discs contain subtitles in several languages To access the subtitles press...

Page 36: ...r title or all titles and chapters on the disc Each press of the REPEAT button steps through the list of options and displays them on the TV screen for a short time Chapter Title and All The next pres...

Page 37: ...ss the ENTER button to highlight the chapter number 6 Enter the desired chapter number using the numeric buttons on the remote control The DVD will skip to the beginning of the chapter selected 7 Pres...

Page 38: ...time The DVD will jump to the specified time 16 Press the arrow down button to highlight Repeat and press ENTER The repeat options will be displayed i e Chapter Title or All the entire contents of th...

Page 39: ...tton to resume play is briefly displayed Play will commence from the exact position where the CD was stopped unless either the disc has been removed from the player or the stop button is pressed a sec...

Page 40: ...red in mm ss format using the numeric buttons on the remote control As soon as you enter the last seconds digit playback will jump to that point on the CD The time that you can enter is limited to the...

Page 41: ...CD Press the REPEAT button Track will be displayed on the screen The current track will play indefinitely until cancelled Press the REPEAT button again All will be displayed on the screen All tracks...

Page 42: ...ed first Folders are shown with an icon similar to that used on personal computers The jpeg files are listed below In the example above Folder 1 has been selected and a thumbnail of the first file is...

Page 43: ...uence that they are listed on the disc Press the GOTO button Select _ _ _ will be displayed Enter the number of the image and press ENTER All three numbers must be entered so for example if you wish t...

Page 44: ...he bottom of the screen Use the skip forwards for the next page and skip backwards for the previous page To start the slide show from a specific jpeg file use the arrow buttons to highlight the thumbn...

Page 45: ...below General Setup Page Audio Setup Page Video Setup Page Preference Page Password Setup Page Exit Setup TV Display Angle Mark OSD Language Captions Screen Saver Last Memory Dolby Digital Setup HDCD...

Page 46: ...of items press the W button 9 To return to the Setup page symbols press the W button again 10 To exit the menu system either highlight the Exit Setup symbol and press ENTER or press the SETUP button...

Page 47: ...standardised method of encoding text into an NTSC television signal They differ from subtitles in that they are carried differently in the signal and are commonly used for on screen text designed for...

Page 48: ...ithout disturbing others Use the cursor up and down buttons to set the level The default is OFF HDCD High Definition Compatible Digital This is a process for delivering high quality audio on CDs Check...

Page 49: ...subtitle language tracks Disc Menu Language Some DVD discs contain the disc menus in different languages This menu enables you to select the preferred language The default is English Parental Control...

Page 50: ...parental control Use the arrow buttons to highlight the change option and press the ENTER button The password change menu will be displayed with the first field selected Enter the existing old passwor...

Page 51: ...lt option 5 Use the T and S buttons to select the memory card type or USB connection and press ENTER 6 Press EXIT to exit the menu system 7 Either insert the memory card or connect the USB device Once...

Page 52: ...puter powers up The TV will automatically adjust the screen resolution Depending on the screen driver options available in your PC you may be able to adjust the screen resolution as follows Right clic...

Page 53: ...This sets the phasing of the display We recommend that you do not change this setting unless there is interference in the form of horizontal or vertical bands on the picture 1 In the Advanced menu pre...

Page 54: ...ke a couple of seconds to stabilise 2 Press MENU to return to the Advanced menu or EXIT to exit the menu system Screen RGB You may find a slight difference between the screen colours and colours that...

Page 55: ...and the device being connected are both switched off Once the connection is made switch both devices on When a signal is received from the external device the TV will switch to that input signal If t...

Page 56: ...d properly Try adjusting the picture settings brightness colour sharpness Make sure the TV is not located close to electrical appliances that may emit radio frequency interference If using an indoor a...

Page 57: ......

Page 58: ...s and dust should be carefully wiped from the disc s surface with a soft cloth Never use chemicals such as record sprays antistatic sprays benzene or thinners to clean the discs These chemicals can ir...

Page 59: ...Product When your TV has reached the end of its life contact your local council regarding available recycling or disposal options Do not dispose of electrical products in the general waste Please ensu...

Page 60: ...rol Batteries 2 x AAA supplied Screen TFT LCD Resolution 1440 x 900 TFT LCD Screen Size 19 480mm TV Receiver TV System PAL I Band VHF Band I III and UHF Band U Number of channels 99 RF Aerial input 75...

Page 61: ...ollowing provisions The guarantee is only valid within the boundaries of the country of purchase The product must be correctly assembled and operated in accordance with the instructions contained in t...

Page 62: ......

Reviews: