


RP6 ROBOT SYSTEM - 4. Programming the RP6
4.1.3. Opening and compiling sample projects
Let's try if everything works fine and open all the sample
projects:
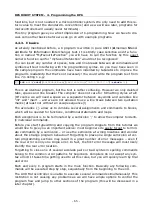
Select “Open Project(s)” in the “File” menu.
In the standard file select dialog, you have to search for the
subdirectory “RP6Base_Examples” in the directory of the
example programs.
Open the file “RP6BaseExamples.ppg”, which is a PN2 project
group. It will load all example programs and the RP6Library as
well into the Projects list. This way, you can comfortably browse
through the example programs and look up functions in the
RP6Libary easily.
Now open the first example program at the top of the projects treeview
(“Example_01_LEDs” and select the file “RP6Base_LEDs.c”)! Simply double click on
“RP6Base_LEDs.c” and a source file editor will be opened!
You should see the output window at the bottom of PN2. If not, you may activate the
window by selecting View->Output in the menu or (it the window is too small) by
dragging the edges with the mouse (the mouse cursor will change its shape into a
double arrow at the upper edge of the narrow grey area labelled “Output” belonging to
the lower program window...).
Just take a quick look at the source code in the editor if you like. Of course you are
not expected to understand all the text right now, but we will soon learn how to
handle these codes. Just for a start: the green colored textlines are comments, which
are not part of the program itself and only document what the program does. We will
explain this (another copy of the program
without
any comments exists to show you
how short the source really is. Comments will enlarge it quite a lot, but are very useful
for documenting the program flow. The uncommented version may be used to copy
parts of the code into your own programs!).
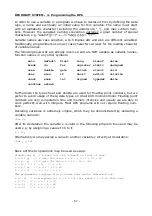
Now we can check the compiling functionality.
The Tools-menu should display both previously added
menu entries (see figure) or alternatively the standard
[WinAVR]-entries of PN2. You may select any of these,
usually both will work without any problem.
Now please click on “MAKE ALL”!
PN2 will now call the previously described batch file
“make_all.bat”, which will run “make”. We will explain
what “make” does later.
The example program gets translated (=“compiled”) and a hexfile is generated, which
contains the special code for the microcontroller and may be loaded and executed!
- 58 -