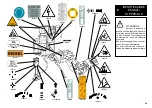


38
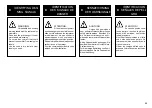
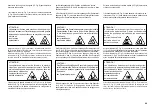
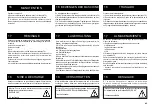
ATTENZIONE!
Non gonfiare il pneumatico con la ruota ancora
montata sull'autocentrante.
Il gonfiaggio di pneumatici può essere pericoloso, perciò
deve essere effettuato togliendo la
ruota dall ‘autocentrante e introducendola
nelle apposite gabbie di sicurezza.
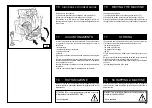
DANGER!!
Do not inflate the tyre with the wheel mounted on the
spindle.
Tyre inflation is dangerous and should only
be done by removing the wheel from the
spindle and placing it inside a safety
cage.
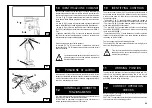
14
14
ORDINARY MAINTENANCE
MANUTENZIONE ORDINARIA
ATTENZIONE!
Ogni operazione di manutenzione deve essere
effettuata dopo aver scollegato la spina dalla
rete elettrica o fermato il gruppo elettrogeno
WARNING!
Each maintenance operation must be
effected only after the disconnetion of the
plug from electric network.
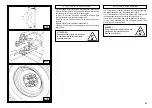
Per il perfetto funzionamento e una maggiore durata del Vs. smonta-
gomme seguire attentamente le seguenti istruzioni:
1) Lubrificare periodicamente, dopo una accurata pulizia con nafta,
le seguenti parti:
- i vari snodi dell'autocentrante
- la guida del braccio porta utensile
- il piatto guida carrello
2) Ingrassare periodicamente il cilindro di sollevamento del braccio
porta-autocentrante e lo snodo del braccio stesso. Utilizzare un
comune grasso lubrificante.
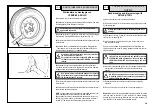
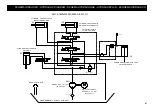
3) Controllare periodicamente il livello olio della centralina oleodinami-
ca, mediante l'apposita asta posta sotto il tappo della centralina stessa.
Se necessario, rabboccare con olio ISO-L-HV VG46 Persian Oil Idrol
T od equivalenti (es. : Esso Invarol EP / Agip Arnica / Mobil DTE 15 /
Fina Hydran HV / Shell Tellus T / Total Equivis ZS / Castrol Hyspin AWH
HV / BP Bactram HV / Chevron Ep Hydraulic Oil HV).
4) Controllare periodicamente il livello olio del riduttore che, con il
braccio porta-autocentrante abbassato a fine corsa, non deve mai
scoprire completamente la spia situata sul carter riduttore.
Se necessario rabboccare con olio ESSO SPARTAN EP 320 o equi-
valente (es.: AGIP F1 REP 237, BP GRX P 320, CHEVRON GEAR
COMPOUND 320, MOBIL GEAR 632, SHELL OMALA OIL 320, CA-
STROL ALPHA SP 320).
N.B.: Se si rende necessario sostituire l’olio del riduttore, o della centra-
lina oleodinamica, si ricorda che, sia il carter riduttore che il serbatoio
centralina, sono dotati di appositi tappi di scarico.
To ensure that this tyre changer works perfectly over the years, carry
out the routine maintenance schedule described below:
1) Lubricate the following parts from time to time, after a thorough
cleaning with naphtha:
- the various swivels on the spindle
- the tool bracket slide runner
- the carriage guide plate.
2) Grease the spindle bracket lift cylinder from time to time and also
its swivel. Using ordinary lubricating grease.
3) From time to time check the oil level in the hydraulic power pack.
Use the dipstick under the reservoir cap.
If necessary top up with ISO-L-HV VG46 Persian Oil Idrol T or similar
hydraulic oil (eg, Esso Invarol EP / Agip Arnica / Mobil DTE 15 / Fina
Hydran HV / Shell Tellus T / Total Equivis ZS / Castrol Hyspin AWH HV
/ BP Bactram HV / Chevron Ep Hydraulic Oil HV).
4) From time to time check the oil level in the gear unit which, when
the tool carrier bracket is completely lowered at end travel, should
not show the sight glass on the gear casing as completely empty. If
necessary top up with Esso Spartan EP 320 or similar oil (eg, Agip
F1 REP 237, BP GRX P 320, Chevron Gear Compound 320, Mobil
Gear 632, Shell Omala Oil 320, Castrol Alpha SP 320).
NB: If the oil in the gear unit or the hydraulic power pack has to be
changed, note that the gear unit casing and the power pack reservoir
have specific drain plugs.
Al raggiungimento dei 5 anni dalla data di installazione
e messa in servizio, il prodotto dovrà essere revisionato
in tutte le sue parti.
At the achievement of 5 years from the date of installa-
tion and commissioning, the product must be reviewed
in its entirety
Après 5 ans à compter de la date d'installation et de mise
en service, le produit doit être revu dans son intégralité
Beim Erreichen von 5 Jahren ab dem Zeitpunkt der Instal-
lation und Inbetriebnahme, muss das Produkt in seiner
Gesamtheit überprüft werden
El logro de 5 años desde la fecha de instalación y puesta
en servicio, el producto debe ser revisado en su totalidad
Per la manutenzione ordinaria del gruppo elet-
trogeno e del compressore occorre consultare i
rispettivi manuali di uso e manutenzione.
Consult the corresponding use and maintenance
manuals for details on the routine maintenance
of the generator and the compressor.
Summary of Contents for S 561
Page 17: ...15 B 1 Min 1100 mm Min 1600 mm...


