background image

3 - 42

Z-34/22 IC

Part No. 128267

July 2007

Section 3 • Scheduled Maintenance Procedures

REV A

D-5
Check the Turntable Rotation
Bearing Bolts


Note: Genie requires that this procedure be
performed every 1000 hours or annually,
whichever comes first.

Maintaining proper torque on the turntable bearing
bolts is essential to safe machine operation.
Improper bolt torque could result in an unsafe
operating condition and component damage.

1 Raise the secondary boom and place a safety

chock on the secondary boom lift cylinder.
Carefully lower the boom onto the lift cylinder
safety chock. Turn the machine off.

Crushing hazard. Keep hands
away from the cylinder and all
moving parts when lowering the
secondary boom.

Note: The lift cylinder safety chock is available
through Genie Service Parts (Genie part number
36555).

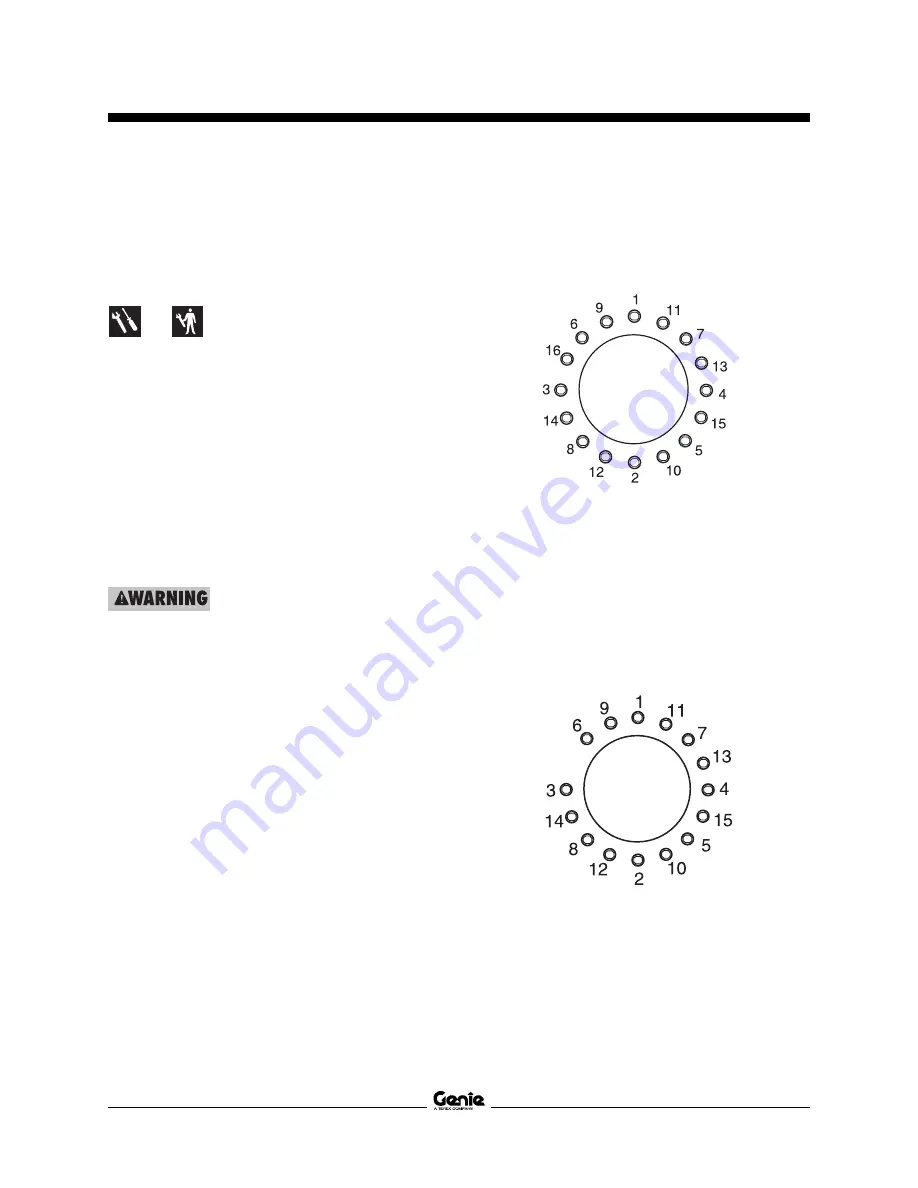
2 Check to ensure that each turntable bearing

bolt is torqued in specified order to
180 ft-lbs / 244 Nm.

Bolt torque sequence

3 Remove the safety chock. Lower the boom to

the stowed position.

4 Access the turntable bearing bolts through the

access hole on the side of the chassis.

5 Check to ensure that each bearing mounting

bolt under the drive chassis is torqued in
specified order to 180 ft-lbs / 244 Nm.

Bolt torque sequence

CHECKLIST

D

PROCEDURES

Summary of Contents for Z-34/22IC

Page 1: ...Service Manual from serial number 3242 to 4799 Refer to inside cover for additional serial number information Part No 128267 Rev A July 2007...

Page 2: ...ghest degree of accuracy possible However continuous improvement of our products is a Genie policy Therefore product specifications are subject to change without notice Readers are encouraged to notif...

Page 3: ...34 22 Serial number Z342207 12345 Electrical schematic number ESXXXX Machine unladen weight Rated work load including occupants XX kg Maximum allowable inclination of the chassis 0 deg Gradeability N...

Page 4: ...Z 34 22 IC Part No 128267 July 2007 This page intentionally left blank iv...

Page 5: ...anual are also safety hazards when maintenance and repair procedures are performed Do Not Perform Maintenance Unless You are trained and qualified to perform maintenance on this machine You read under...

Page 6: ...r and other protective clothing if the situation warrants it Be aware of potential crushing hazards such as moving parts free swinging or unsecured components when lifting or placing loads Always wear...

Page 7: ...s A Machine Specifications 2 1 PerformanceSpecifications 2 2 Hydraulic Oil Specifications 2 3 HydraulicComponentSpecifications 2 4 ManifoldComponentSpecifications 2 5 Machine Torque Specifications 2 5...

Page 8: ...m Engine Maintenance Kubota Models 3 12 A 10 Grease the Turntable Rotation Bearing and Worm Drive Gear 3 12 A 11 Perform Engine Maintenance Kubota Models 3 13 A 12 Drain the Fuel Filter Water Separato...

Page 9: ...Models 3 33 A ChecklistCProcedures C 1 Grease the Platform Overload Mechanism if equipped 3 34 C 2 Test the Platform Overload System if equipped 3 34 C 3 Clean the Fuel Tank Diesel Models 3 37 C 4 Per...

Page 10: ...omponents 3 1 Jib Boom 4 11 3 2 Jib Boom Bell Crank 4 12 3 3 Jib Boom Lift Cylinder 4 12 A Primary Boom Components 4 1 Plastic Cable Track 4 14 4 2 Primary Boom 4 14 4 3 Primary Boom Lift Cylinder 4 1...

Page 11: ...4 34 8 2 RPM Adjustment 4 34 8 3 Flex Plate 4 34 8 4 Coolant Temperature and Oil Pressure Switches 4 35 A HydraulicPumps 9 1 Auxiliary Pump 4 36 9 2 Function Pump 4 37 9 3 Drive Pump 4 38 A Manifolds...

Page 12: ...s 13 1 Hub and Bearings 2WD Models 4 56 Section 5 Rev Schematics Introduction 5 1 A Electrical Symbols Legend 5 2 A HydraulicSymbolsLegend 5 3 A Electrical Schematic Diesel Models from serial number 3...

Page 13: ...ng Diagram Gasoline LPG Models from serial number 3578 to 4799 5 22 A Platform Control Box Wiring Diagram Diesel Models from serial number 3242 to 3577 5 23 A Platform Control Box Wiring Diagram Diese...

Page 14: ...Z 34 22 IC Part No 128267 July 2007 This page intentionally left blank xvi...

Page 15: ...8 5 8 18 8 5 8 18 Rear 9 5 8 18 9 5 8 18 Tire pressure 45 psi 100 psi 3 1 bar 6 89 bar Lug nut torque 125 ft lbs 125 ft lbs lubricated 170 Nm 170 Nm For operational specifications refer to the Operato...

Page 16: ...or extended 0 6 mph 0 6 mph 1km h 1km h 40 ft 40 sec 40 ft 40 sec 12 2 m 40 sec 12 2 m 40 sec Braking distance maximum 3 to 4 ft on paved surface 0 9 to 1 2 m Gradeability See Operator s Manual SPECI...

Page 17: ...ey should provide excellent antiwear oxidation corrosion inhibition seal conditioning and foam and aeration suppression properties Optional fluids Biodegradable Petro Canada Environ MV46 Statoil Hydra...

Page 18: ...r revolution 1 53 cu in after serial number 3733 25 cc Rear drive motors all models Displacement per revolution 1 83 cu in before serial number 3734 30 cc Displacement per revolution 1 53 cu in after...

Page 19: ...DC 6 schematic items L M N O P Q R S T U AA AB BA and BB 3 position 4 way solenoid valve 10V DC 6 schematic item E CH CI Proportional solenoid valve 12V DC 5 schematic item D SPECIFICATIONS Machine T...

Page 20: ...to 0 0072 in 0 145 to 0 183 mm Enginecoolant Capacity 3 3 quarts 3 1 liters Lubrication system Oil pressure 36 to 64 psi 2 48 to 4 41 bar Oil capacity 5 4 quarts including filter 5 1 liters Oil viscos...

Page 21: ...Extreme operating temperatures may require the use of alternative engine oils For oil requirements refer to the Engine Operator Handbook on your machine Fuel pump Fuel pressure static 2 84 psi 0 19 ba...

Page 22: ...alve clearance cold 0 0078 in 0 2 mm Engine coolant capacity 3 28 quarts 3 1 liters Engine coolant should be clean soft water with 50 anti freeze concentration ethylene glycol to BS 6580 1992 or ASTMD...

Page 23: ...lbs 427 1 Nm Seal Lok Fittings hose end SAE Dash size Torque 4 18 ft lbs 25 Nm 6 30 ft lbs 40 Nm 8 40 ft lbs 55 Nm 10 60 ft lbs 80 Nm 12 85 ft lbs 115 Nm 16 110 ft lbs 150 Nm 20 140 ft lbs 190 Nm 24...

Page 24: ...3 8 7 16 1 2 1 1 2 9 16 5 8 3 4 7 8 1 1 1 8 1 1 4 LUBED 1 4 LUBED DRY LUBED DRY LUBED DRY LUBED SAE FASTENER TORQUE CHART Grade 5 DRY LUBED This chart is to be used as a guide only unless noted elsew...

Page 25: ...t result has occurred after performing a series of steps Scheduled Maintenance Procedures Observe and Obey Maintenance inspections shall be completed by a person trained and qualified on the maintenan...

Page 26: ...tion Make copies of the Pre delivery Preparation report to use for each inspection Store completed forms as required Maintenance Schedule There are five types of maintenance inspections that must be p...

Page 27: ...s form to record the results Place a check in the appropriate box after each part is completed Follow the instructions in the operator s manual If any inspection receives an N remove the machine from...

Page 28: ...3 4 Z 34 22 IC Part No 128267 July 2007 Section 3 Scheduled Maintenance Procedures This page intentionally left blank...

Page 29: ...riate box after each inspection procedure is completed Use the step by step procedures in this section to learn how to perform these inspections If any inspection receives an N tag and remove the mach...

Page 30: ...Perkins models MAINTENANCE INSPECTION REPORT Model Serial number Date Hour meter Machine owner Inspected by print Inspector signature Inspector title Inspector company Comments Instructions Make copi...

Page 31: ...operating conditions 1 Check to make sure that the operator s and safety manuals are present and complete in the storage container on the platform 2 Examine the pages of each manual to be sure that th...

Page 32: ...es to determine if routine maintenance procedures are required Complete information on how to perform this procedure is available in the appropriate Genie Z 34 22 IC Operator s Manual on your machine...

Page 33: ...erator s Manual Genie part number 84250 Perkins 403C 11 User s Handbook Genie part number 97360 A 5 Perform 30 Day Service The 30 day maintenance procedure is a one time sequence of procedures to be p...

Page 34: ...All other models Disconnect the retaining clamps securing the end cap to the air cleaner canister Remove the end cap 3 Remove the air filter element 4 Clean the inside of the air filter canister and t...

Page 35: ...art number EG601 8916 1 Kubota D905 Operator s Manual Genie part number 31743 Kubota DF752 Operator s Manual Genie part number 84250 A 8 Perform Engine Maintenance Kubota Models Note Engine specificat...

Page 36: ...n of lubrication to the turntable bearing and worm drive gear is essential to good machine performance and service life Continued use of an improperly greased gear will result in component damage 1 Ra...

Page 37: ...hevron Ultra duty grease EP NLGI 2 lithium based or equivalent CHECKLIST A PROCEDURES A 11 Perform Engine Maintenance Kubota Models Note Engine specifications require that this procedure be performed...

Page 38: ...ks flames and lighted tobacco Always have an approved fire extinguisher within easy reach Note Perform this procedure with the engine off 1 Locate the fuel filter water separator and loosen the vent p...

Page 39: ...screw on the injection pump 9 Clean up any fuel that may have spilled 10 Attempt to start the engine using the starter motor for a maximum of 15 seconds resting the starter for 30 seconds before tryin...

Page 40: ...operational in the gasoline mode This choke will not operate in propane mode 1 Check the choke linkage connections a choke solenoid b linkage lock nuts 2 Turn the key switch to ground control and the...

Page 41: ...xhaust leaks i e carbon buildup around seams and joints B 3 Inspect the Battery Note Genie requires that this procedure be performed every 250 hours or quarterly whichever comes first Proper battery c...

Page 42: ...llow the battery to rest at least 6 hours 8 Remove the battery vent caps and check the specific gravity of each battery cell with a hydrometer Note the results 9 Check the ambient air temperature and...

Page 43: ...ach air filled tire Refer to Section 2 Specifications B 4 Inspect the Electrical Wiring Note Genie requires that this procedure be performed every 250 hours or quarterly whichever comes first Maintain...

Page 44: ...that this procedure be performed every 250 hours or quarterly whichever comes first Failure to maintain proper drive hub oil levels may cause the machine to perform poorly and continued use may cause...

Page 45: ...art number 97360 B 9 Check and Adjust the Engine RPM Note Genie requires that this procedure be performed every 250 hours or quarterly whichever comes first Maintaining the engine rpm at the proper se...

Page 46: ...the spring lock nut 5 Turn the high idle adjustment nut and spring lock nut clockwise to increase the rpm or counterclockwise to decrease the rpm 6 Tighten the spring lock nut Then recheck the rpm Di...

Page 47: ...the stowed position 1 Push in the platform red Emergency Stop button to the off position 2 Turn the key switch to ground control and pull out the red Emergency Stop button to the on position 3 Start...

Page 48: ...very 250 hours or quarterly whichever comes first A properly operating engine idle select switch is essential to good engine performance and safe machine operation There are three settings Low idle tu...

Page 49: ...his test after checking the gasoline and LPG fuel levels and warming the engine to normal operating temperature 1 Move the fuel select switch to gasoline and then move the engine idle control switch t...

Page 50: ...whichever comes first Proper brake action is essential to safe machine operation The drive brake function should operate smoothly free of hesitation jerking and unusual noise Hydrostatic brakes and hy...

Page 51: ...quickly and smoothly to operator control Drive performance should also be free of hesitation jerking and unusual noise over the entire proportionally controlled speed range Note Select a test area th...

Page 52: ...h activated high idle rabbit and foot switch symbol 4 Press down the foot switch and raise the primary boom above horizontal 5 Choose a point on the machine i e contact patch of a tire as a visual ref...

Page 53: ...inguisher within easy reach 1 Remove the cap from the fuel tank 2 Check for proper venting Result Air passes through the fuel tank cap Proceed to step 4 Result If air does not pass through the cap cle...

Page 54: ...s the test See E 1 Test or Replace the Hydraulic Oil CHECKLIST B PROCEDURES B 19 Test the Alarm Package if equipped Note Genie requires that this procedure be performed every 250 hours or quarterly wh...

Page 55: ...elease it Result The travel alarm should sound when the drive control handle is moved off center in either direction B 20 Replace the Diesel Fuel Filter Water Separator Element Diesel Models Note Engi...

Page 56: ...d the fuel system Note Before bleeding the system fill the fuel tank 10 Loosen the vent plug screw located on the filter head 11 Operate the hand primer until fuel free of air flows from the vent plug...

Page 57: ...Engine Maintenance Kubota D905 Models Note Engine specifications require that this procedure be performed every 400 hours Required maintenance procedures and additional engine information is availabl...

Page 58: ...or equivalent C 2 Test the Platform Overload System if equipped Note Genie specifications require that this procedure be performed every 500 hours or six months whichever comes first Testing the platf...

Page 59: ...ine serial plate 3 Remove all weight tools and accessories from the platform Note Failure to remove all weight tools and accessories from the platform will result in an inaccurate test CHECKLIST C PRO...

Page 60: ...y before the overload indicator lights flash and the alarm sounds 8 Test all machine functions from the platform controls Result All platform control functions should not operate 9 Turn the key switch...

Page 61: ...to the tank to the closed position 2 Usinganapprovedhand operatedpump drain the fuel tank into a suitable container Refer to Section 2 Specifications for tank capacity Explosion and fire hazard When...

Page 62: ...ual Kubota part number 16622 8916 5 OR the Perkins 403C 11 User s Handbook Perkins part number 100816460 Kubota D905 Operator s Manual Genie part number 31743 Perkins 403C 11 User s Handbook Genie par...

Page 63: ...Extend and retract the primary boom through the entire range of motion to check for tight spots that could cause binding or scraping Note Always maintain squareness between the primary boom outer and...

Page 64: ...ours or annually whichever comes first Replacing the torque hub oil is essential for good machine performance and service life Failure to replace the torque hub oil at yearly intervals may cause the m...

Page 65: ...ter with an oil filter wrench 3 Apply a thin layer of oil to the new oil filter gasket 4 Install the new filter and tighten it securely by hand Clean up any oil that may have spilled Medium pressure f...

Page 66: ...lower the boom onto the lift cylinder safety chock Turn the machine off Crushing hazard Keep hands away from the cylinder and all moving parts when lowering the secondary boom Note The lift cylinder...

Page 67: ...aise the primary and secondary booms to full height using the ground controls Do not extend the primary boom CHECKLIST D PROCEDURES 4 Place a dial indicator between the drive chassis and the turntable...

Page 68: ...ms to the stowed position and turn the machine off 12 Remove the dial indicator from the machine D 7 Perform Engine Maintenance Note Engine specifications requires that this procedure be performed eve...

Page 69: ...container under the hydraulic tank Refer to Section 2 Specifications Checklist E Procedures 2 Before serial number 3364 Close the two hydraulic tank shut off valves at the hydraulic tank Component dam...

Page 70: ...and tag the machine to inform personnel of the condition 16 Clean up any oil that may have spilled Properly discard of oil 17 Start the engine and check for leaks E 2 Grease the Steer Axle Wheel Beari...

Page 71: ...e hub 12 Place the hub on a flat surface and gently pry the bearing seal out of the hub Remove the rear bearing 13 Pack both bearings with clean fresh grease 14 Place the large inner bearing into the...

Page 72: ...al Kubota part number EG601 8916 1 OR the Perkins 403C 11 User s Handbook Perkins part number 100816460 Kubota D905 Operator s Manual Genie part number 31743 Kubota DF752 Operator s Manual Genie part...

Page 73: ...ay result in property damage Indicates that a specific result is expected after performing a series of steps Indicates that an incorrect result has occurred after performing a series of steps Observe...

Page 74: ...ke release e terminal ground f terminal positive g terminal A drive forward h threshold potentiometer i high range potentiometer 6 Turn the keyswitch to platform controls and pull out the red Emergenc...

Page 75: ...t and finish lines by marking two lines on the ground 40 feet 12 2 m apart 19 Start the engine from the platform controls and move the engine idle select switch to foot switch activated high idle rabb...

Page 76: ...s 23 Press down the foot switch and raise the primary boom approximately 3 feet 1 m 24 Choose a point on the machine i e contact patch of a tire as a visual reference for use when crossing the start a...

Page 77: ...e diode between the black wire from the boom function speed controller and the white redwire 4 Connect the red lead from a volt meter to the wire connector of the white red wire next to the diode Conn...

Page 78: ...there is no air in the closed loop 1 Extend the boom until the slave cylinder barrel end pivot pin is accessible 2 Raise the boom slightly and place blocks under the platform for support Lower the boo...

Page 79: ...e gradually Do not allow oil to squirt or spray 3 Support the platform mounting weldment with a suitable lifting device Do not apply any lifting pressure 4 Remove the six mounting bolts from the platf...

Page 80: ...5 seconds then release it 6 Fully rotate the platform to the left and continue holding the platform rotate toggle switch until air stops coming out of the bleed screw Immediately release the platform...

Page 81: ...ch trigger point 4 Gently move the platform up and down by hand so it bounces approximately 1 to 2 inches 2 5 to 5 cm Allow the platform to settle Result The overload indicator light and the alarm is...

Page 82: ...alarm turn off 8 Add an additional 10 lb 4 5 kg test weight to the original test weight to overload the platform Result The alarm should sound The platform overload indicator light should be flashing...

Page 83: ...d Cap the fittings on the manifold Bodily injury hazard Spraying hydraulic oil can penetrate and burn skin Loosen hydraulic connections very slowly to allow the oil pressure to dissipate gradually Do...

Page 84: ...asteners from the jib boom bell crank at the extension boom Use a soft metal drift to remove the pin 6 Use a soft metal drift to remove the slave cylinder rod end pivot pin 7 Remove the jib boom bell...

Page 85: ...nd lower one of the leveling links to the ground Tap the pin the other direction and lower the opposite leveling link Do not remove the pin 5 Attach a lifting strap from an overhead crane to the rod e...

Page 86: ...o pry down on the lower clip 2 Repeat step 1 for each link 3 To remove a single link open the lower clip and then use a screw driver to pry the link to the side 4 2 Primary Boom How to Shim the Primar...

Page 87: ...onnect the hydraulic hoses to the slave cylinder and connect them together using a connector Plug the slave cylinder hoses from the cable track Bodily injury hazard Spraying hydraulic oil can penetrat...

Page 88: ...inder rod end pin Use a soft metal drift to remove the pin Crushing hazard The boom lift cylinder will fall unless it is properly supported 21 Lower the rod end of the primary boom lift cylinder onto...

Page 89: ...rotate the barrel end of the extension cylinder until the pin mounting bore is in a vertical position 6 Attach a lifting strap from an overhead crane to the extension tube at the platform end 7 Suppo...

Page 90: ...pivot pin 3 Attach a lifting strap from an overhead crane to the primary boom for support Do not apply any lifting pressure 4 Place a block of wood across the upper secondary boom to support the cyli...

Page 91: ...ad crane 18 Attach a lifting strap from an overhead crane or similar lifting device to the rod end of the primary boom lift cylinder Carefully loosen the straps and allow the barrel end of the primary...

Page 92: ...on the cylinder Bodily injury hazard Spraying hydraulic oil can penetrate and burn skin Loosen hydraulic connections very slowly to allow the oil pressure to dissipate gradually Do not allow oil to s...

Page 93: ...Hose and Fitting Torque Specifications 1 Remove the rear turntable cover 2 Raise the secondary boom until the master cylinder barrel end pivot pin is above the turntable counterweights 3 Raise the pr...

Page 94: ...der Do not remove the pin from the upper mid pivot Push the pin to one side only far enough to remove the cylinder Crushing hazard The upper secondary boom and the upper pivot may fall if the pivot pi...

Page 95: ...Part No 128267 Z 34 22 IC 4 23 Section 4 Repair Procedures July 2007 This page intentionally left blank...

Page 96: ...on 4 Repair Procedures REV A Secondary Boom Components Secondary Boom a upper pivot b upper compression arm c mid pivot d compression link e lower secondary boom f lower compression arm g turntable pi...

Page 97: ...ic oil can penetrate and burn skin Loosen hydraulic connections very slowly to allow the oil pressure to dissipate gradually Do not allow oil to squirt or spray 13 Remove the hose clamp from the side...

Page 98: ...ables and hoses can be damaged if they are kinked or pinched 21 Position a lifting strap from the overhead crane approximately 2 feet 60 cm from the platform end of the primary boom Measure from the p...

Page 99: ...cure the cylinder from moving 33 Remove the pin retaining fasteners from the lower pivot pin of the compression link Use a soft metal drift to remove the pin 34 Attach a lifting strap from an overhead...

Page 100: ...rough the compression arm pivot pins and twist to remove the pins 47 Remove the pin retaining fasteners from the mid pivot to lower secondary boom pivot pins Use a soft metal drift to remove the pin 4...

Page 101: ...of the secondary boom lift cylinder 4 Open the engine side turntable cover Pull up on the engine tray lock pin and swing the engine tray out and away from the machine Secure the engine tray from movi...

Page 102: ...g 3 Install the connector plate and wires to all three glow plugs 4 Turn the key switch to ground control and pull out the red Emergency Stop button to the on position 5 Connect the red positive lead...

Page 103: ...ure drops below the switch point the contacts open and the engine will shut off to prevent damage A low oil pressure indicator light at the ground controls should turn on when the switch opens Compone...

Page 104: ...Adjustment Note The carburetor cannot be adjusted The carburetor mixture screws are factory sealed with tamper resistant caps installed by the manufacturer If service or repair is needed contact your...

Page 105: ...Temperature and Oil Pressure Switches The engine coolant temperature switch is a normally open switch The switch contacts close at approximately 225 F 107 C If the coolant temperature rises above the...

Page 106: ...o maintenance procedure B 9 Check and Adjust the Engine RPM 8 3 Flex Plate The flex plate acts as a coupler between the engine and the pump It is bolted to the engine flywheel and has a splined center...

Page 107: ...ge hazard Do not force the drive pump during installation or the flex plate teeth may become damaged 8 4 Coolant Temperature and Oil Pressure Switches The engine coolant temperature switch is a normal...

Page 108: ...nd pull out the red Emergency Stop button to the on position at both the ground and platform controls 4 Activate any function using auxiliary power Result The pressure gauge reads 2800 psi 193 bar imm...

Page 109: ...rve the pressure gauge while cranking the engine Immediately stop if the pressure reaches or exceeds 3000 psi 206 bar Result The pressure gauge reads 3000 psi 206 bar immediately stop cranking the eng...

Page 110: ...Dealer service is recommended Note When removing a hose assembly or fitting the O ring on the fitting and or hose end must be replaced and then torqued to specification during installation Refer to Se...

Page 111: ...o not allow oil to squirt or spray 4 Support the pump with a suitable lifting device 5 Remove the drive pump mounting bolts Carefully remove the pump How to Prime the Pump 1 Connect a 0 to 6000 psi 0...

Page 112: ...r J Secondary boom down 25 30 ft lbs 34 41 Nm 6 Relief valve 1600 psi 110 bar K Primary boom down 25 30 ft lbs 34 41 Nm 7 Proportional solenoid valve D System flow regulating circuit 35 40 ft lbs 47 5...

Page 113: ...Part No 128267 Z 34 22 IC 4 41 July 2007 Section 4 Repair Procedures REV A MANIFOLDS W F G H I J K D E V C A B U R P O L T S Q N X M 23 5 6 7 8 9 12 10 11 13 24 25 1 3 2 4 14 15 16 17 18 19 20 21 22...

Page 114: ...t lbs 11 14 Nm 18 Solenoid valve 2 position 3 way L Platform level up 8 10 ft lbs 11 14 Nm 19 Solenoid valve 2 position 3 way T Primary boom extend 8 10 ft lbs 11 14 Nm 20 Solenoid valve 2 position 3...

Page 115: ...Part No 128267 Z 34 22 IC 4 43 July 2007 Section 4 Repair Procedures REV A MANIFOLDS W F G H I J K D E V C A B U R P O L T S Q N X M 23 5 6 7 8 9 12 10 11 13 24 25 1 3 2 4 14 15 16 17 18 19 20 21 22...

Page 116: ...alve cap Tip over hazard Do not adjust the relief valve higher than specified 7 Repeat steps 2 through 6 to confirm the relief valve pressure setting How to Adjust the Secondary Boom Down Relief Valve...

Page 117: ...o Description Item Function Torque 1 Solenoid valve 3 position 4 way CH Jib boom up down 8 10 ft lbs 11 14 Nm 2 Solenoid valve 3 position 4 way CI Platform rotate left right 8 10 ft lbs 11 14 Nm 3 Flo...

Page 118: ...ve chassis cover at the non steer end Index Schematic No Description Item Function Torque 1 Check Valve AC Pressure circuit 8 10 ft lbs 10 15 Nm 2 Solenoid valve 2 position 3 way AB 2 speed motor shif...

Page 119: ...it that gets hot oil out of low pressure side of drive pump and allows low pressure flow path for brake release and 2 speed motor shift 10 12 ft lbs 14 16 Nm 2 Relief valve 210 psi 14 5 bar B Charge p...

Page 120: ...33 9 Nm 8 Orifice plug 0 039 inch 1 mm BQ Equalizes pressure on both sides of flow divider combiner valve BO 9 Check valve BG Drive motor anti cavitation 20 ft lbs 27 1 Nm 10 Orifice plug 0 032 inch 0...

Page 121: ...Part No 128267 Z 34 22 IC 4 49 July 2007 Section 4 Repair Procedures REV A MANIFOLDS BB BL BK BA BF BP BO BQ BG BC BH BM BJ BD BS BT BR BI BN BE 7 6 8 5 2 3 1 9 10 11 12 16 15 17 18 19 20 4 13 14...

Page 122: ...ressure relief valve is set too low Proceed to step 3 to adjust the charge pressure relief valve Result The engine stalls The charge pressure relief valve is set too high Proceed to step 3 to adjust t...

Page 123: ...r jewelry 1 Tag and disconnect the wiring from the coil to be tested 2 Test the coil resistance Coils with 2 terminals Connect the leads from the ohmmeter to the valve coil terminals Coils with 1 term...

Page 124: ...ed across the terminals Resistor 10 Genie part number 27287 a multimeter b 9V DC battery c 10 resistor d coil Note Dotted lines in illustration indicate a reversed connection as specified in step 6 9V...

Page 125: ...ump drain the fuel tank into a suitable container Refer to Section 2 Specifications Explosion and fire hazard Engine fuels are combustible Remove the fuel tank in an open well ventilated area away fro...

Page 126: ...dition FUEL AND HYDRAULIC TANKS 3 Remove the drain plug from the hydraulic tank and completely drain the tank into a container of suitable capacity Refer to Section 2 Specifications Bodily injury haza...

Page 127: ...ove the Turntable Rotation Motor Note Do not allow the turntable to rotate until the hydraulic motor is installed 1 Tag disconnect and plug the hydraulic hoses from the turntable rotation motor Cap th...

Page 128: ...e pressed in races must be replaced 1 Be sure that both bearings are packed with clean fresh grease 2 Place the large inner bearing into the rear of the hub 3 Install a new bearing grease seal into th...

Page 129: ...necessary tools and test equipment are available and ready for use About This Section There are two groups of schematics in this section An illustration legend precedes each group of drawings Electric...

Page 130: ...DE Light Quick disconnect terminal Diode RED BLK FS1 Foot switch CR4 Relay contact normally open TS3 START ENGINE Toggle switch SPDT Circuits crossing no connection TS6 RIGHT LEFT Toggle switch DPDT...

Page 131: ...id operated dump valve Differential sensing valve Solenoid operated proportional valve Variable orifice or shut off valve Solenoid operated 2 pos 3 way directional valve Pilot operated flow control va...

Page 132: ...5 4 Z 34 22IC PartNo 128267 June 2007 Section 5 Schematics...

Page 133: ......

Page 134: ...A TB27 RED TB9 TB28 TB23 P1 RED GRND RED PLAT RED TS51 WHT 2 RED BLK 1 BLK RED 3 RED 1 CB2 BLK 2 P3 HORN RED TS1 P2 FS1 BLK RED TB34 TB33 1 10 5 6 7 8 9 4 3 2 BLK R1 EH TB21 CR2 KEY BYPASS IGN FUEL ON...

Page 135: ...A OEM CONTROL FLOW R X BP1 ROTARY X B R DP1 _ A L1 TS15 BLK 5 BRN 5 RED 5 WHT 5 RED WHT 25 CH WHT RED 32 CH WHT 30 EH LS2 CR9 CR10 CR9 CR10 CUT OUT CE VERSION ONLY PLATFORM LEVEL ORG 6 RED 6 LS4 R L...

Page 136: ...July 2007 Section 5 Schematics Electrical Schematic Diesel Models from serial number 3242 to 3577...

Page 137: ......

Page 138: ...D FS TB34 TB33 1 10 5 6 7 8 9 4 3 2 BLK R1 EH TB21 CR2 KEY BYPASS IGN FUEL ON ENG FAULT GROUND KEY PWR BATTERY START INPUT AUX ON IGNITION START MODULE START RELAY TACHOMETER TS52 BLK BLK 1 TS56 BLK R...

Page 139: ...Y X B R DP1 _ A L1 TS15 BLK 5 BRN 5 RED 5 WHT 5 RED WHT 25 CH WHT RED 32 CH WHT 30 EH LS2 CR9 CR10 CR9 CR10 CUT OUT CE VERSION ONLY PLATFORM LEVEL ORG 6 RED 6 LS4 R L R L STEER ORG RED BRN PWR GND FWD...

Page 140: ...July 2007 Section 5 Schematics Electrical Schematic Diesel Models from serial number 3578 to 4799...

Page 141: ......

Page 142: ...CR7 CR3 FB WHT BLK 5 CH WHT 4 CH CR1 TB22 KS1 RED CB1 EH RED CB1 10A 10A RED TB9 TB28 TB23 P1 RED GRND RED PLAT RED TS51 WHT 2 RED BLK 1 BLK RED 3 RED 1 CB2 BLK 2 P3 HORN RED P2 FS1 BLK RED TB38 TS53...

Page 143: ...ED 3 A OEM CONTROL FLOW R X BP1 ROTARY X B R DP1 _ A L1 TS15 BLK 5 BRN 5 RED 5 WHT 5 RED WHT 25 CH WHT RED 32 CH WHT 30 EH LS2 CR9 CR10 CR9 CR10 CUT OUT CE VERSION ONLY PLATFORM LEVEL ORG 6 RED 6 LS4...

Page 144: ...Section 5 Schematics July 2007 Electrical Schematic Gasoline LPG Models from serial number 3242 to 3577...

Page 145: ......

Page 146: ...ED CB1 EH RED CB1 10A BEFORE SERIAL NUMBER 3812 10A RED TB9 TB28 TB23 P1 RED GRND RED PLAT RED TS51 WHT 2 RED BLK 1 BLK RED 3 RED 1 CB2 BLK 2 P3 HORN RED P2 FS1 BLK RED TB38 TS53 TB34 TB33 1 10 5 6 7...

Page 147: ...OTARY X B R DP1 _ A L1 TS15 BLK 5 BRN 5 RED 5 WHT 5 RED WHT 25 CH WHT RED 32 CH WHT 30 EH LS2 CR9 CR10 CR9 CR10 CUT OUT CE VERSION ONLY PLATFORM LEVEL ORG 6 RED 6 LS4 R L R L STEER ORG RED BRN PWR GND...

Page 148: ...Section 5 Schematics July 2007 Electrical Schematic Gasoline LPG Models from serial number 3578 to 4799...

Page 149: ...Ground Control Box Wiring Diagram Diesel Models from serial number 3242 to 3308 Section 5 Schematics July 2007...

Page 150: ...SP PLATFORM LEVEL UP PLATFORM LEVEL DOWN LS2 LS4 JUNCTION LS1 LS2 JUNCTION OFF LIMIT SPEED GAS STEER RIGHT HIGH RPM STEER LEFT GLOW PLUG L P GROUND JIB UP JIB DOWN GROUND PLATFORM LEVEL CUTOUT CE VER...

Page 151: ...P PLATFORM LEVEL UP PLATFORM LEVEL DOWN LS2 LS4 JUNCTION LS1 LS2 JUNCTION OFF LIMIT SPEED GAS STEER RIGHT HIGH RPM STEER LEFT CHOKE L P GROUND JIB UP JIB DOWN GROUND PLATFORM LEVEL CUTOUT CE VERSION O...

Page 152: ...Section 5 Schematics July 2007 Ground Control Box Wiring Diagram Diesel Models from serial number 3309 to 3577...

Page 153: ...Ground Control Box Wiring Diagram Diesel Models from serial number 3578 to 4799 Section 5 Schematics July 2007...

Page 154: ...STEER RIGHT STEER LEFT GLOW PLUG HIGH RPM OFF LIMIT SPEED GRN BLK 1 BLK 6 49 52 44 52 50 BRN GND STUD GRN BLK SP LS2 LS4 JUNCTION LS1 LS2 JUNCTION JIB DOWN GROUND GROUND PLAT LEVEL UP PLAT LEVEL DOWN...

Page 155: ...BLK RED 1 BLU BLK 1 BLU RED 1 ORG 1 BLU 1 37 35 34 36 39 38 40 BLK SP RED WHT MH WHT RED SP WHT EH WHT SP RED SP RED WHT CH WHT BLK EH BLK WHT SP BLK RED SP BLU MH BLU BLK MH DRIVE ENABLE LIGHT SEC B...

Page 156: ...Section 5 Schematics July 2007 Ground Control Box Wiring Diagram Gasoline LPG Models from serial number 3242 to 3308...

Page 157: ...Ground Control Box Wiring Diagram Gasoline LPG Models from serial number 3309 to 3577 Section 5 Schematics July 2007...

Page 158: ...BLK SP RED WHT MH WHT RED SP WHT EH WHT SP RED SP RED WHT CH WHT BLK EH BLK WHT SP BLK RED SP BLU MH BLU BLK MH DRIVE ENABLE LIGHT SEC BOOM DOWN BOOM RETRACT SEC BOOM UP BOOM EXTEND HORN PLAT LEVEL U...

Page 159: ...LS4 SEE OPTIONAL WIRING WHT RED CH BRN OPT 2 3 BRN OPTION 1 WHT 7 WHT 12 ORG BLK 15A BLK 7A BLK WHT 8A RED EH 12GA RED 27A RED CR1 12GA BLK 22A WHT 23A WHT RED 32A BRN GND WHT BLK EH WHT RED EH WHT 2...

Page 160: ...Section 5 Schematics July 2007 Ground Control Box Wiring Diagram Gasoline LPG Models from serial number 3578 to 4799...

Page 161: ...Platform Control Box Wiring Diagram Diesel Models from serial number 3242 to 3577 Section 5 Schematics July 2007...

Page 162: ...GGLE JIB UP DOWN SWITCH TOGGLE GLOW PLUG SWITCH TOGGLE DESCRIPTION BOOM FUNCTION SPEED CONTROLLER DRIVE CONTROLLER EMERGENCY STOP BUTTON AUXILIARY TOGGLE SWITCH P3 HORN BUTTON DRIVE ENABLE LIGHT L1 NO...

Page 163: ...K 3 WHT 3 WHT BLK 3 ORG RED 3 BLU WHT 3 RED BLK 1 A X R RED WHT 1 TS4 TS6 TS2 RED FS BLK RED 1 BLK WHT 1 BLK 1 ORG 3 BRN WHT RED 1 RED WHT 3 TS8 BP1 WHT RED RED BRN 1 1 LS18 ORG BLK 1 ORG RED 1 GRN WH...

Page 164: ...Section 5 Schematics July 2007 Platform Control Box Wiring Diagram Diesel Models from serial number 3578 to 4799...

Page 165: ...Section 5 Schematics July 2007 Platform Control Box Wiring Diagram Gasoline LPG Models from serial number 3242 to 3577...

Page 166: ...BLK RED 1 BLK 1 ORG 3 BRN WHT RED 1 TS4 BLK WHT 1 BLU WHT 1 BLU RED 1 TS3 TS8 BRN RED RED GRN WHT 1 SPARE WIRES ORG RED 1 ORG BLK 1 GRN WHT 3 RED WHT 3 TS15 TS14 TS8 TS7 TS9 TS10 TS11 TS12 TS13 PLATFO...

Page 167: ...K 1 ORG 3 BRN WHT RED 1 TS4 BLK WHT 1 BLU WHT 1 BLU RED 1 TS3 TS8 BRN RED RED GRN WHT 1 SPARE WIRES ORG RED 1 ORG BLK 1 GRN WHT 3 RED WHT 3 TS15 TS14 TS8 TS7 TS9 TS10 TS11 TS12 TS13 PLATFORM ROTATE TO...

Page 168: ...Section 5 Schematics July 2007 Platform Control Box Wiring Diagram Gasoline LPG Models from serial number 3578 to 4799...

Page 169: ...Generator Option Wiring Diagram from serial number 3242 to 4081 Section 5 Schematics July 2007...

Page 170: ...S11 TS12 TS4 GLOW PLUG SWITCH SECONDARY BOOM SWITCH PLATFORM LEVEL SWITCH PLATFORM ROTATE SWITCH JIB UP DOWN SWITCH TURNTABLE ROTATE SWITCH DRIVE ENABLE SWITCH PRIMARY BOOM EXTEND SWITCH PRIMARY BOOM...

Page 171: ...11 TS12 TS4 GLOW PLUG SWITCH SECONDARY BOOM SWITCH PLATFORM LEVEL SWITCH PLATFORM ROTATE SWITCH JIB UP DOWN SWITCH TURNTABLE ROTATE SWITCH DRIVE ENABLE SWITCH PRIMARY BOOM EXTEND SWITCH PRIMARY BOOM S...

Page 172: ...Section 5 Schematics July 2007 Generator Option Wiring Diagram from serial number 4082 to 4799...

Page 173: ...Load Sense Option Wiring Diagram from serial number 3242 to 3577 Section 5 Schematics July 2007...

Page 174: ...T FS OPTION BRN TS15 TS13 DP1 BP1 TS1 TS2 P2 LABEL TS7 TS6 TS8 TS9 TS10 TS11 TS12 TS4 GLOW PLUG SWITCH SECONDARY BOOM SWITCH PLATFORM LEVEL SWITCH PLATFORM ROTATE SWITCH JIB UP DOWN SWITCH TURNTABLE R...

Page 175: ...T LIMIT SWITCH WHT 7 BLK 7 22 14 LS1 EXTEND RETRACT LIMIT SWITCH CABLE 8 CABLE 5 CABLE 6 CABLE 7 SHOWN WITH BOOM EXTENDED NOTE ALL LIMIT SWITCHES SHOWN WITH PLUNGER IN EXTENDED RELAXED POSITION BOOM I...

Page 176: ...Section 5 Schematics July 2007 Manifold and Limit Switch Wiring...

Page 177: ......

Page 178: ...HARGE PRESSURE 0 025 inch T P REAR LEFT T2 T1 M2 M4 170 psi TANK A PORT STEERING PSI 25 M AUXILIARY PUMP 0 5 gpm DRIVE PUMP 3500 psi 220 psi E B 3500 psi A FUNCTION PUMP 3 gpm CHARGE PRESSURE A B S2 S...

Page 179: ...after serial number 3644 PRIMARY BOOM CYLINDER 1600 psi 0 032 inch 1600 psi SECONDARY BOOM CYLINDER 3000 psi 1 5 1 TURNTABLE ROTATE 5 9 CU IN REV 3000 psi 3 1 3000 psi 4 5 1 MASTER CYLINDER SLAVE CYL...

Page 180: ...Section 5 Schematics July 2007 Hydraulic Schematic 2WD Models...

Page 181: ......

Page 182: ...22 gpm 8 7 gpm TEST 1 3 MICRON 50 psi 50 50 50 50 FUNCTION PUMP 3 2 gpm 0 032 inch STEER CYLINDER D E A B 10 MICRON 25 psi C 0 039 inch 0 039 inch 0 079 inch 0 079 inch 50 50 0 039 inch 0 039 inch T2...

Page 183: ...1 after serial number 3644 PRIMARY BOOM CYLINDER 1600 psi 0 032 inch 1600 psi SECONDARY BOOM CYLINDER 3000 psi 1 5 1 TURNTABLE ROTATE 5 9 CU IN REV 3000 psi 3 1 3000 psi 4 5 1 MASTER CYLINDER SLAVE CY...

Page 184: ...Section 5 Schematics July 2007 Hydraulic Schematic 4WD Models...

Page 185: ...7 3375 1002 Phone 86 21 53852570 Fax 86 21 53852569 Phone 65 98 480 775 Fax 65 67 533 544 Phone 81 3 3453 6082 Fax 81 3 3453 6083 Phone 82 25 587 267 Fax 82 25 583 910 Phone 55 11 41 665 755 Fax 55 1...

Reviews: