background image

2

3

English

OVERVIEW

USING CLASSIC/S

SELECTING THE AUDIO SOURCE 

The audio source can either be selected with remote 

control key or the touch panel keys on the device 

FMDAB,   and   ).

FM RADIO

1.   Touch  FM on the remote control until the  

display shows an FM frequency or touch FM on 

the device.

2. Select a FM station with   and  :

  •  Use a single touch: change frequency by 0.1 MHz.

  •  Hold down for a short time: automatically search 

for another station. 

Storing a radio station with the presets

1. Select your favorite radio station using the   or    

  key on the remote control or on the touch panel.

2. Select one of the 6 preset keys on the remote  

  control, and keep pressing it until the correspond- 

  ing letter on the display starts blinking. The station  

  has now been stored.

Using the presets 

Press one of the preset keys to recall a radio station. 

DAB / DAB+( 

Classic/S with DAB/DAB+/FM and 

Bluetooth 

ONLY )

1.   Touch  DAB on the remote control until the display 

shows DAB or touch DAB on the device.

2.   Select a DAB station with   and  .

  Classic/S DAB+ is compatible with DAB, DAB+,  

 DMR and DMB.

Scan function 

When using your Classic/S for the first time, the radio 

needs to find available radio stations in your region 

( done by using the “Scan” function ). After a scan, the 

stations will be automatically stored.

•  Within 5 seconds of entering DAB mode, hold down 

the   button until “Scan” displays.

“Scan” is also needed after traveling to a new location 

with different radio stations, or when you move  

the radio to a different room where there is different 

radio reception.

BLUETOOTH

Mobile phones and computers with Bluetooth can 

connect to the Classic/S and play music. The mobile 

phone or computer must support Bluetooth A2DP.

Initial set-up (“pairing”):

1. Press the     key. The display will show “BLUE”. 

Wait for 20 seconds until the display shows “PAIRING” 

as blinking .

2. Select “settings” on your mobile phone. Select 

“General/Bluetooth”. Turn on Bluetooth. New Blue-

tooth devices are discovered automatically (on some 

devices you will need to press ‘scan’).

3. After a few seconds, “Classic/S” will appear.

4. Select “Classic/S”. The mobile phone is now con-

necting (“pairing”) to the Classic/S.

5. If the mobile phone asks for a PIN, enter “0000” 

(four zeros).

6. You can now play music on your mobile phone and 

listen to it on the Classic/S.

Playing music

Most mobile phones will connect automatically to the 

Classic/S after initial set-up (“pairing”).

1. Be sure the Bluetooth setting on your mobile phone 

is ON.

2. Press the     key. The display will show “BLUE”, 

then will show “SEARCH”, as blinking.

3. After a few seconds, Classic/S will  automatically 

connect to your mobile phone. The display will show 

“CONNECT”.

4. Play music on the mobile phone and the music will 

start playing on the Classic/S automatically after a 

few seconds.

LINE - IN

1.  Connect one end of a Line - In cable to the Line - In 

plug on the back of Classic/S. Then connect the 

other end to the audio device ( headphone or Line-

Out  plug ). 

2.   Touch   until the display shows “Line” or  .

ALARM

Setting the alarm

1. Touch 


, “A” starts blinking on the display.

2.  Set the desired alarm time using   and  .

3.  Touch     again to save the alarm time. “A” indi-

cates alarm is now on. 

4. Touch     to turn Classic/S off.
Turning the alarm On and Off

1.  Turn on Classic/S, then touch   to toggle the alarm. 

“A” ( Classic/S ) or “ON” ( Classic/S DAB+ ) indicates 

that the alarm is on.

2.  If the device is off, the alarm can also be toggled by 

touching any key on the touch panel.

Muting the alarm

Touch any key on the touch panel to mute the alarm. 

The alarm will automatically turn off after 2 minutes if 

no key on the touch panel is touched.
Selecting the alarm sound

There are two alarm sounds: radio and a beeping 

sound. If you set the alarm and the current mode is 

FM or DAB, the FM or DAB radio will play when the 

alarm goes off. Otherwise the beeping sound is used.
Setting the clock manually

1.   Touch  : “C” starts blinking on the display.

2. Use   and   to set the time.

3. Touch   to complete the procedure.

Classic/S (with DAB/DAB+/FM and Bluetooth) sets 

the time automatically. 

Every time Classic/S gets a valid time signal from a 

DAB station, it will set the time automatically. If there 

are no DAB stations, the time has to be set manually.

AUDIO SOURCES

You can play music from the following audio sources:

•  FM Radio

•  DAB Radio ( available only for Classic/S DAB+ )

•  Mobile phone or computer via Bluetooth

•  Other devices with a Line-In cable

Bluetooth

DAB Radio

FM Radio

Line-In

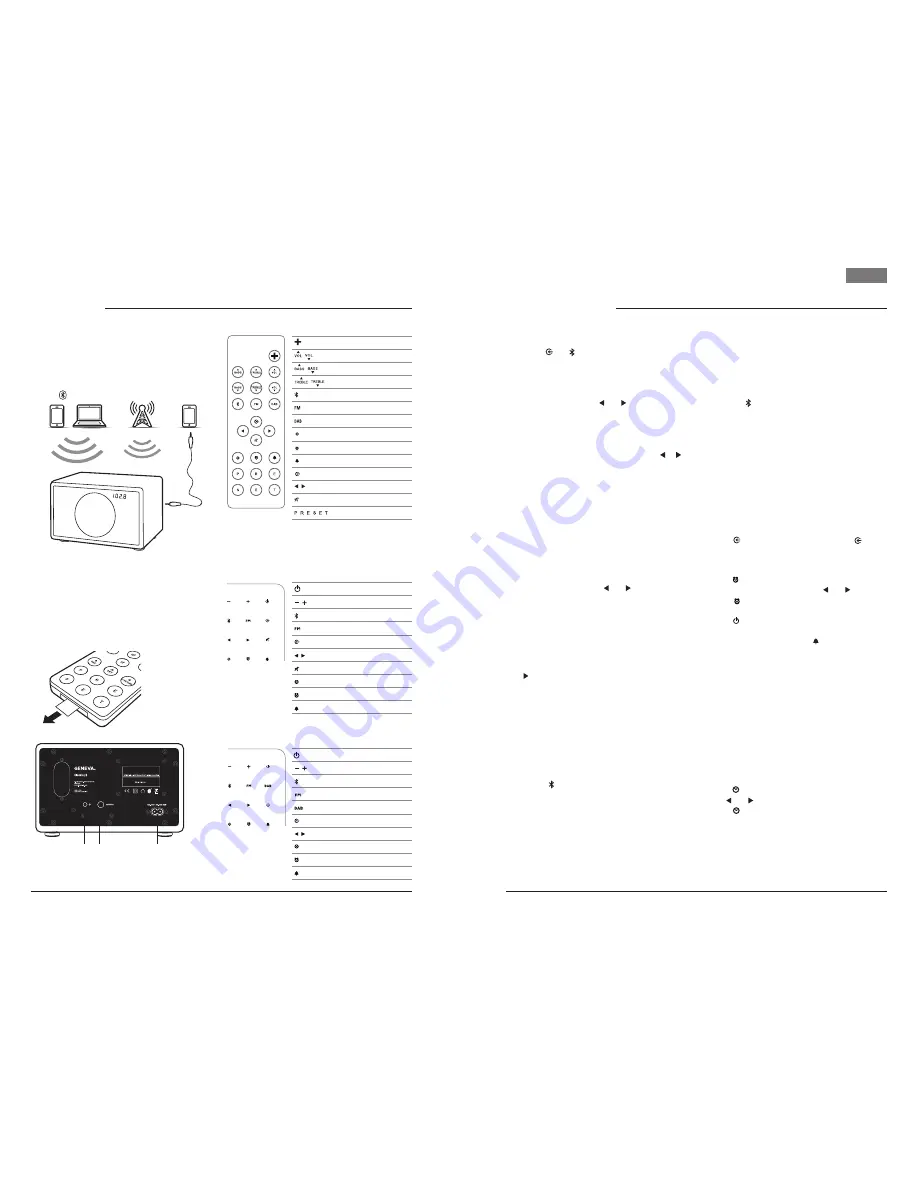
GETTING STARTED

1. Remove the protection paper from the remote  

  control battery compartment.

2. Connect the enclosed external telescopic antenna.  

  Connect the AC power cable to the AC power plug  

  on the back panel.

REMOTE CONTROL

TOUCH PANEL 

Classic/S (with FM and Bluetooth) 

Classic/S (with DAB/DAB+/FM and Bluetooth)


Power On / Off


Volume control

 Bluetooth

 FM


Line - In


FM frequency, alarm

 Mute


Set time 


Set alarm time


Alarm On / Off


Power On / Off


Volume control

 Bluetooth

 FM

 DAB


Line - In


DAB / FM frequency, alarm


Set time 


Set alarm time


Alarm On / Off

Line-In

Antenna

AC power


Power On / Off


Volume control


Bass control


  Treble control

 Bluetooth

 FM

 DAB / DAB+ 

1


Set time


Set alarm time


Alarm On / Off


Line - In


DAB & FM frequency, alarm


Mute, Mono / Stereo  ( FM )

                 DAB / FM presets

Summary of Contents for Classic/S

Page 1: ...English 01 Bedienungsanleitung Deutsch 05 Mode d emploi Fran ais 09 Manual del usuario Espa ol 13 Manuale dell utente Italiano 17 Handleiding Nederlands 21 Brugervejledning Dansk 25 Anv ndar Manual Sv...

Page 2: ...readily operable 21 Correct Disposal of this product This marking indicates that this product should not be disposed with other household wastes throughout the EU To prevent possible harm to the envir...

Page 3: ...ill show BLUE then will show SEARCH as blinking 3 After a few seconds Classic S will automatically connect to your mobile phone The display will show CONNECT 4 Play music on the mobile phone and the m...

Page 4: ...ue vom richtigen Typ und Modell Nummer CR2032 Lithium Knopfzelle 3 V Betriebstemperaturen Die empfohlene Betriebstemperatur f r das Classic S betr gt zwischen 5 und 40 Grad Celsius 41 und 104 Grad Fah...

Page 5: ...s Mobiltelefon verbindet sich jetzt Pairing mit dem V 5 Wenn das Mobiltelefon nach einer PIN fragt geben Sie 0000 vier Nullen ein 6 Sie k nnen nun Musik auf Ihrem Handy abspielen und sie auf dem Class...

Page 6: ...ive 2014 53 CE La d claration de conformit peut tre consult e sur demande G Lab GmbH Zug Suisse ou sur http genevalab com RECYCLAGE Ce produit peut tre recycl Les produits portant ce symbole NE DOIVEN...

Page 7: ...ls et d autres t l phones mobiles allez www genevalab com et s lectionnez Support Information d tat sur l cran S Search recherche des appareils d j jumel s C Connect connexion tablie P Pairing si le C...

Page 8: ...V Temperaturas operativas el rango de temperaturas operativas para el Classic S es de 5 40 Celsius 41 105 grados Fahrenheit CERTIFICACI N Certificaci n CE G Lab GmbH declara que este dispositivo cump...

Page 9: ...otros dispositivos y tel fonos m viles Vaya a www genevalab com y selec cione Asistencia Informaci n del estado en la pantalla S Search B squeda de dispositivos acoplados anteriormente C Connect Cone...

Page 10: ...di conformit pu essere consultata su richiesta a G Lab GmbH Zugo Svizzera o su http genevalab com RICICLAGGIO Il presente prodotto deve essere riciclato I prodotti recanti questo simbolo NON devono es...

Page 11: ...duzione automatica anche su Classic S Guida all abbinamento per gli altri dispositivi e telefoni cellulari Andare su www genevalab com e selezionare Supporto Informazioni di stato sul display S Search...

Page 12: ...n dit toestel uit het stopcontact bij onweer of wanneer het lange tijd niet wordt gebruikt 14 Laat onderhoud en herstellingen uitvoeren door bevoegd onder houdspersoneel Reparaties zijn nodig wanneer...

Page 13: ...e muziek begint automatisch te spelen op Classic S Koppelingsinstructies voor andere toestellen en mobiele telefoons Ga naar www genevalab com en selecteer Support Statusinformatie op het scherm S Sea...

Page 14: ...ud under tordenvejr eller n r det ikke bruges over lange perioder 14 Overlad alt service til det kvalificerede personale Service er n d vendig n r apparatet er blevet beskadiget p hvilken som helst m...

Page 15: ...andre apparater og mobiltele foner G til www genevalab com og v lg Support Statusinformation p displayet S Search S ger efter tidligere parrede enheder C Connect Forbindelse oprettet P Pairing Hvis Cl...

Page 16: ...nder en l ngre period 14 Alla reparationsarbeten m ste utf ras av kvalificerad personal Reparationsarbeten r n dv ndiga n r apparaten har skadats p n got s tt t ex om elkabeln r skadad om v tska har s...

Page 17: ...iskt p Classic S Parkopplingshj lp f r andra enheter och mobiltelefoner G till www genevalab com och v lj Support Statusinformation p displayen S Search S ker tidigare ihopparade enheter C Connect Ans...

Page 18: ...ig type og modell nummer CR2032 litium coin cell batteri 3 V Driftstemperaturer Anbefalt driftstemperatur for Classic S Classic S DAB er 5 40 grader Celsius CE Tilpasset G Lab GmbH erkl rer at dette p...

Page 19: ...for pairing med andre enheter og telefoner G til www genevalab com og velg St tte Statusinformasjon p skjermen S Search S ker etter tidligere pairede enheter C Connect Tilkopling lyktes P Pairing Hvis...

Page 20: ...t on j tett v valtuutetun huollon teht v ksi Laite on toimitettava huoltoon jos se on vaurioitunut jollakin tavalla jos esimerkiksi verkkojohto tai sen pistoke on vaurioitunut tai mik li laitteen sis...

Page 21: ...sohjeet muille laitteille ja matkapuhelimille Valitse www genevalab com sivustosta kohta Tuki N yt n tilatiedot S Search Etsit n laitteita joiden kanssa on aiemmin muodostettu pari C Connect Yhteys mu...

Page 22: ...o cair 15 N o instale este equipamento em um espa o confinado ou em butido como estante ou unidade similar e deixe em condi es de boa ventila o A ventila o n o deve ser impedida pela cobertura das abe...

Page 23: ...www genevalab com e selecione Suporte Informa o de estado no visor S Search Procurar dispositivos anteriormente emparelhados C Connect Conex o bem sucedida P Pairing Se o Classic S n o efetuar uma con...

Page 24: ...uma nova bateria de c lula de l tio 3V do tipo CR2032 Como que apago ou substituo uma predefini o As predefini es guardadas n o precisam de ser apa gadas basta utilizar os passos para guardar uma nov...

Page 25: ...PAIRING 20 Classic S Classic S Classic S 0000 0 4 Classic S Classic S BLUE SEARCH Classic S CONNECT Classic S S Search C Connect P Pairing Classic S 20 Classic S 2 1 Classic S 2 MODE 1 A 2 3 A 4 Clas...

Page 26: ...LASSIC S www genevalab com 8 1 Classic S 2 5 RESET 3 PIN PIN 0000 4 PIN Classic S WLAN WiFi V3 CR2032 type DAB DAB DAB DMR DMB Band III 5A 13F 174 240 MHz AC genevalab com genevalab com www genevalab...

Reviews: