background image

page | 14

Configuring the Digital Signage Player

Connecting to a Network using DHCP

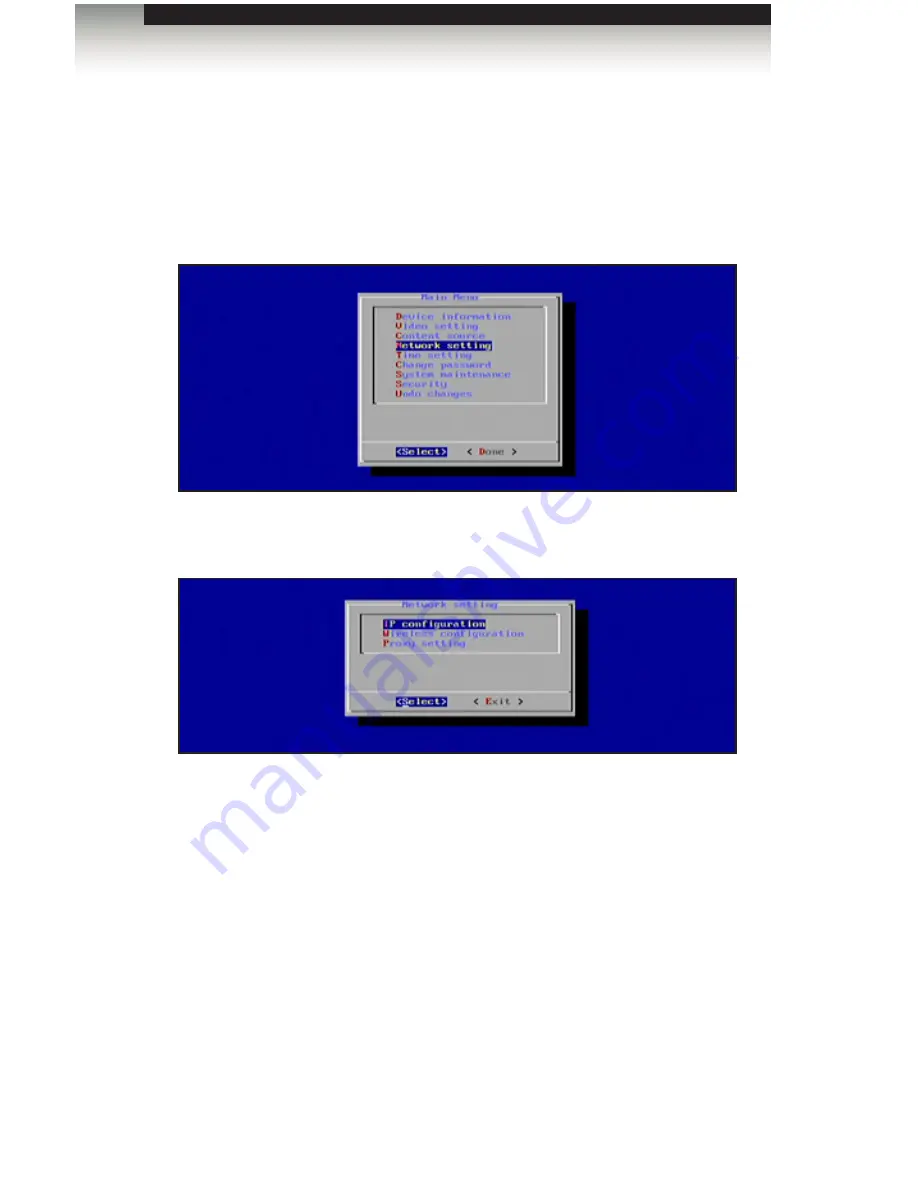
1.  Highlight the Network Setting option in the Main Menu. 


The Digital Signage Player will automatically scan for wireless networks during the 

boot-up sequence.  When an Ethernet connection is used, the Wi-Fi will be disabled. 


2.  Press the Enter key to display the Network Setting dialog.  The IP Configuration option 

is selected by default. 


The Network Setting dialog provides the following options:

• 

IP Configuration

• 

Wireless Configuration

• 

Proxy Setting 


3.  Press the Enter key to display the IP Configuration dialog. 


(continued on next page)

Operating the Digital Signage Player with Wi-Fi

Summary of Contents for EXT-HD-DSWFN

Page 1: ...Audio Embedder 3GSDI Release A2 User Manual EXT HD DSWFN Digital Signage Player with Wi Fi...

Page 2: ...et 10 Protect the power cord from being walked on or pinched particularly at plugs convenience receptacles and the point where they exit from the apparatus 11 Only use attachments accessories specifie...

Page 3: ...may be required in order to claim warranty 2 Customers outside the US are responsible for shipping charges to and from Gefen 3 Copper cables are limited to a 30 day warranty and cables must be in the...

Page 4: ...5 00 PM Monday Friday Pacific Time Digital Signage Player with Wi Fi is a trademark of Gefen LLC Important Notice Gefen LLC reserves the right to make changes in the hardware packaging and any accomp...

Page 5: ...ntent from the USB drive or network to the internal memory When using the Signage Manager Express software for the first time the Full HD Open API Media Player V2 must be selected as the active player...

Page 6: ...p Automatic error recovery with built in WDT Auto play starts playing scheduled contents automatically Compact and wall mountable solid metal enclosure for excellent heat dissipation and durability Pa...

Page 7: ......

Page 8: ...sing DHCP 14 Connecting to a Network using a Static IP 16 Connecting to a Network using Wi Fi 17 Changing the Proxy Type 20 Changing the Proxy Server 21 Setting the Internal Clock 22 Setting the Time...

Page 9: ...x Table of Contents Digital Signage Player with Wi Fi Using the Trigger Template 71 Restoring Factory Default Settings 72 04 Appendix GPIO PCB Installation 76 Network Cable Diagram 78 Specifications 7...

Page 10: ......

Page 11: ...Digital Signage Player with Wi Fi 01 Getting Started Panel Layout 2 Front 2 Side 3 Installation 4 Sample Wiring Diagram 4...

Page 12: ...t 4 Ethernet Connect an Ethernet cable between the port and the network router or switch 5 USB Connect a USB keyboard and flash drive to these ports to configure the Digital Signage Media Player with...

Page 13: ...ption 1 12V DC Connect the included 12 V DC locking power supply to this connector 2 HDMI out Connect the included RS 232 to Ethernet adapter to this port 3 VGA out Connect a VGA monitor to this port...

Page 14: ...layer with Wi Fi to the network 4 Connect a keyboard to the USB port on the back panel of the Digital Signage Player 5 Connect the included 12 V DC power supply to the unit and connect the AC power co...

Page 15: ......

Page 16: ......

Page 17: ...lution 10 Setting the Content Source 11 Pulling Content 12 Changing the name of the Digital Signage Player 13 Connecting to a Network using DHCP 14 Connecting to a Network using a Static IP 16 Connect...

Page 18: ...tent using the USB port If content has already been loaded then playback will begin immediately If no content has been loaded or if the unit has been reset then the Welcome screen will be displayed Po...

Page 19: ...o highlight a menu item Press the Spacebar to make the selection by placing an asterisk next to the highlighted item Press the Enter key to confirm the selection Displaying the Device Information 1 Se...

Page 20: ...ull HD 1080i60 1920 x 1080i 60 Hz SVGA 800 x 600 60 Hz Full HD 1080i60 1920 x 1080i 60 Hz XGA 1024 x 768 60 Hz Full HD 1080p60 1920 x 1080p 60 Hz SXGA 1280 x 1024 60 Hz Composite NTSC UGA 1600 x 1200...

Page 21: ...ying Digital Signage content 1 Select the Content Source option from the Main Menu 2 Press the Enter key to display the Content Source dialog The available options on this dialog are Server URL Player...

Page 22: ...xport location path directly to the created WEB folder in step 1 or to a convenient location where the content can be moved into the WEB folder at a later time 3 Get the full address path on the Web s...

Page 23: ...to the player By default a random alphanumeric number is used 1 From the Content Source dialog select the Player Name option 2 Type in the desired name of the player Press the Enter key to confirm th...

Page 24: ...p sequence When an Ethernet connection is used the Wi Fi will be disabled 2 Press the Enter key to display the Network Setting dialog The IP Configuration option is selected by default The Network Set...

Page 25: ...twork IP address for the Digital Signage Player If DHCP will be used then no further network configuration should be necessary 4 Press the Enter key to return to the Network Setting dialog 5 Select th...

Page 26: ...yed 2 Entered the following information in the Static IP dialog IP address Netmask Gateway address Domain DNS 3 Enter the required information in each of the fields by selecting the Change option and...

Page 27: ...rk Setting dialog 2 Select Wireless Configuration and press the Enter key When the Wireless Configuration screen is displayed select between Auto Scan Scan are for a WiFi access point Manual Manual co...

Page 28: ...ne from the Main Menu and select Yes to save the changes Manually Configuring a Wi Fi access point 1 Highlight Manual from the Wireless Configuration dialog and press the Enter key to select it 2 Ente...

Page 29: ...ignage Player supports the following security algorithms No security not recommended WEP WPA Personal TWIP WPA Personal AES WPA2 Personal TKIP WPA2 Personal AES 4 Once the security option is highlight...

Page 30: ...roxy Type Proxy Server 3 Highlight Proxy Type then press the Enter key The Digital Signage Player supports the following proxy options HTTP HTTP 1 0 SOCKS 4 SOCKS 5 4 Select the desired Proxy Type usi...

Page 31: ...Proxy Settings dialog then press the Enter key 2 Enter the required information in the Proxy Server dialog box Host Port User Password 3 Use the Change option to modify the information in each field...

Page 32: ...nd the time zone can be set from within this menu 2 Press the Enter key to display the Time Setting dialog The Time Setting dialog allows you to set the following options Local Time Time Zone Time Ser...

Page 33: ...time press the Enter key to confirm the changes 6 Select Done from the Main Menu to save the changes Setting the Time Zone 1 To set the clock highlight the Time Zone option under the Time Setting menu...

Page 34: ...Mid Atlantic GMT 01 00 Azores GMT 00 00 Africa West GMT 00 00 Universal Coordinated Time GMT 00 00 Western European GMT 01 00 Africa Central West GMT 01 00 Central European GMT 01 00 Namiba GMT 02 00...

Page 35: ...h GMT 09 30 Australia South GMT 10 00 Australia East GMT 10 00 Pacific Ocean Papua Guam GMT 10 00 Russia Zone 09 Vladivostok Khabarovsk GMT 11 00 Pacific Ocean UTC Solomon Islands Vanuatu GMT 11 00 Ru...

Page 36: ...In the example above www google com is specified as a timer server If the Content Source option is selected the Digital Signage Player will use the time and date from the same server which provides t...

Page 37: ...l and press the Spacebar to select it Press the Enter key to confirm the changes and return to the Custom Time Server dialog 5 Change the server by highlighting Server and pressing the Enter key 6 Typ...

Page 38: ...d dialog If no password was previously set or if the unit has been reset then the Old Password field will be blank Use the and keys to move between each field 3 Highlight the Change button and press t...

Page 39: ...ing the Under Changes option from the Main Menu 1 Select Under Changes from the Main Menu 2 Press the Enter key The following dialog will be displayed By default the No option is highlighted Select Ye...

Page 40: ...Player will reboot 1 Select Done on the Main Menu 2 By default Cancel is highlighted To return to the Main Menu press the Enter key To save all changes and exit the Main Menu select Yes and press the...

Page 41: ......

Page 42: ......

Page 43: ...ngesting the Content 40 Changing the Display Interval 45 Adding Video 47 Combining Images with Video 51 Adding a Ticker 53 Using Additional Colors 56 Using Widgets 58 Using Weekly Schedules 64 Adding...

Page 44: ...s installer from the Gefen Web site at http www gefen com kvm support download jsp 2 Double click the msi file to run the installation Wizard 3 The installer Welcome screen will be displayed Follow th...

Page 45: ...et cable from the Ethernet jack of the Digital Signage Player to the network Configure the network settings of the Digital Signage Player as required 2 Launch the Signage Manager Express from the Star...

Page 46: ...ides the option for looping the content or defining a schedule Looping is the default setting See Using Weekly Schedules for information on using the Weekly schedule option Creating a Sample Presentat...

Page 47: ...applied to both a single pane or multiple panes The use of multiple panes is illustrated in the section Adding Video For this example select the 4 3 aspect ratio 7 Click the Layout Format button and...

Page 48: ...ull Screen layout to the far left The selected layout is a 4 3 full screen layout Video with audio or images can be placed in this area 2 Click the Add button Clicking the Add button allows you to add...

Page 49: ...ected click the Open button The selected image will now appear under the Recent Items window and the Media Files window highlighted in yellow Creating a Sample Presentation page 39 Click Open Select t...

Page 50: ...yellow Ingesting the Content In the Digital Signage environment the term ingesting or ingestion refers to the process whereby a client device is uploaded with content The Signage Manager Express refer...

Page 51: ...f the new information provided by this window Selects how the content will be transferred to the unit Lists the Media files and or Playlists which will be used in publishing the content Displays infor...

Page 52: ...ey are not discovered by the software Selects all Players in the list Goes back to the Schedule screen Deselects all Players in the list Exports the current content to the Player Adds a Player to the...

Page 53: ...tent to the Digital Signage Player The Digital Signage Player will indicate that it is ingesting the content by displaying Preparing in the player list Press the Cancel button to cancel the export pro...

Page 54: ...aying on the display connected to the Digital Signage Player The Log button can be pressed to view upload activity If necessary use the scroll button on the side of the LogViewer dialog to view all pr...

Page 55: ...interval can be changed 1 Click the Back to schedule button on the top portion of the menu 2 Highlight one of the images under the Media files window and right click the mouse to bring up the context...

Page 56: ...e bottom of the window Then click on the Proceed button again on the next window The content on the Digital Signage Player will be updated The first image will be displayed for 10 seconds and the seco...

Page 57: ...roject use the scroll bar and scroll all the way to the right Select the fifth template from the far right shown below This template contains one video window two image windows and one ticker window T...

Page 58: ...w later in this section The video window is currently highlighted yellow indicating that it is the active window You can click any of the four windows to make it the active window In the example below...

Page 59: ...eo window is selected 3 Highlight each of the images and click the Remove button 4 Click the OK button to confirm the removal of the file from the Signage Manager Express software When a file is delet...

Page 60: ...he movie file will appear under both the Media files window and the Recent Items window 7 As with any image file you can right click on the movie file in the Media window to adjust the playback proper...

Page 61: ...er right corner window as shown below by left clicking the mouse This window will only accept an image file as denoted by the image icon 2 Click and drag one of the images from the Recent Items window...

Page 62: ...n they will appear under the Recent Items window and be available for other projects 6 Select the image window on the lower right corner of the template and drag the other image to the Media Files win...

Page 63: ...tom or both the top and the bottom of the screen 1 Create a text file using Windows Notepad etc and add the text you want to display in the ticker window Save the text file 2 Select the Ticker window...

Page 64: ...page 54 Creating a Sample Presentation 5 Click the Background color to bring up the color picker 6 Select the color black at the bottom of the pull down list Signage Manager Express Software...

Page 65: ...rmal speed 9 Click the OK button 10 Click the Proceed to export button then click the Export button on the following screen in order to update the Digital Signage Player The Signage Manager Express pr...

Page 66: ...lors 1 To access more Background or Font colors click the More button at the bottom of the pull down list This will display the Windows color picker as shown below Creating a Sample Presentation Signa...

Page 67: ...quired then click the Define Custom Colors button to display the full range of available colors 3 Click the mouse in the color palette to replace the selected color under the Basic colors palette 4 Cl...

Page 68: ...s real time news weather calenders clocks RSS feeds and even other Web pages Adding a calendar a clock and a weather feed 1 To create a widget click the Widget shortcut just above the template scroll...

Page 69: ...w and select Calendar from the Widget list 4 Click the Option button and select the color red from the pull down list Creating a Sample Presentation Click the down arrow to display the Widget list Sig...

Page 70: ...eating a Sample Presentation 5 Click and highlight the right middle window then select the Clock widget 6 Click the Option button and select a blue color from the pull down list Signage Manager Expres...

Page 71: ...the Option dialog 8 Select the city using the pull down list If the city state country is not listed you can type the location directly into the text field 9 Select either the Fahrenheit F or Centigr...

Page 72: ...elect the main larger area in the template and add a Webpage widget as shown below 2 Click the Option button and type in the desired address in the URL field NOTE The specified URL must be the address...

Page 73: ...dialog box 3 Click the Proceed to export button at the bottom of the Signage Manager Express screen 4 Finally click the Export button to upload the assets and template to the Digital Signage Player w...

Page 74: ...eekly schedule from scratch Let s look at an example 1 Select File New N to clear the current project 2 Select Weekly schedule mode from the Edit menu or select it from the drop down list at the top o...

Page 75: ...isted Mon Fri 9 00 am 9 00 pm 09 00 21 00 Sat Sun 10 00 am 8 00 pm 10 00 20 00 Let s make a simple change to the hours of operation on Sunday Instead of staying open until 7 00 pm let s change the clo...

Page 76: ...dit dialog 7 Click the drop down list for the end time hour from 20 8 00 pm to 17 5 00 pm 8 Click the OK button at the bottom of the Edit dialog Signage Manager Express Software Using Weekly Schedules...

Page 77: ...nday Screen off time block from 20 00 through 23 00 The time block will be outlined in red Signage Manager Express Software Using Weekly Schedules NOTE Both the Digital Signage Player with Wi Fi and D...

Page 78: ...the Edit button to edit the time block 12 Click the drop down list for the Screen off start time hour from 20 8 00 pm to 17 5 00 pm 13 Click the OK button on the Screen off dialog to save the changes...

Page 79: ...sented Add and Screen off 3 Click Add to display the Edit dialog box 4 Set the desired start time start day end time and end day 5 Click the OK button to save the changes The new time block will appea...

Page 80: ...dialog box will appear 3 Select the desired content from the file browser then clock the Open button to select the desired file 4 Click the Option button to change the playback attributes of the sele...

Page 81: ...On the right hand side of the screen under the Aspect ratio drop down list click the down arrow to expand the list of templates Once the list of templates is displayed click the second template as sho...

Page 82: ...connect the power to the Digital Signage Player 4 Wait approximately 10 seconds or until the Status LED flashes 5 Release the Reset button and wait for the Digital Signage Player to reboot The reboot...

Page 83: ......

Page 84: ......

Page 85: ...Digital Signage Player with Wi Fi 04 Appendix GPIO PCB Installation 76 Network Cable Diagram 78 Specifications 79...

Page 86: ...vices to existing Digital Signage presentations 1 Connect the included USB cable from one of the USB ports on the Digital Signage Player to the GPIO PCB as shown below 2 Connect open close switches to...

Page 87: ...page 77 Appendix GPIO PCB Installation NOTE It is recommended that multi core wires are used for installation...

Page 88: ...l signal 3 Green White RD Receive Data positive differential signal 4 Blue Unused 5 Blue White Unused 6 Green RD Receive Data negative differential signal 7 Brown White Unused 8 Brown White Unused CAT...

Page 89: ...female 1 x VGA HD 15 female 1 x 3 5mm mini stereo Composite A V USB 2 0 2 x Type A female Ethernet 1 x RJ 45 Compact flash slot 16 GB max Operational Wi Fi 802 11 b g n Wi Fi security WPA WPA2 TKIP A...

Page 90: ...power supplies 20600 Nordhoff St Chatsworth CA 91311 1 800 545 6900 818 772 9100 fax 818 772 9120 www gefen com ds gefen com Pb Stretch it Switch it Split it Control it Gefen s got it This product us...

Reviews: