Chapter 2 Installation Instructions
Section 1 Horizontal Display
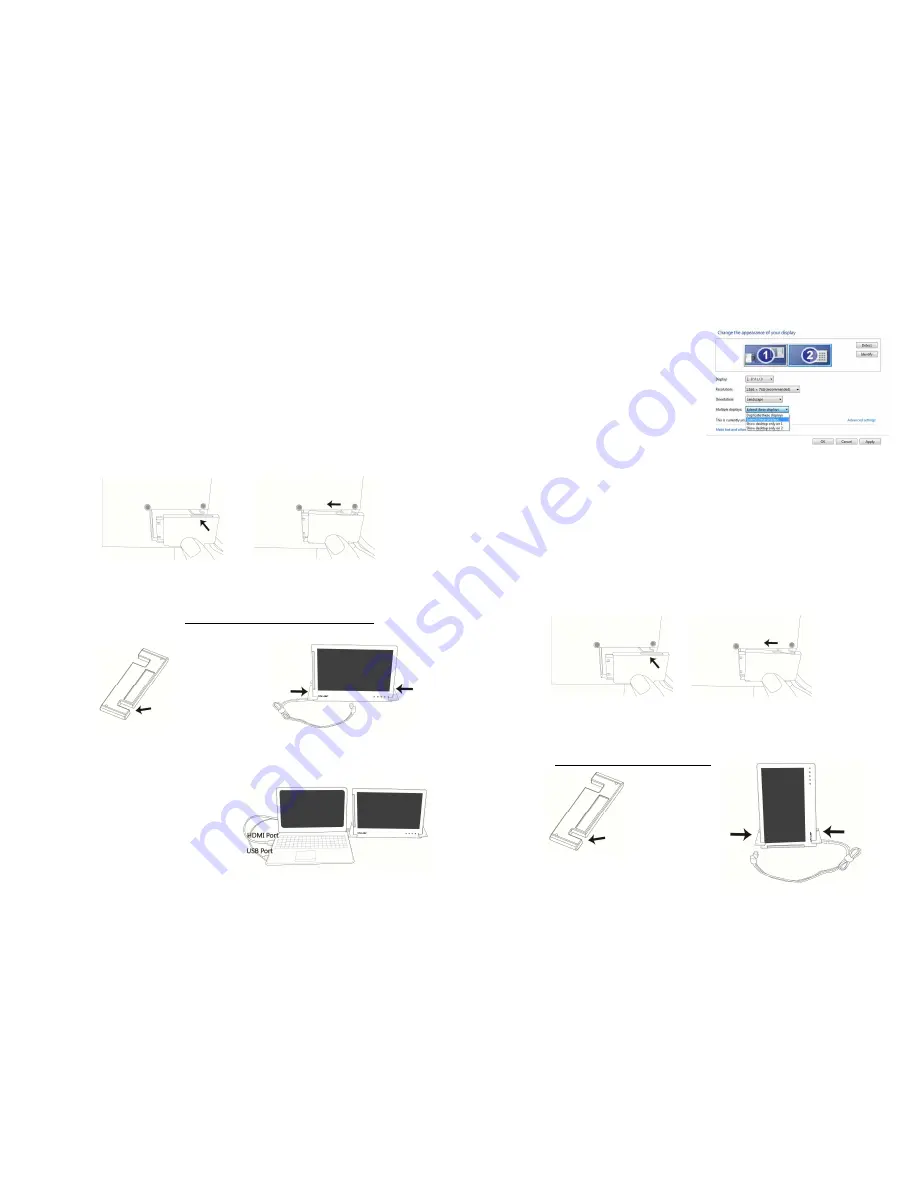
Step1. Install the video and USB power cable
If you wish to use the HDMI port on the laptop, please use Digital Video and USB-
Powered Cable. If you wish to use the D-sub (VGA) or mini-Display Port on the lap-
top, please purchase the Analog Video and USB-Powered Cable or mini-Display Port
and USB-Powered Cable.
Connect the Image and Power connector to On-Lap video port, (1) Insert the latch
into the groove of the video power connector. (2) Slide the video power connector
toward the leE for a proper connecon. [Warning: Not inserng the latch into the
groove may result in damage to connector. Please check the video power connector
is properly connected and not protruding out. If protrusion occurs, the connecon
might not be properly connected and monitor will not be able to operate.]
Picture: Insert the latch into the groove of the video power connector.
Fig.: Insert the latch into the groove of the video power connector of the On-Lap
Monitor
Step2. Install Stand Bricks
As illustrated, buckle the narrow opening [9 mm wide] of Stand Bricks to the leE and
right sides of On-Lap Monitor. Be careful not to interfere with the cable. Adjust the
posion of the Stand Bricks along the edge of the On-Lap Monitor to change the angle
between the Monitor and the table.
Fig.: Install Stand Bricks to the leE and right sides of On-Lap Monitor
Step3.Connect On-Lap Monitor to the laptop
Connect the USB power connector to the laptop's USB port, and then the digital video
connector to the laptop's HDMI video out-
put port (If Analog video and USB power
cable is used, connect the analog video
connector to the laptop's D-sub port). Tidy
the cables with cable clips.
Fig.: Horizontal display of On-Lap Monitor
Buckle the narrow opening
to the On-Lap Monitor
4
Step4. Make the laptop and monitor extension setting
(Refer to Secon 2 of Chapter 3 for monitor
display se,ng.)
AEer powering on the laptop, go to
Windows’ "Control Panel" to make the
monitor extension se,ng.
If you are using Windows 7:
Select "2.DVI LCD" (digital video) or
“2. display device: VGA” (analog video) for
Display.
Select "1366x768" for
Resoluon
Select "Landscape" for
Orientaon
Select "Extend these displays" for
Mulple
monitors
, and drag Display 2 to the right side
of Display 1.
Section 2 Vertical Display
Step1.
Install the video and USB power cable
If you wish to use the HDMI port on the laptop, please use Digital Video and USB-
Powered Cable. If you wish to use the D-sub (VGA) or mini-Display Port on the lap-
top, please purchase the Analog Video and USB-Powered Cable or mini-Display Port
and USB-Powered Cable.
Connect the Image and Power connector to On-Lap video port, (1) Insert the latch
into the groove of the video power connector. (2) Slide the video power connector
toward the leE for a proper connecon. [Warning: Not inserng the latch into the
groove may result in damage to connector. Please check the video power connector
is properly connected and not protruding out. If protrusion occurs, the connecon
might not be properly connected and monitor will not be able to operate.]
Picture: Insert the latch into the groove of the video power connector.
Fig.: Insert the video power connector to the video power port of On-Lap Monitor
Step2. Install Stand Bricks
As illustrated, place the On-Lap Monitor on the table in the vercal posion. Buckle
the narrow opening [9 mm wide] of Stand Bricks to the leE and right sides of On-Lap
Monitor. Be careful not to squeeze the cable
Fig.: Install Stand Brick to the leE and right
sides of the standing On-Lap Monitor
Buckle the narrow
opening to the On-Lap
Monitor
5


