background image

Table of Contents


Chapter 1 Content Descripon


P1 

        Secon 1 Noces for using On-Lap Monitor


P2 


Secon 2 Safety Instrucons


P2 


Secon 3 Safety Precauons


P2 


Secon 4 Product Maintenance


P2 

        Secon 5 LCD Pixel Statement


P2 


Secon 6 On-Lap Monitor and Accessories


P2 

Chapter 2 Installaon Instrucons


P4 

        Secon 1 Horizontal Display


P4 


Secon 2 Vercal Display


P5 


Secon 3 Upward Extension Display


P6 

  Secon 4 Dual Monitor Display 

P7 

Chapter 3 Power On and Off the On-Lap Monitor


P11 


Secon 1 Operang Instrucons


P11 


Secon 2 Monitor Display Se,ng


P11 

Chapter 4 Using with other 3C Products


P15 


Secon 1 Hot Keys  Descripon


P16 


Secon 2 OSD Descripon


P16 


Secon 3 Other Funcons of OSD


P19 

Chapter 6 Specificaon


P20 

        Secon 1 Plug and Play


P20 


Secon 2 Pin Assignment


P20 


Secon 3 Standard Default Modes


P21 


Secon 4 Troubleshoong


P21 

Chapter 5 Hot Keys and OSD Instrucons 

P16 

  Secon 5 Remove On-Lap Monitor’s Holder Plate


P10 

Chapter 1 Content Description  
Section 1 Notices for using On-Lap Monitor  

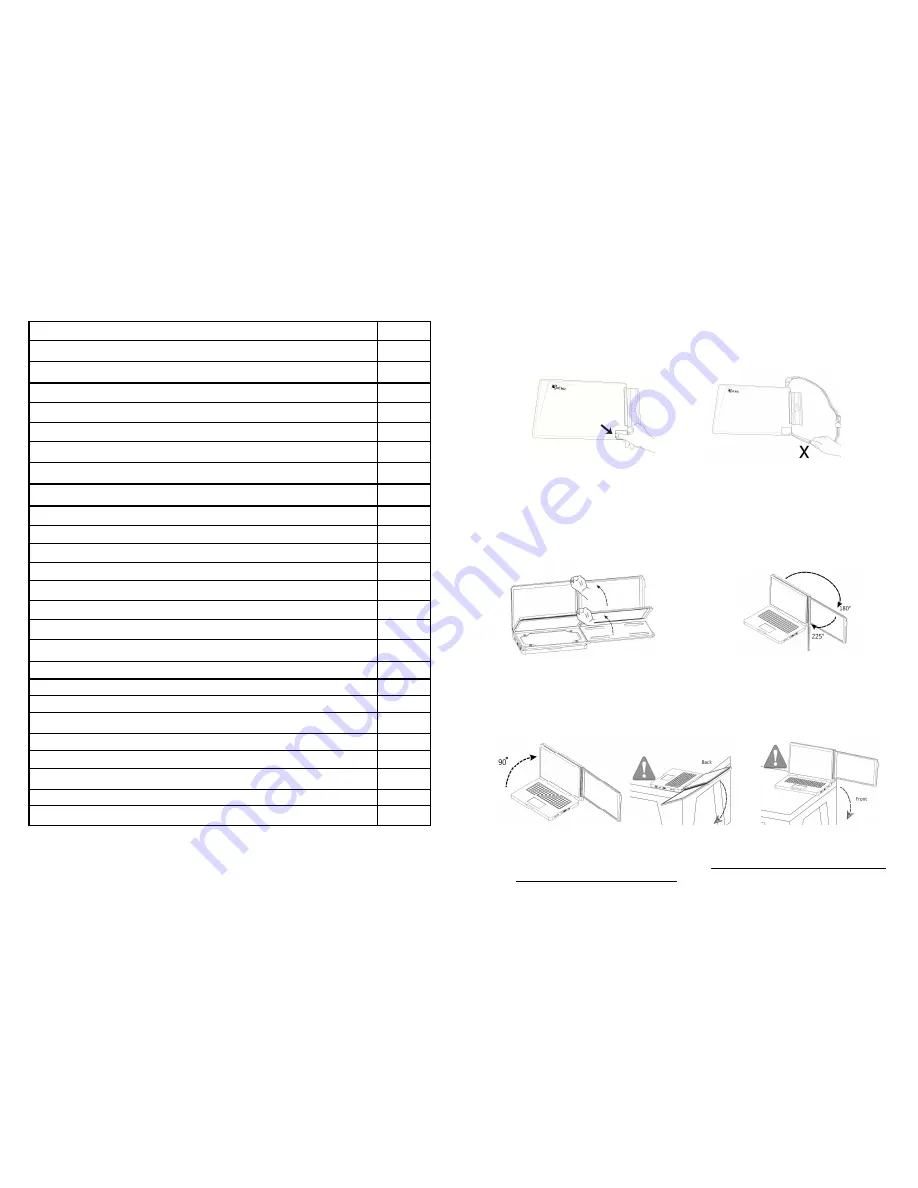
1.  The  cable  may  be  damaged  if  you  pull  it  out  by  force.  Please  push  forward  the   

protruding part between the video and power cable connector and the back cover 
of the monitor to get out the connector by finger p.


2.  Noce when installing the On-Lap Monitor onto your laptop: 


● 

Use the laptop and On-Lap Monitor on a level table. If the table is not level, 
the laptop and On-Lap Monitor may topple. 

3.  On-Lap  only reads DVI digital video signal; it does not support complete HDMI in-

terface and does not have a speaker.  

● 

When using On-Lap, flip open On-
Lap to a horizontal posion first, and 
then open the laptop’s monitor. 
Avoid knocking against objects on 
the table.


● 

As shown below, it is recommend-
ed  to  rotate  the  On-Lap  Monitor 
to  an  orientaon  viewable  to  the 
user  (i.e.,  angle  between  180°  - 
225°)


● 

Keep  the  laptop  away  from  the 
table  edge  to  prevent  it  from   
falling off the table if it topples.


● 

The  laptop’s  monitor  should  be   
posioned  in  an  upright  posion  to 
prevent  it  from  ppling.  If  the      
laptop’s  monitor  lts,  it  means  the 
laptop  might  not  be  able  to  sustain 
the weight.


Forbidden: do not unplug by pulling 
the cord. 

Fig.: Push out the connector using the 
finger p. 

Summary of Contents for OnLap 1302

Page 1: ...n 13F 4 No 367 Gongyi Road West District Taichung City 403 Taiwan R O C Customer Service service gechic com www gechic com Facebook Page www facebook com gechicen 1302 1501 User Manual Monitor Monitor...

Page 2: ...otices for using On Lap Monitor 1 The cable may be damaged if you pull it out by force Please push forward the protruding part between the video and power cable connector and the back cover of the mon...

Page 3: ...ated into the Product Section 5 LCD Pixel Statement The On Lap Monitor uses a high quality LCD panel Nevertheless there might be instances where defec ve pixels may occur however this will not a ect t...

Page 4: ...e clips Fig Horizontal display of On Lap Monitor Buckle the narrow opening to the On Lap Monitor 4 Step4 Make the laptop and monitor extension setting Refer to Sec on 2 of Chapter 3 for monitor displa...

Page 5: ...er viewing is poorer from the right side 6 Step2 Install Stand Bricks As illustrated place the On Lap Monitor on Stand Bricks II Note Center the On Lap Monitor for close ng with Stand Bricks II Fig Pl...

Page 6: ...the On Lap Monitor A recommended angle is between 180 and 225 4 Connect the video and power cable As illustrated connect the USB power con nector to the laptop s USB port and then the digital video co...

Page 7: ...try to liE up the Holder Plate directly with hands as it may result in deforma on of the Holder Plate for reuse 10 Chapter 3 Power On and Off the On Lap Monitor Section 1 Operating Instructions 1 Ini...

Page 8: ...Extend my Windows desktop to this monitor and then select OK and exit Note Ver cal mode cannot be directly chosen on Windows XP system the adjustment needs to be made via the video card Please refer...

Page 9: ...utput format and use not all prod ucts can make On Lap display full screen 1 Before using digital camera please purchase 5V portable baDery and HDMI to mini HDMI adapter Connec on Method On Lap USB po...

Page 10: ...ding For con nuous adjustment of Increase Up or Decrease Down press and hold the corresponding bu2on for automa c con nuous increase decrease 2 Color se ng Contrast Press to launch the OSD panel Press...

Page 11: ...tal signal as source of input Auto Search auto search for input signal Press to exit 18 Section 3 Other functions of OSD 1 Monitor State Explana on When there is no analog or digital input source the...

Page 12: ...ection 4 Troubleshooting 1 With Digital video cable 2 With VGA cable Problem Screen Display Solu on No screen image Please check if the video and USB power plug is correctly connected to the On Lap Mo...

Reviews: