background image

Chapter 6 Specification 

Section 1 Plug and Play


The On-

Lap Monitor conforms to VESA DDC standard and supports VESA DDC2.  DDC2B 

is a bi-

direconal data channel based on I

2

C protocol. The host can request EDID infor-

maon over the DDC2B channel. The On-Lap Monitor is able to inform the host system 
of its identy, and depending on the level of DDC used, communicate addional infor-
maon about its display capabilies. 

Section 2 Pin Assignment 

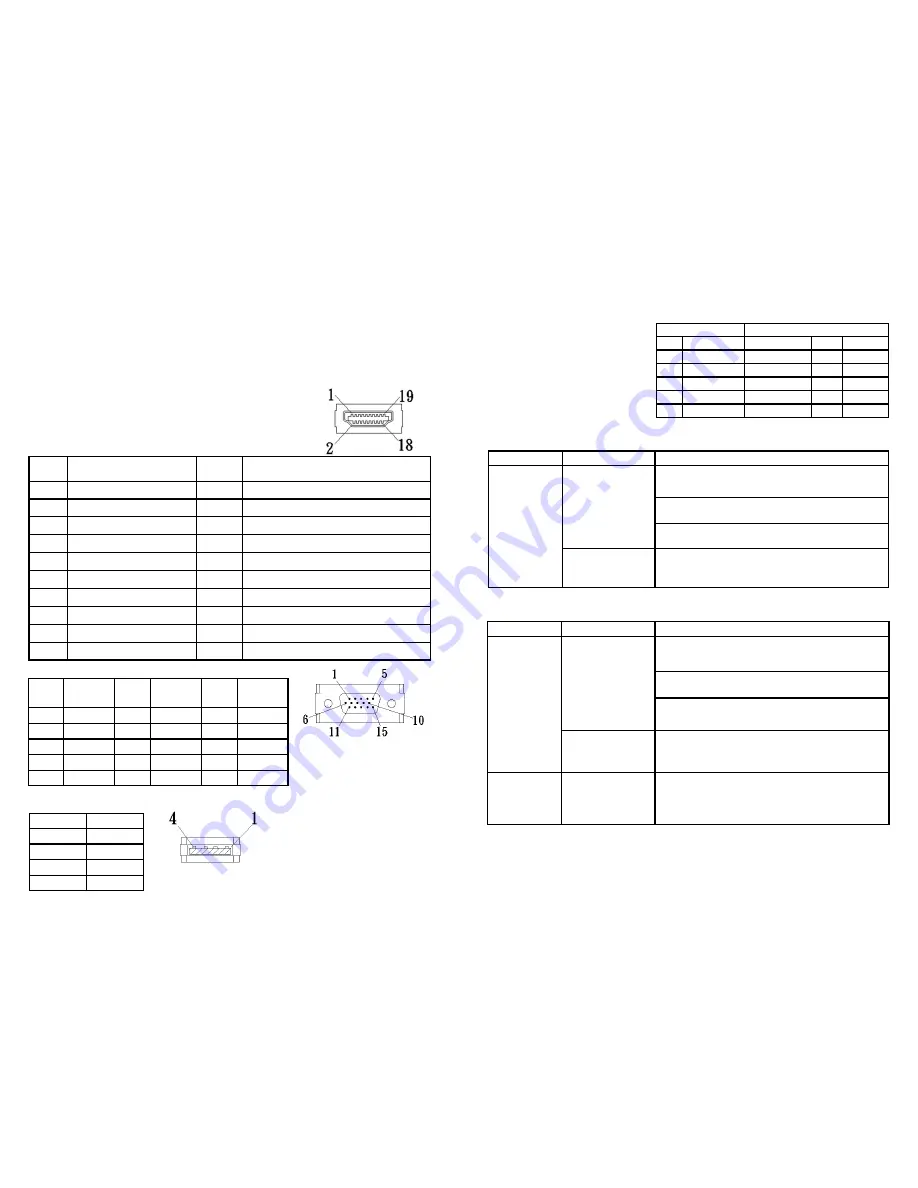
1.  Digital video connector 

Pinout


Fig.: Digital video connector 
(Connect to PC’s HDMI port) 

Pin 

No.


Name


Pin 

No.


Name


1


TMDS Data2+


11


TMDS Clock Shield


2


TMDS Data2 Shield


12


TMDS Clock


3


TMDS Data2


13


Reserved


4


TMDS Data1+


14


Reserved


5


TMDS Data1 Shield


15


SCL (I C Serial Clock for DDC)


6


TMDS Data1


16


SDA (I C Serial Data Line for DDC)


7


TMDS Data0+


17


DDC Ground


8


TMDS Data0 Shield


18


+5 V Power


9


TMDS Data0


19


Hot Plug Detect


10


TMDS Clock+


2.  VGA Connector Pinout 

Fig.: VGA Connector 
(Connect to PC’s VGA 

port) 

Pin 

No.


Name


Pin 

No.


Name


Pin 

No.


Name


RED 

RGND 

11 

NC 

GREEN 

GGND 

12 

SDA 

BLUE 

BGND 

13 

HSYNC 

NC 

+5V 

14 

VSYNC 

GND 

10 

SGND 

15 

SCL 

3. 

USB Power Cable Connector Pinout


Pin No.


Name


1


Vcc(+5V)


2


NC


3


NC


4


Ground


Fig.: USB Power Cable 

(Connect to 5V DC Power) 

20 

Display Mode


Resoluon


MAC 

640x480 

60 

Hz 

VESA 

720x400 

60 

Hz 

SVGA 

800x600 

56 

Hz 

SVGA 

800x600 

60 

Hz 

XGA 

1024x768 

60 

Hz 

WXGA 

1366x768 

60 

Hz 

Section 3 Standard Default Modes 


Section 4 Troubleshooting 

1. 

With Digital video cable


2. 

With VGA cable


Problem


Screen Display


Soluon


No screen 

image


Please  check  if  the  video  and  USB  power  plug  is 
correctly  connected  to  the  On-Lap  Monitor’s  
video power port. 
Please check if USB power cable is connected to a 
5V DC power source. 

Please adjust Brightness and Contrast se,ngs, or 
reset them to factory default via OSD. 

OSD shows “No 
Signal” warning


Please check if Digital video cable is correctly con-
nected to On-Lap Monitor’s video input port and 
computer’s HDMI output port. 

Blank screen 


Problem 

Screen Display 

Soluon 

No screen 
image 

Please  check  if  the  video  power  plug  is  correctly 
connected  to  the  On-Lap  Monitor’s  video  power 
port. 

Please check if USB power cable is connected to a 
5V DC power source. 

Please adjust Brightness and Contrast se,ngs, or 
reset them to factory default via OSD. 

OSD displays “No 
signal” warning 

Please check if Digital video cable is correctly  
connected to On-Lap Monitor’s video input port 
and computer’s VGA output port. 

Abnormal 
screen  image 

Image disappears 
or  image size is 
too big, too small, 
or image is not 
centralized 

Please adjust resoluon, clock, horizontal        
posion and vercal posion via OSD. 

Blank screen  

21 

3. 

If  your  laptop  does  not  have  the  opon  of  “Duplicate  these  displays”,  “Extend   
these displays” or “portrait”, it could be limited by the graphics chip of the  laptop, 
or the graphics chip funcon is limited by the laptop’s power saving mode, or the 
graphics  chip  driver  needs  an  update.  It  is  recommended  that  you  seek  technical 
support from your laptop manufacturer or graphics chip maker

.


Summary of Contents for OnLap 1302

Page 1: ...n 13F 4 No 367 Gongyi Road West District Taichung City 403 Taiwan R O C Customer Service service gechic com www gechic com Facebook Page www facebook com gechicen 1302 1501 User Manual Monitor Monitor...

Page 2: ...otices for using On Lap Monitor 1 The cable may be damaged if you pull it out by force Please push forward the protruding part between the video and power cable connector and the back cover of the mon...

Page 3: ...ated into the Product Section 5 LCD Pixel Statement The On Lap Monitor uses a high quality LCD panel Nevertheless there might be instances where defec ve pixels may occur however this will not a ect t...

Page 4: ...e clips Fig Horizontal display of On Lap Monitor Buckle the narrow opening to the On Lap Monitor 4 Step4 Make the laptop and monitor extension setting Refer to Sec on 2 of Chapter 3 for monitor displa...

Page 5: ...er viewing is poorer from the right side 6 Step2 Install Stand Bricks As illustrated place the On Lap Monitor on Stand Bricks II Note Center the On Lap Monitor for close ng with Stand Bricks II Fig Pl...

Page 6: ...the On Lap Monitor A recommended angle is between 180 and 225 4 Connect the video and power cable As illustrated connect the USB power con nector to the laptop s USB port and then the digital video co...

Page 7: ...try to liE up the Holder Plate directly with hands as it may result in deforma on of the Holder Plate for reuse 10 Chapter 3 Power On and Off the On Lap Monitor Section 1 Operating Instructions 1 Ini...

Page 8: ...Extend my Windows desktop to this monitor and then select OK and exit Note Ver cal mode cannot be directly chosen on Windows XP system the adjustment needs to be made via the video card Please refer...

Page 9: ...utput format and use not all prod ucts can make On Lap display full screen 1 Before using digital camera please purchase 5V portable baDery and HDMI to mini HDMI adapter Connec on Method On Lap USB po...

Page 10: ...ding For con nuous adjustment of Increase Up or Decrease Down press and hold the corresponding bu2on for automa c con nuous increase decrease 2 Color se ng Contrast Press to launch the OSD panel Press...

Page 11: ...tal signal as source of input Auto Search auto search for input signal Press to exit 18 Section 3 Other functions of OSD 1 Monitor State Explana on When there is no analog or digital input source the...

Page 12: ...ection 4 Troubleshooting 1 With Digital video cable 2 With VGA cable Problem Screen Display Solu on No screen image Please check if the video and USB power plug is correctly connected to the On Lap Mo...

Reviews: