


D-6
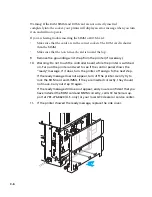
Move guide to fit
the length of
the envelope.
Load the envelopes so the flaps
are facing the bottom of the tray
and the top edge of the envelopes
are facing the right side of the tray.
Right side
Squeeze handles and
slide guides to fit
width of envelope.
6.
Adjust the length and width guides so that they fit snugly against the
envelope, but not so tightly that they might cause binding.
To avoid envelope jams, be sure to set the length and width guides to the correct
positions for your particular envelope.
7.
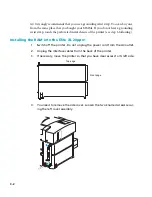
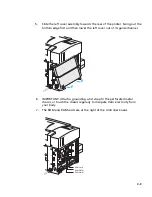
Attach the plastic cover on the front of the envelope cassette and insert
the envelope cassette into the 500-sheet feeder.
Setting default paper trays through the control panel
You may want to make the 500-sheet paper tray your default paper tray. This means
that it will appear as the default choice in application’s Print dialog boxes.
You can make the 500-sheet tray the default by using the printer’s control panel.
Briefly, you take the printer offline, choose the Paper Handling menu and select Tray
2 from the Default Source submenu. Full details of how to change menu settings are
in the section of this manual under “Control Panel”.
You can change the settings in the control panel before you carry out the software
updates on computers. If you decide to change the settings on the printer after you
have updated the software on the computers, you will have to update the software
again.
Summary of Contents for Elite XL 20ppm
Page 1: ...USER S MANUAL GCC TECHNOLOGIES EliteTM XL20ppm ...
Page 168: ...A 5 G H F Skew 2 0mm 0 0787in E 2 0mm 0 0787in E F G H 245mm Paper feed direction ...
Page 172: ...A 9 Squareness 1 3mm 0 0512in J 1 3mm 0 0512in K L M 210mm M L Paper feed direction K J 90 ...
Page 187: ...D 3 On Line Comm Paper Servic e ...


