


30
Replacing or Adding System Components
Adding a 5.25-inch or 3.5-inch removable
media drive
You can use the additional, externally accessible, upper drive cage to install
(1-inch height and 1.6-inch half-height) 5.25-inch or 3.5-inch removable
media drives, such as a tape drive, a CD-RW drive, or a high capacity disk
storage drive. This procedure covers adding both types of drives.
To install an additional drive:
1
Observe the safety and ESD precautions in “Preventing static electricity
discharge” on page 15.
2
Turn off the server, then disconnect the power cord(s), modem cable (if
installed), and all external devices.
3
Remove the cover panel. (See “Removing the cover panel” on page 17.)
4
Remove the bezel. (See “Removing the bezel” on page 19.)
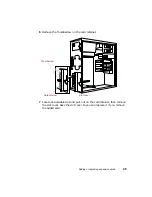
5
Remove the appropriate plastic bezel insert covering the drive bay by
pressing the retaining tab and pulling the insert out from the back of
the bezel. Save the insert so that you can replace it if you remove the
added drive.
5.25-inch insert
3.5-inch insert
Summary of Contents for 910 Series
Page 1: ...8508341 Gateway 910 Series System Manual September 2001 ...
Page 6: ...iv Contents ...
Page 22: ...14 System Setup ...
Page 26: ...18 Case Access 7 Lift the back edge of the cover panel then remove the panel from the server ...
Page 28: ...20 Case Access 3 Swing the bezel outward and disengage the bezel from the hinges ...
Page 100: ...92 Troubleshooting ...
Page 112: ...104 Safety Regulatory and Legal Information ...
Page 122: ...114 Reference Data ...