


-32-
PURPO
PURPO
PURPO
PURPOSE:
SE:
SE:
SE: Cloning a hard drive completely formats that drive and copies system files from the recorder. All files that were
on the cloned drive will be lost and a fresh system is copied onto it.
PROCEDURE:
PROCEDURE:
PROCEDURE:
PROCEDURE:
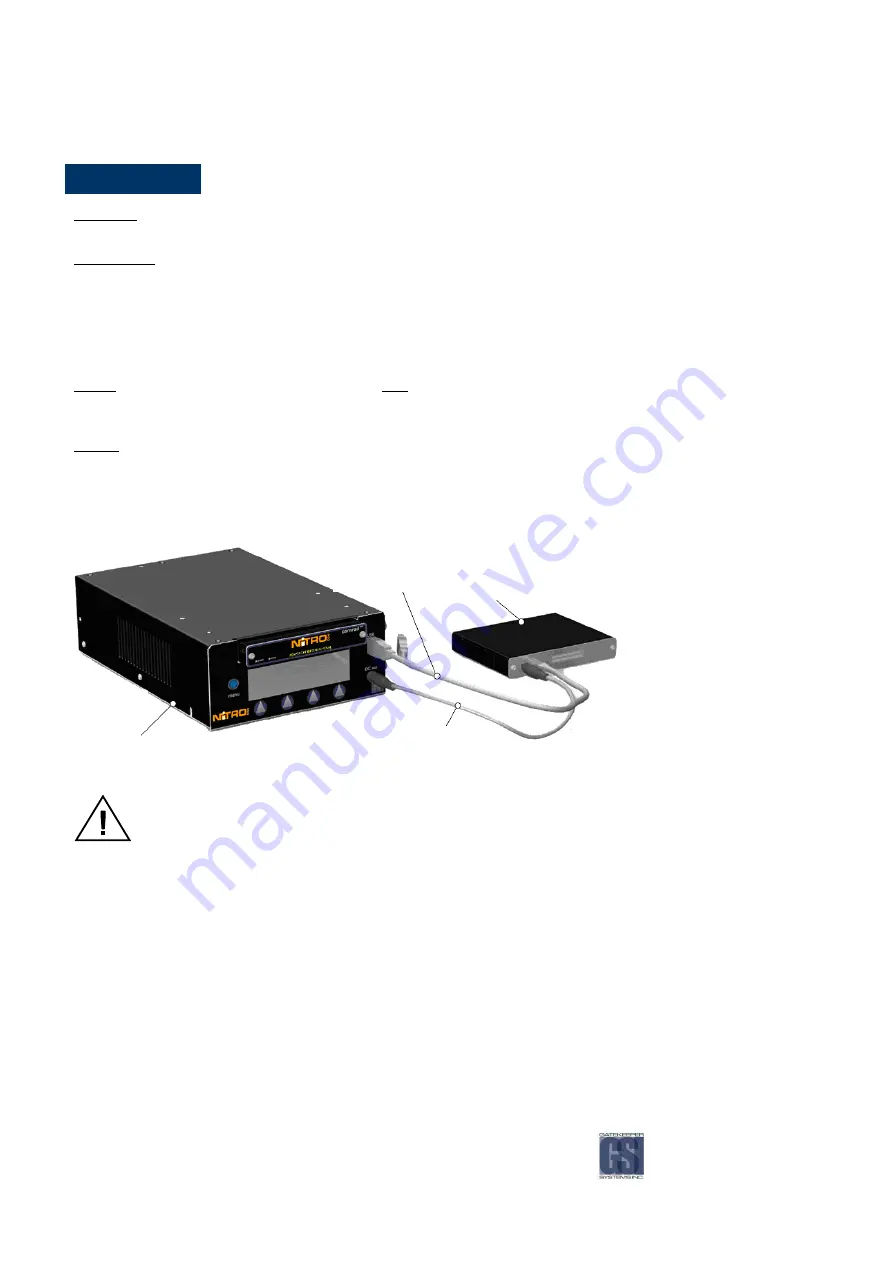
Connect the corrupt comrad™ to the front USB port of the recorder via a Dual Head USB 2.0 cable. Apply power
to the comrad™ either from the front DC Output with a DC to DC Cable or from the comrad™ power supply (12V,
3A).
When the drive is connected, one to three beeps will be heard to indicate the connection. The hard drive that will
be formatted is the one connected to the USB port.
The message “Clone HD to USB” will be shown. Press OK to begin the cloning process. The cloning process will
take several minutes and “Cloning…” will be displayed on the LCD while it is being cloned.
ENTRY
ENTRY
ENTRY
ENTRY: Press ‘Go’ to enter Clone menu. Press
OK to begin cloning the hard drive.
EXIT
EXIT
EXIT
EXIT: When the cloning process is complete the menu ends up on the
Clone HD to USB menu. Press cancel or the blue menu button to exit
the Clone menu.
OTHER:
OTHER:
OTHER:
OTHER: The Cloning feature is used to repair
corrupt hard drives or to upgrade other units.
Remember, cloning will format the drive first, so
do not use clone if you want to keep the video
stored on the drive.
When using the Dual Head USB Cable, ensure that the main head (the
one with two wires coming out of it) is plugged into the system.
Figure
Figure
Figure
Figure 18
18
18
18: Cloning a
: Cloning a
: Cloning a
: Cloning a comrad
comrad
comrad
comrad™
™
™
™....
The NiTRO™ System is incompatible with GSX System. Do not clone from a GSX System to a NiTRO™ System
or from a NiTRO™ System to a GSX System. Do not plug the GSX comrad™ into the front of the NiTRO™
System or plug the NiTRO™ comrad™ into the front of the GSX System.
Recording
Recording
Recording
Recording....
By default, the system will begin recording upon startup of the Bus. If you need to leave the record menu to playback video
or configure the system, follow the directions below to begin recording again.
Start Recording
Start Recording
Start Recording
Start Recording....
Go to Record Menu, press Go. The system will start to record. While the system is in record mode, the Record menu is
displayed on the LCD screen.
CLONE
Working
Working
Working
Working
System
System
System
System
DC
DC
DC
DC –
–
–
– DC Cable
DC Cable
DC Cable
DC Cable
Dual
Dual
Dual
Dual head
head
head
head
USB Cable
USB Cable
USB Cable
USB Cable
Corrupt
Corrupt
Corrupt
Corrupt
comrad™
comrad™
comrad™
comrad™
Summary of Contents for Digital Smart Recorder NiTRO 900
Page 1: ...NiTRO 900 Manual Version 1 8 1 1 Safety Security Peace of Mind...
Page 58: ...58 Notes Notes Notes Notes...
Page 59: ...59...
Page 60: ...60...


