background image

                                                                                                Page 11    /    19 

Operating Instructions 

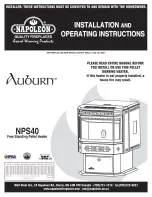
BUTTON AND INDICATOR LIGHT


1. POWER LIGHT 

2.    ALARM    LIGHT 

3.    ON/OFF BUTTON 

4. MODE TRANSFER BUTTON: 

Set the unit’s to one of three main modes settings: Manual, Temp, and 

Weekly.   

5. TIMER BUTTON:


Order the start time or shutdown time of the unit: Press Timer, then set the period of 

time  you  needed,  attention:  the  maximum  is  7  hours.  Minimum  is  1  hour.  After 
setting 5 seconds later, the stove will be inactive; it will follow your set time.       


6. HOLD BUTTON: 

POWER 
LIGHT 

ON/OFF 

TIMER 

ALARM   
LIGHT 

MODE 

TRANSFER 

BUTTON 

HOLD 

SET 

DOWN 

UP 

CONCEL 

Infrared 

Receiver 

Summary of Contents for HP24

Page 1: ...estrictions and installation inspection requirements in your area PLEASE READ THIS ENTIRE MANUAL BEFORE INSTALLATION AND USE OF THIS PELLET BURNING ROOM HEATER FAILURE TO FOLLOW THESE INSTRUCTIONS COU...

Page 2: ...6 9 Troubleshooting 17 10 Warranty 18 11 Figure Electricity control 19 Technical Specification Stove Mass 98 kg Nominal output Maximum setting Total Efficiency 92 3 Nominal Heat Output 9 4 kW Mean CO...

Page 3: ...ed pellet type P F I PELLET STANDARDS Fines fine particles 1 maximum through a 3 mm 1 8 screen Bulk Density 650 kg m3 minimum Size 6 mm to 8 mm diameter 12mm to 35 mm long Ash Content 1 maximum Premiu...

Page 4: ...s The stove s exhaust system works with negative combustion chamber pressure and a slightly positive chimney pressure A chimney draught of 12 Pa can be regarded as typical when operating at maximum ou...

Page 5: ...sposed ashes should be placed in a metal container The closed container of ashes should be on a non combustible floor on the ground well away from all combustible materials pending final disposal If t...

Page 6: ...T DO NOT CONNECT THIS UNIT TO A CHIMNEY FLUE SERVING ANOTHER APPLIANCE FRESH AIR Outside Fresh Air connection is optional It must be connected to all units installed in Mobile and Air Tight Homes R200...

Page 7: ...ature is still above 120 F 52 C Product performance The pellet stove has an advanced designed and has individual fresh air input and venting system Negative pressure burning technology causes high eff...

Page 8: ...clearance between the walls or to the top should be no less than the size in the figure Min installation clearance mm 2 Electrical The unit must be grounded earthed The grounded electrical cord should...

Page 9: ...fumes into the room The stove air input pipe diameter is 50 mm venting pipe diameter is 80 mm The total length of pipes is not longer than 3m Indoor venting pipe joint should be sealed by silicone sea...

Page 10: ...Page 10 19...

Page 11: ...l Temp and Weekly 5 TIMER BUTTON Order the start time or shutdown time of the unit Press Timer then set the period of time you needed attention the maximum is 7 hours Minimum is 1 hour After setting 5...

Page 12: ...WEEKLY PROGRAMMER Temperature Units Blower Voltage and Exhaust Voltage Restore default setting and use Diagnostic platform are also access 8 CONCEL BUTTON 9 UP AND DOWN BUTTON Three status s descript...

Page 13: ...TEMPERATURE 5 MAIN MODE HEATING POWER LEVEL IGNITOR COMBUSTION BLOWER blower AUGER CONVECTION BLOWER VACUUM SWITCH LIMIT SWITCH ON OFF STATE ADDITIONAL CONTROL MODE MAIN MODE DATE and TIME WORK STAGE...

Page 14: ...The stove will power off and the fire will be put out when the auger motor stops b The stove will power off and the fire will be put out when the convection blower stops c Auger motor stops feeding w...

Page 15: ...round the stove when it is operating 3 When installing this unit on a combustible floor for example linoleum hardwood flooring a non combustible hearth pad 15mm thickness with sufficient load bearing...

Page 16: ...way any fly ash that may have collected on the heat exchanger tubes 5 Put the ash in the ash drawer out TIMELY 6 When the appliance is not to be used for a long time it should be cleaned completely Es...

Page 17: ...ht the high temperature switches connection Change the high temperature switch D Three lights aren t bright No 220V power Pellet feeder is power off The wires of start and clock unit loose or break Ch...

Page 18: ...own the blower Clean the heat exchange tubes 8 Ash and smoke fly out Leak between the connection of convection motor and venting pipe The clean method is wrong Use silicon rubber to seal Clean the dus...

Page 19: ...Page 19 19...

Reviews: