


VRT Hydraulic Drive
– Monitor Setup
Page 69
02/10
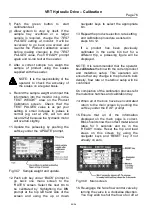
6. Repeat this process to enable all
remaining bins. Set the pasture planter,
if fitted, as the Auxiliary bin. The
example shown below (Fig. V13) shows
a typical 2 bin air seeder fitted with a
pasture planter.
Fig. V13 Setup screen complete.
7. Next, set machine options from the
‘OPTION’ screen.
Fig. V14 Option screen.
8. Set the correct time and date on the
‘CLOCK/GPS’ screen. The GPS status
should be disabled if this function is not
going to be used. Push the soft key to
the left of the GPS prompt. Continue
pressing
the
soft
key
until
the
‘DISABLED’ or ‘ENABLED’ zone is
highlighted. Now use the navigator keys
to change the status of the GPS system.
9. Set
all
seeder
alarms from
the
‘ALARMS’ screen. Refer ALARMS
Settings section beginning this page.
10. Set the specific machine settings in the
‘MACHINE’ screen. Refer MACHINE
Settings on page 70.
The monitor is now ready for operation. The
next step is to calibrate the seeder with the
product to be sown. Refer to the Calibration
Procedure section starting on page 74.
Note: For further information on the monitor
refer to the Farmscan Operator’s manual, as
supplied with the machine.
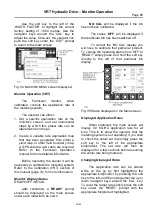
ALARM Settings
Alarm settings are normally factory set.
These can be adjusted or disabled at
anytime. Enter the ‘ALARMS’ screen from
the ‘MENU’ screen. Factory settings for
alarms are:
FAN
2000
4600
Enabled
low alarm
high alarm
AIR
0.0
20.0
Enabled
low alarm
high alarm
DEPTH
(
)
0
Disabled
hold
(
)
A Depth indicator can be fitted as an
option on VRT equipped seeders. Disable if
not in use.
Fig. V15 The first Alarms screen of 3.
Press the soft key under ‘NEXT’ prompt to
progress to the next alarm’s screen.


