General Maintenance
Page
128
01/10
End of Season Checklist
At the end of the season ensure that
the seeder is cleaned of all product and
mud. Some fertilisers are very corrosive
and can reduce the life of the seeder if left
in contact with steel surfaces.
Refer to the Storage and Cleaning
section for a full description.
1.
General Checklist.
Inspect tyres for wear or damage
and check tyre pressures.
Inspect all gaskets on hatches for
wear and damage.
Inspect bins and seals for damage
(bins must be air tight).
Check that all bearings on the
meterbox and drive system are
serviceable and greased.
Check the nose bearing on the end
of the metershaft is serviceable and
greased.
Check sprockets and chains for wear
and lubricate.
Replace oil filter if it has been used
for more than two years.
Check hydraulic hoses for external
damage.
Release oil pressure in hydraulic
hoses
when
disconnecting
breakaway fittings.
Pre-Season Checklist
1.
Variators and Drive System
Inspect both input and output
shafts on variators for rust.
Check variator oil seals for leaks.
Replace oil in variator if
contamination may have occurred
due to condensation or faulty
seals. (Refer page 61).
Lubricate all chains.
Check chains for tension and
alignment.
2.
General
Check meterbox is free of fertilizer
and seed.
Check meterwheels are clean.
Check metershafts turn freely.
Grease all meterbox bearings.
Check the nose bearing on the end
of the metershaft is serviceable.
Check calibration system turns
freely.
Replace the hydraulic oil filter if
necessary.
Check meterbox hatch seals.
Check clutch bolt is tight (g/drive).
Grease all drive shaft bearings.
Check tyre pressures (refer to the
specification pages for the specific
machine and tyre size pages 8-14).
Check calibration scale accuracy
(refer checking procedure below.
Charge internal battery on scales.
Calibration Scale Accuracy Checking
Procedure:
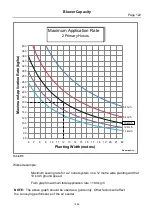
The scales have been provided with a
non-certified 2kg test weight that should be
accurate
enough
for
most
seeding
operations. Use the 2kg sample as a base
weight and add extra weight to check the full
range eg. Check 2 kg weight reads within 5
grams. Remove weight and add 2 kg of
product. Now place the weight back on the
scales to ensure the load indicated increases
by 2kg plus or minus 5 grams. Continue
process until the top limit of the scales is
reached.
Fig. GM3- Scale Test Weight being used.

