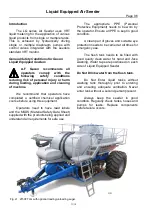
Liquid Equipped Air Seeder
Page
97
11/15
General Start Up Instructions
Place at least 200 litres of liquid in the
tank ensuring main supply taps are switched
on before operating. Pumps should not be
operated dry for more than 2 minutes.
Connect the liquid pump hydraulic
hoses to the tractor. Note the pressure line
is marked with a red tie. Reduce the
hydraulic flow setting from the tractor before
engaging.
The Canlink 3500 Monitor can be set
to display pump speed by selecting Fan 2
on the main screen. For pump speed see
Table L2.
Low Application
Rates
300
– 350 RPM
Medium Application
Rates
350
– 400 RPM
High Application
Rates
400
– 450 RPM
Table L2
During
initial
start-up,
the
main
pressure gauge on the pump unit should
read below 1 Bar. The pressure gauge on
Pump 2 (if fitted for Extra Agitation) should
read between 3 and 5 Bar. For further
information on high system pressure refer
Trouble Shooting section.
Operating Machine
P
P
o
o
t
t
t
t
e
e
s
s
t
t
i
i
n
n
g
g
o
o
f
f
l
l
i
i
q
q
u
u
i
i
d
d
p
p
r
r
o
o
d
d
u
u
c
c
t
t
s
s
.
. To
ensure compatibility of liquid products being
used in the Liquid Equipped Seeder it is
recommended that the operator perform a
compatibility test also referred to as a liquid
pot test or jar test. To do this use a bucket
or jar mixing a small sample of each
chemical including water in the same
proportion and order as the mix to be
applied. The bucket/jar is then left to stand
for several hours and observed to determine
compatibility. If products separate or crystals
are formed then it may be necessary to
review mixture.
Tank mixing additives. When additional
chemicals are added directly to the seeder’s
tanks, always add an equal quantity to both
tanks. If additional chemicals are added to
1 tank only, allow at least 45 minutes of
pump operation before applying product.
Cleaning filters. Filters need to be
cleaned regularly. Efficient operation will
occur if filters are kept clean. Refer table for
filter specification:
Suction Filter
32 Mesh
Pressure Filter
50 Mesh
Distribution filter
100 Mesh
Table L3
Distribution
flush
procedure.
The
following procedure will reduce the amount
of fresh water transfer into the main fertilizer
tanks.
1.
Set
the
liquid
pump
speed
to
approximately 100
– 200 rpm by adjusting
the oil flow at the tractor. (Running the pump
at a slow speed will keep pressure below 6
Bar and ensure PRV doesn’t send fresh
water to the fertilizer tanks).
2. On the monitor.
a)
Go to the ‘RATES’ page.
b)
Select ‘BIN 1’ (liquid tank) to be flushed.
c) Press
‘CALIB PROD’ to go to the Product
Calibration page.
d) Press
‘FLUSH’ this will close the bypass
valve and open the shutoff valve directing all
flow to the implement. Note: product will
start flowing through to the implement.


