background image

1556800.REV 

C     SmartScan 

User 

Manual 

13


6. 

Open the 

SmartScan

 door panel, remove the  

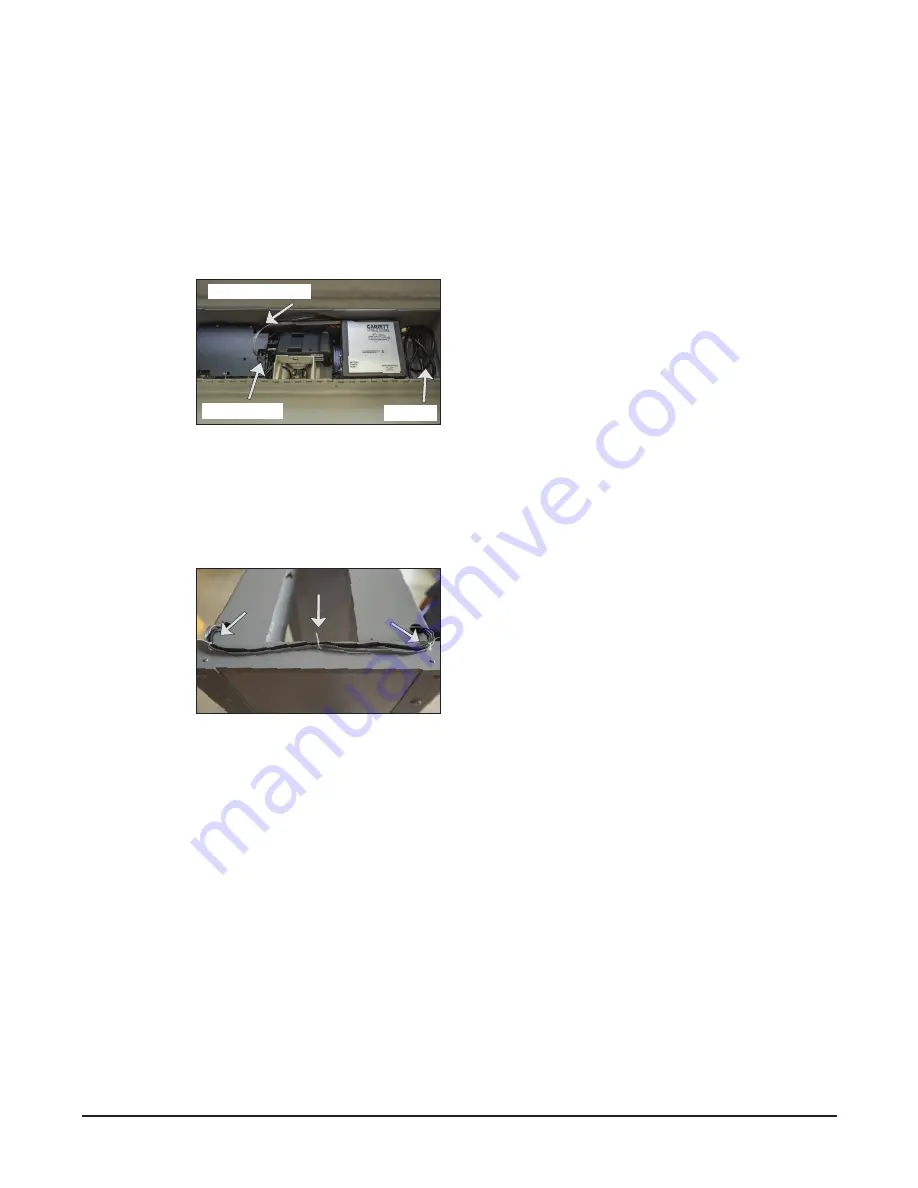
    rubber plug and feed both the power and the  

    RS485 cables through the hole into the 

Smart- 

   Scan

 detection unit. Run the power cable over the  

    battery source and plug it in behind the controller  

    cover. Next, plug the RS485 cable into the 

Smart- 

   Scan

 controller board. Organize loose cable into  

    the small open area underneath the feed through  

    hole. Close the 

SmartScan

 door panel. (Figure  

   2-9).


7.

 Remove and reuse the screws to mount the  

    provided tie anchors in the locations indicated by  

    the arrows in Figure 2-10. Once anchors are  

    screwed in place, secure the loose wires to the  

    anchors using the cable ties provided. 


8.

 Reconnect the AC power to the wall outlet and  

    turn on the PD 6500i/MZ 6100 walkthrough  

   unit.

STABILIZING

The 

SmartScan

-enable walk-through metal detector may 

be bolted directly to the floor using the holes in the unit’s 

boot. Alternately, optional adhesive mounting plates or 

stabilizer bar may be used.

  Stabilizing the unit is particularly important in loca-

tions where the floor slopes or tilts, disorderly crowds, 

high winds, etc., are possible. It is recommended that the 

unit be tested for functionality and interference prior to 

permanent mounting.

INSTALLATION COMPLETION

Complete installation of the 

SmartScan

 Thermal Screen-

ing Unit by warming up the system and conducting  

ten sample screenings. This process is fully described in 

"Operation" (Section 6 of this manual). 


SmartScan

 does not ship with a fully charged battery. 

It is therefore important to fully charge it before using 

without AC connected. While 

SmartScan 

is now ready 

for use, it is important to initially operate on AC power 

to allow for at least 16 hours to fully charge the battery 

before using remotely without AC.

Installation

Loose cable

Power cable connection

RS485 connection

FIGURE 2-10

Summary of Contents for SmartScan

Page 1: ...curity garrett com Phone 800 234 6151 US Canada INTERNATIONAL CUSTOMERS Garrett Metal Detectors International Division 1881 W State Street Garland TX 75042 6797 USA Email international garrett com Pho...

Page 2: ......

Page 3: ...Warning Battery Safety The SmartScan system contains batteries that require proper disposal Caution Do not short circuit Serious burns may result Caution Do not dispose of batteries in a fire They may...

Page 4: ...e to radio communications However there is no guarantee that interference will not occur in a particular installation If this equipment does cause harmful interference to radio or television reception...

Page 5: ...ls 15 4 DEFAULT SETTINGS INFORMATION DISPLAYS 16 Default Settings 16 Information Displays 16 Settings 17 5 MULTIPLE UNIT SITE INSTALLATION 20 6 OPERATION 21 Operational Startup 21 Operational LED Indi...

Page 6: ...or powering on and off the system as well as battery health Power SmartScan comes with a 14Ahr battery and has the ability to run on AC power alone or on battery backup for up to 8 hours of uninterrup...

Page 7: ...ght or large objects with temperatures greater than the operating temperature may affect tempera ture readings Cold air blowing in front of Smart Scan should be avoided as this may alter temperature r...

Page 8: ...Ray or Search Table Detector Operator 12 30 cm min Bag Screener X Ray or Search Table Detector 12 30 cm min Bag Screener Pacer Traffic Flow 10 304 8 cm min 30 Pacing Line SUGGESTED SINGLE LANE CONFIGU...

Page 9: ...m min Bag Screener Bag Screener Pacing Line Pacer Traffic Flow 10 304 8 cm min Pacing Line Pacer Traffic Flow 10 304 8 cm min Pacing Line Wanding Temp Check Area Wanding Temp Check Area Wanding Temp C...

Page 10: ...Detector Detector Bag Screener Bag Screener Bag Screener Operator Operator X Ray or Search Table X Ray or Search Table X Ray or Search Table 12 30 cm min 12 30 cm min 10 304 8cm min Pacing Line Traffi...

Page 11: ...11 CONTENTS PARTS LIST Contents 1 Power cord jumper 2 RS485 cable 3 Warranty card 4 Quick Start guide 5 Wire ties and tie anchors 1 Power cord jumper 1 Warranty Card 1 Quick Start Guide 1 RS485 cable...

Page 12: ...oning its mounting holes onto the screws and then partially tightening them Stand the walk through unit up and then fully tighten the SmartScan mounting screws to ensure the walk through unit is level...

Page 13: ...rough metal detector may be bolted directly to the floor using the holes in the unit s boot Alternately optional adhesive mounting plates or stabilizer bar may be used Stabilizing the unit is particul...

Page 14: ...ill decrease as each sample is taken Note that there are only nine LEDs for 10 samples so LED 9 will disappear after two sam ples are taken Alternately 1 person whose temp has been verified to be in t...

Page 15: ...e heard when a detected temperature is lower than the customizable temperature set point The non read sound can only be heard when SmartScan is connected to a Garrett walkthrough that is turned on Hig...

Page 16: ...mperature recorded as soon as the face was detected The embedded artificial intelligence software is able to track a face once iden tified and continue to record temperatures as a person walks closer...

Page 17: ...f two scanning options Multi Scan or Statistical Multi Scan The SmartScan unit scans patrons multiple times between the time the patron first steps into the field of view and the time the patron exits...

Page 18: ...low limit fields are hidden when algorithm is not Multi Scan however the default value for low temperature is 96 5 F and the starting value for high temperature is 97 6 F plus the offset value which b...

Page 19: ...em is ready and scanning for faces Solid green LEDs on the entry side indicates face detection and normal temp Red LEDs on the exit side indicate high tem perature low temperature or non read Advanced...

Page 20: ...ference among units Detectors installed with Garrett SmartScan units will op erate efficiently in the scenarios presented in the user s manual It is recommended to keep SmartScan enabled detectors sid...

Page 21: ...starting from a distance of 10 feet in front of the SmartScan unit The white LEDs will decrease as each sample is taken Once the samples are complete SmartScan s LEDs will turn blue with a single roll...

Page 22: ...tecting one person at a time Red LEDs Indicates that a high temp low temp or misread has been detected The red LEDs are displayed for 1 to 4 seconds based on settings only on the exit side Patrons on...

Page 23: ...e the temperature of the hair and not the forehead Make sure there is no sunlight on the face or in the view of the SmartScan camera This may lead to false readings Direct sunlight on the face drastic...

Page 24: ...on The battery is designed for 8hrs of operation and will eventu ally need to be recharged Stay within 30 walking path in front of the SmartScan while approaching the walkthrough We recommend adding a...

Page 25: ...e s App store and search for RD Client Select and install the Remote Desktop Mobile app published by Microsoft Corporation see Figure 7 1 Use your phone s WiFi to connect SmartScan to your device Sele...

Page 26: ...system s Access Point before trying to access the system The WiFi Access Point can typically be found on your phone in Settings under the WiFi or Connections menu The SSID for SmartScan starts with SS...

Page 27: ...ill show up if multiple SmartScans are within wireless range Once connected you should see something like this Fig ure 7 9 For Wired access to your SmartScan device via wired Eth ernet cable connect o...

Page 28: ...ctively Check the Allow me to save credentials box and then click Con nect See Figure 7 14 When prompted enter the password SmartScan check the Remember me box and then click OK Figure 7 15 If the fol...

Page 29: ...nt Caution doing this will disconnect your Remote Desk top session and you will no longer be able to access the SmartScan client wirelessly A wired Ethernet connection will be required to access Smart...

Page 30: ...adings It is recommended to position SmartScan in a location where perspiration will not be a factor EXCESSIVE NON READS People wearing hats sun glasses on their forehead cover ings that cover their h...

Page 31: ...failure in the Garrett client interface YES Open SmartScan system and verify cooling fan is on If not then check power cable between computer and controller board SmartScan is not indicating a non rea...

Page 32: ...EXPRESSLY IN LIEU OF ALL OTHER WARRANTIES EXPRESSED OR IMPLIED INCLUDING THE WARRANTY OF MERCHANTABILITY OR FITNESS FOR A PAR TICULAR PURPOSE THE BUYER ACKNOWL EDGES THAT ANY ORAL STATEMENTS ABOUT TH...

Page 33: ...cord Storage Display Photo storage w time stamp optional but not required HDMI connection available Calibration Self calibration automatically adjusts ambient biased readings Power Fully automatic 100...

Page 34: ...2021 Garrett Metal Detectors PN 1556800 REV B...

Reviews: