Chapter 12
Hard Disk Drive (HDD) Replacement
12-9
7. Ensure that the metallic underside of the wrist strap is in direct contact with your
skin.
The wrist strap should be snug around the wrist so that it does not rotate. (See
“Antistatic Precautions” on page 1-9
Caution –
Before handling FRUs, be sure to connect the clip of the antistatic wrist strap
and of the antistatic mat to the server grounding port, and attach the band of the wrist strap
to one of your wrists. Place the FRUs on the grounded antistatic mat. Failure to take these
antistatic measures might result in serious damage.
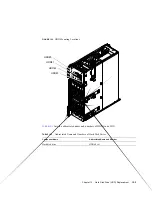
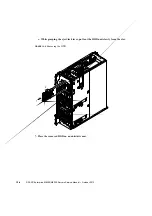
8. Remove the HDD unit to be replaced. (See
)
a. Press the square push button on the HDD unit to be replaced.
The eject/lock lever protrudes at an angle of about 45 degrees.
b. Pull the eject/lock lever to an angle of about 90 degrees to release the lock.
c. While grasping the eject/lock lever, pull out the HDD unit slowly from the slot.
9. Place the removed HDD on an antistatic mat.
10. Mount the replacement HDD by following the removal instructions in
reverse order. Align the HDD with the slot guides, insert it carefully, and secure it
firmly.
Caution –
Do not forcibly push the HDD when inserting it, even if it is not moving
smoothly. You may fail to insert the HDD due to the presence of any obstruction in a slot or
any problem with a connector pin; and if you forcibly insert it, serious damage may result.
Caution –
Do not insert an HDD into a slot while the eject/lock lever is closed. If an HDD
is inserted in this condition, it is stopped halfway and becomes difficult to pull out.
11. Switch on all main line switches for the AC section (ACS) in the power supply
system.
12. Confirm that the XSCF STANDBY LED (green) on the operator panel remains lit.
If it is blinking, wait until it remains lit.
Summary of Contents for SPARC Enterprise M8000
Page 4: ......
Page 15: ...Contents xv Index Index 1 ...
Page 16: ...xvi SPARC Enterprise M8000 M9000 Servers Service Manual October 2012 ...
Page 22: ......
Page 27: ...Chapter 1 Safety and Tools 1 5 M9000 Server Front View ...
Page 29: ...Chapter 1 Safety and Tools 1 7 Power Supply Unit PSU ...
Page 38: ...1 16 SPARC Enterprise M8000 M9000 Servers Service Manual October 2012 ...
Page 88: ...2 50 SPARC Enterprise M8000 M9000 Servers Service Manual October 2012 ...
Page 148: ......
Page 154: ...5 6 SPARC Enterprise M8000 M9000 Servers Service Manual October 2012 ...
Page 205: ...Chapter 7 I O Unit IOU Replacement 7 13 FIGURE 7 8 Removing the IOU Front of M9000 1 1 2 3 ...
Page 227: ...Chapter 8 FAN Unit Replacement 8 11 FIGURE 8 9 Removing the FAN Unit Rear of M8000 1 2 ...
Page 256: ...10 8 SPARC Enterprise M8000 M9000 Servers Service Manual October 2012 ...
Page 272: ...11 16 SPARC Enterprise M8000 M9000 Servers Service Manual October 2012 ...
Page 312: ...13 30 SPARC Enterprise M8000 M9000 Servers Service Manual October 2012 ...
Page 340: ...15 14 SPARC Enterprise M8000 M9000 Servers Service Manual October 2012 ...
Page 358: ...17 10 SPARC Enterprise M8000 M9000 Servers Service Manual October 2012 ...
Page 370: ...18 12 SPARC Enterprise M8000 M9000 Servers Service Manual October 2012 ...
Page 380: ...19 10 SPARC Enterprise M8000 M9000 Servers Service Manual October 2012 ...
Page 409: ...Chapter 20 Backplane Replacement 20 29 FIGURE 20 16 Removing the FANBP Rear of the M8000 ...
Page 422: ...21 10 SPARC Enterprise M8000 M9000 Servers Service Manual October 2012 ...
Page 439: ...Chapter 23 Switch Backplane Replacement 23 7 FIGURE 23 4 Removing the SWBP Rear of the M8000 ...
Page 442: ...23 10 SPARC Enterprise M8000 M9000 Servers Service Manual October 2012 ...
Page 460: ...24 18 SPARC Enterprise M8000 M9000 Servers Service Manual October 2012 ...
Page 484: ...25 24 SPARC Enterprise M8000 M9000 Servers Service Manual October 2012 ...
Page 494: ...A 10 SPARC Enterprise M8000 M9000 Servers Service Manual October 2012 ...
Page 544: ...C 4 SPARC Enterprise M8000 M9000 Servers Service Manual October 2012 ...
Page 552: ...D 8 SPARC Enterprise M8000 M9000 Servers Service Manual October 2012 ...


