RX2540 M1
Upgrade and Maintenance Manual
171
Expansion cards and backup units
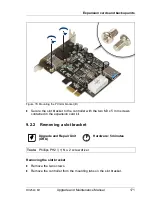
Figure 78: Mounting the PCI slot bracket (B)
Ê
Secure the slot bracket to the controller with the two M3 x 5 mm screws
contained in the expansion card kit.
9.2.2
Removing a slot bracket
Removing the slot bracket
Ê
Remove the two screws.
Ê
Remove the controller from the mounting tabs on the slot bracket.
Upgrade and Repair Unit
(URU)
Hardware: 5 minutes
Tools:
Phillips PH2 / (+) No. 2 screw driver
Summary of Contents for PRIMERGY RX2540 M1
Page 24: ...24 Upgrade and Maintenance Manual RX2540 M1 Contents ...
Page 38: ...38 Upgrade and Maintenance Manual RX2540 M1 Before you start ...
Page 68: ...68 Upgrade and Maintenance Manual RX2540 M1 Basic hardware procedures ...
Page 150: ...150 Upgrade and Maintenance Manual RX2540 M1 Hard disk drives solid state drives ...
Page 158: ...158 Upgrade and Maintenance Manual RX2540 M1 System fan ...
Page 316: ...316 Upgrade and Maintenance Manual RX2540 M1 Processors ...
Page 330: ...330 Upgrade and Maintenance Manual RX2540 M1 Accessible drives ...
Page 362: ...362 Upgrade and Maintenance Manual RX2540 M1 Front panel and external front connectors ...
Page 410: ...410 Upgrade and Maintenance Manual RX2540 M1 System board and components ...
Page 418: ...418 Upgrade and Maintenance Manual RX2540 M1 Cables ...
Page 438: ...438 Upgrade and Maintenance Manual RX2540 M1 Appendix ...


