background image

C156-E097-01EN

2 - 15

2.3

Optical Disk Cartridge Specifications

2.3.1

Recommended optical disk cartridge specifications

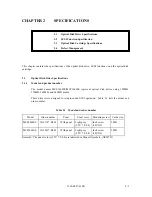
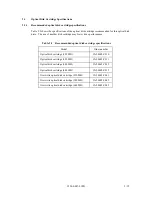
Table 2.5 shows the specifications of the optical disk cartridge recommended for this optical disk
drive.  The use of another disk cartridge may lower drive performance.

Table 2.5

Recommended optical disk cartridge specifications

Model

Order number

Optical disk cartridge (128 MB)

CA90002-C010

Optical disk cartridge (230 MB)

CA90002-C011

Optical disk cartridge (540 MB)

CA90002-C012

Optical disk cartridge (640 MB)

CA90002-C013

Overwrite optical disk cartridge (230 MB)

CA90002-C041

Overwrite optical disk cartridge (540 MB)

CA90002-C042

Overwrite optical disk cartridge (640 MB)

CA90002-C043

Summary of Contents for MCE3064SS

Page 1: ...C156 E097 01EN MCE3064SS MCF3064SS OPTICAL DISK DRIVES PRODUCT MANUAL ...

Page 2: ...REVISION RECORD Edition Date published Revised contents 01 May 1999 Specification No C156 E097 EN The contents of this manual is subject to change without prior notice All Rights Reserved Copyright 1999 FUJITSU LIMITED ...

Page 3: ...This page is intentionally left blank ...

Page 4: ...MCF3064SS optical disk drives and describes their standard features system configuration and drive configuration Chapter 2 SPECIFICATIONS This chapter describes the specifications of the MCE3064SS MCF3064SS optical disk drives SCSI function specifications and optical disk cartridge specifications Chapter 3 INSTALLATION REQUIREMENTS This chapter describes basic installation requirements environment...

Page 5: ...4SS optical disk drives are called an ODD drive device or target TARG in the explanations in this manual Chapter 7 SCSI BUS This chapter describes in detail the configuration physical electrical conditions interface protocol and operation of the SCSI Small Computer System Interface which is an interface for connecting the MCE3064SS MCF3064SS optical disk drives and the user system to each other ...

Page 6: ...re correctly This indicates a hazarous situation could result in minor or moderate personal injury if the user does not perform the procedure correctly This alert signal also indicates that damages to the product or other property may occur if the user oes not perform the procedure correctly This indicates information that could help the user use the product more efficiently In the text the alert ...

Page 7: ...e defined as a failure requiring adjustment repair or replacement Fujitsu is not responsible for failure due to misuse operation outside the specified environment conditions power line trouble controller problems cable failure or other failure not caused by the optical disk drive itself ...

Page 8: ...s mode should not be used for storing important data When using the mode for storing important data a preventive system measure such as file duplication is required 3 26 1 Shock or vibration applied to the drive that exceeds the values defined in the standard damage the drive Use care when unpacking 2 Do not leave the drive in dirty or contaminated environments 3 Since static discharge may destroy...

Page 9: ...nected to the end of the cable 3 The cables must be kept away from the rotating part of the spindle motor 4 14 Before demounting the optical disk drive turn off the system power Do not remove screws securing the cables and drive when the power is on 4 17 Cleaning cartridge Use the cleaning solution and cleaning cloth specified in Table 5 2 If other than the specified items is used disk media surfa...

Page 10: ...AINTENANCE SCSI BUS MCE3064SS MCF3064SS OPTICAL DISK DRIVES SCSI Logical Specifications C156 E098 COMMAND PROCESSING DATA BUFFER MANAGEMENT COMMAND SPECIFICATIONS SENSE DATA AND ERROR RECOVERY PROCEDURE SCSI MESSAGES ERROR RECOVERY MCE3064SS MCF3064SS OPTICAL DISK DRIVES MAINTENANCE MANUAL C156 F030 MAINTENANCE AND DIAGNOSIS FAULT ANALYSIS REMOVAL AND REPLACEMENT PROCEDURES PRINCIPLES OF OPERATION...

Page 11: ...ce 2 SCSI 2 American National Standards Institute ANSI 3 ISO IEC 10090 90 mm optical disk cartridges rewritable and read only for data interchange ISO IEC JTC1 4 ISO IEC 13963 Data interchange om 90 mm optical disk cartridges Capacity 230 megabytes per cartridge ISO IEC JTC1 5 ISO IEC 15041 Data interchange om 90 mm optical disk cartridges Capacity 640 megabytes per cartridge ISO IEC JTC1 Note ISO...

Page 12: ...1 SCSI bus configuration 1 10 1 3 2 Input output device addressing 1 11 CHAPTER 2 SPECIFICATIONS 2 1 2 1 Optical Disk Drive Specifications 2 1 2 1 1 Model and product number 2 1 2 1 2 Drive specifications 2 2 2 1 3 Environmental and power requirements 2 5 2 1 4 Error rate 2 6 2 1 5 Reliability 2 7 2 2 SCSI Function Specification 2 8 2 3 Optical Disk Cartridge Specifications 2 15 2 3 1 Recommended ...

Page 13: ...14 3 4 1 Connectors and terminals 3 14 3 4 2 Cable connection requirements 3 17 3 4 3 External operator panel 3 22 3 4 4 External operator panel setting CNH2 3 25 CHAPTER 4 INSTALLATION 4 1 4 1 Notes on Drive Handling 4 1 4 2 Connection Modes 4 4 4 3 Settings 4 5 4 3 1 Setting switches SW1 4 7 4 3 2 Setting of supplying power to SCSI terminating resistor 4 10 4 3 3 SCSI terminating resistor mode 4...

Page 14: ...4 2 Cleaning procedure 5 10 CHAPTER 6 DIAGNOSIS AND MAINTENANCE 6 1 6 1 Diagnosis 6 1 6 1 1 Initial self diagnosis 6 2 6 1 2 Diagnostic command 6 2 6 1 3 Test program 6 2 6 2 Maintenance Information 6 3 6 2 1 Maintenance requirements 6 3 6 2 2 Revision number 6 4 CHAPTER 7 SCSI BUS 7 1 7 1 System Configuration 7 1 7 2 Interface Signal Definition 7 3 7 3 Electrical Requirements 7 6 7 3 1 SCSI inter...

Page 15: ...ATA phase 7 30 7 5 8 STATUS phase 7 33 7 5 9 MESSAGE phase 7 33 7 5 10 Signal requirements concerning transition between bus phases 7 34 7 5 11 Time monitoring feature 7 36 7 6 Bus Conditions 7 37 7 6 1 ATTENTION condition 7 37 7 6 2 RESET condition 7 40 7 7 Bus Sequence 7 42 Glossary GL 1 Abbreviations AB 1 Index IN 1 ...

Page 16: ... Centers of gravity 3 8 3 6 Mounting frame structure 3 9 3 7 Service clearance 3 10 3 8 Current waveform 5 VDC 3 11 3 9 Power on off sequence 1 3 11 3 10 Power on off sequence 2 3 12 3 11 Power on off sequence 3 3 12 3 12 AC noise filter recommended 3 13 3 13 Connector and terminal locations 3 14 3 14 Power supply connector 3 15 3 15 SCSI interface connector drive side 3 15 3 16 Cable connection m...

Page 17: ...3 7 3 DATA BUS and SCSI ID 7 4 7 4 SCSI termination circuit 7 7 7 5 BUS FREE phase 7 14 7 6 ARBITRATION phase 7 16 7 7 SELECTION phase 7 18 7 8 RESELECTION phase 7 20 7 9 INFORMATION TRANSFER phase phase control 7 22 7 10 Transfer in asynchronous mode 7 24 7 11 Transfer in synchronous mode 7 28 7 12 Transfer in FAST SCSI mode 7 29 7 13 Data transfer rate in asynchronous mode 7 31 7 14 Data transfe...

Page 18: ... 3 24 3 7 Device type mode setting 3 25 3 8 SCAM mode setting 3 25 3 9 Write verify mode setting 3 26 3 10 Macintosh mode setting 3 26 3 11 Logical specification type setting 3 27 4 1 SCSI ID setting SW1 4 8 4 2 SCSI data bus parity checking SW1 4 8 4 3 Write cache mode setting 4 9 4 4 Device type mode setting 4 9 4 5 Spindle automatic stop mode setting 4 10 4 6 SCSI terminating resistor power sup...

Page 19: ...l driving method 7 8 7 5 Bus phases and signal sources 7 9 7 6 Timing specifications 7 10 7 7 FAST SCSI Timing specifications 7 12 7 8 Parameters used for synchronous data transfer 7 32 7 9 Setting value of SCSI time monitoring 7 36 ...

Page 20: ...optical disk drives which incorporate an SCSI controller The interface connecting the MCE3064SS MCF3064SS drives to the host system complies with the Single Ended SCSI 2 standard ANSI X3T9 2 86 109 Small Computer System Interface 2 The flexibility and expandability of the SCSI the high performance of the MCE3064SS MCF3064SS optical disk drives and the drives commands set enable the user to constru...

Page 21: ... is limited also by the SCSI bus cable length and transfer features 3 High speed mean seek time This drive features a linear voice coil motor for high speed head positioning The average seek time is the average of 1 000 random seeks and is 23 ms 128 MB 230 MB 540 MB and 640 MB However this does not include SCSI overhead or address check 4 ISO standard medium compatibility 3 5 inch cartridge type 1...

Page 22: ... disk rotation to minimize dust accumulation on the disk This function can be set that time by the MODE SELECT command 1 1 2 Reliability 1 Mean time between failure MTBF This drive features a 120 000 hour MTBF 2 Error recovery For the error depending on the optical disk drive an recovery process is made by a suitable retry This drive features Reed Solomon error correction ECC to assure error free ...

Page 23: ...950 U S A safety CDRH class 1 U S A laser CSA C22 2 No 950 Canada safety EN60950 Europe safety EN60825 Class 1 Europe laser 5 Various radio wave standards This optical disk device is installed in a host system and meets the following standards EN55022 class B EN50082 1 European wave standards AS NZS3548 class B Australian wave standards 1 1 5 Interface 1 SCSI 2 This drive supports the basic SCSI 2...

Page 24: ...ion of the data transfer to the data buffer without waiting the completion of the write and verify operations then the write and verify operations are made asychronouslly with the SCSI operation Therefore the apparent write command processing time measured at the host system is reduced and the I O performance of the host system is improved The write cache teature is enabled or disabled by the sett...

Page 25: ... 01EN 1 2 Drive Configuration 1 2 1 Drive model Figures 1 1 to 1 3 show the MCE3064SS MCF3064SS outer view Figure 1 1 MCE3064SS MCF3064SS outer view With panel Figure 1 2 MCE3064SS MCF3064SS outer view Without panel ...

Page 26: ...cally when the optical disk cartridge is fully inserted in the optical disk drive s disk slot and a mechanism which automatically ejects the cartridge when the Eject button on the front panel is pressed 2 Spindle motor The optical disk cartridge s hub and the spindle motor s shaft are connected magnetically Therefore if the spindle motor s shaft is rotating the disk medium is rotating at the same ...

Page 27: ...nserting the cartridge thereby facilitating the insertion The panel is also simply designed by making the eject button and LED light emitting part integral with each other 1 2 4 Control circuit section Figure 1 4 is the block diagram of the control circuit section Figure 1 4 Control circuit section block diagram The control circuit section is divided into two parts an SCSI controller section which...

Page 28: ...uit section The drive circuit section consists of the following circuits Laser diode control circuit Signal reproduction circuit Servo seek control circuit Rotation control circuit Drive miscellaneous control circuit The DSP digital signal processor is used for the servo seek control circuit to reduce the circuit amount therefore this circuit is a simple configuration The drive circuit section exe...

Page 29: ... that operates as the initiator Figure 1 5 System configuration example 1 3 1 SCSI bus configuration A maximum of eight SCSI devices can be connected to the SCSI bus The combination of an SCSI device operating as an initiator and an SCSI device operating as a target is arbitrary A multihost system can be configured in which several host systems operate as initiators The disconnect or reconnect fun...

Page 30: ... A unique device address LUN logical unit number is assigned to each logical unit An initiator specifies an SCSI ID to select an SCSI device operating as a target then specifies an LUN to select the input output device connected to or under the target An optical disk drive is constructed with all volumes as a single logical unit Specifiable SCSI IDs and LUN are as follows SCSI ID 0 to 7 selectable...

Page 31: ...This page is intentionally left blank ...

Page 32: ...t number The model names MCE3064SS MCF3064SS represent optical disk drives using 128MB 230MB 540MB and 640MB media These drives were designed for single ended SCSI operation Table 2 1 lists the model and order number Table 2 1 Model and order number Model Order number Panel Panel color Mounting screw Cache size MCE3064SS CA01747 B101 With panel Light gray 2 5Y 7 2 0 4 Inch screw 32UNC 2 MB MCF3064...

Page 33: ... s max 0 32 MB s continuous writing execution 0 97 MB s continuous reading execution 1 65 to 2 65 MB s max 0 39 to 0 62 MB s continuous writing execution 1 16 to 1 86 MB s continuous reading execution 2 95 to 4 96 MB s max 0 64 to 1 08 MB s continuous writing execution 1 92 to 3 26 MB s continuous reading execution 2 94 to 4 90 MB s max 0 77 to 1 29 MB s continuous writing execution 2 33 to 3 88 M...

Page 34: ...tion 0 76 MB s continuous reading execution 1 3 to 2 1 MB s max 0 31 to 0 49 MB s continuous writing execution 0 92 to 1 47 MB s continuous reading execution 2 33 to 3 92 MB s max 0 51 to 0 86 MB s continuous writing execution 1 52 to 2 58 MB s continuous reading execution 2 32 to 3 87 MB s max 0 61 to 1 02 MB s continuous writing execution 1 84 to 3 07 MB s continuous reading execution Random see...

Page 35: ...eject command is issued to when the optical disk cartridge is ejected 5 The maximum SCSI data transfer rate may be limited by the initiator response time SCSI bus transfer characteristics or transfer distance 6 The bit error rate must be 10 12 or less when a disk whose raw error rate is 10 4 or less is used Table 2 2 Specifications 4 of 4 Power save mode Power save mode 1 2 3 Time for entering pow...

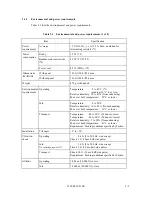
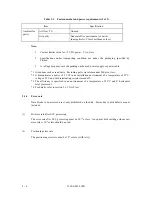
Page 36: ... wet bulb temperature 29 C or lower Idle Temperature 0 to 50 C Relative humidity 10 to 85 Noncondensing Max wet bulb temperature 36 C or lower Transport Temperature 40 to 60 C 24 hours or less Temperature 20 to 60 C 24 hours or more Relative humidity 5 to 90 Noncondensing Max wet bulb temperature 41 C or lower Requirement Packing conditions specified by Fujitsu Installation Tilt angle 5 to 10 Vibr...

Page 37: ...s 2 It demonstrates a power of 5 3 W in an installation environment of a temperature of 25 C voltage of 5 V and with terminating resistor turned off 3 The efficiency is specified in an environment of a temperature of 25 C and 0 horizontal level placement 4 For details refer to section 3 1 3 Air Flow 2 1 4 Error rate Data blocks to be accessed are evenly distributed on the disk Errors due to disk d...

Page 38: ...the total time power is applied 2 Device failures indicate that devices require repair readjustment or replacement Failure due to external factors such as minor defects during device handling operation outside environmental specifications power failure host system errors and interface cable errors are not included 2 Data security at power failure Except for the data of the block to which write ope...

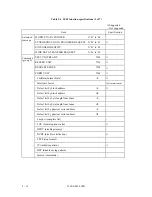
Page 39: ...RMPWR signal supply demand function Jumper selectable Terminating resistor On Off function Jumper selectable Connector Nonshielded Protect key provided Data bus parity Switch selectable Bus arbitration function Disconnection Reconnection function Addressing SCSI ID 0 to 7 Switch selectable LUN Logical unit number 0 is Fixed Data transfer Asynchronous mode 5 MB s Max Synchronous mode 20 MB s Max Da...

Page 40: ... 06 MESSAGE REJECT X 07 NO OPERATION X 08 MESSAGE PARITY ERROR X 09 LINKED COMMAND COMPLETE X 0A LINKED COMMAND COMPLETE WITH FLAG X 0B BUS DEVICE RESET X 0C CLEAR QUEUE X 0E INITIATE RECOVERY X 0F TERMINATE I O PROSESS X 11 IDENTIFY X 80 to FF Disconnect Privilege Disk Priv Bit Logical Unit Target LUNTAR Bit 2 byte message ABORT TAG X 0D SIMPLE QUEUE TAG X 20 HEAD OF QUEUE TAG X 21 ORDERED QUEUE ...

Page 41: ...03 FORM UNIT X 04 FmtData Format Data 0 Interleave factor Non interleaved Defect list by block address 0 Defect list by block address 0 Defect list by byte length from Index 0 Defect list by byte length from Index 0 Defect list by physical sector address 0 Defect list by physical sector address 0 CmpLst complete list FOV format options valid DPRY disable primary DCRT disable certification STPF sto...

Page 42: ... data 64 bytes MODE SELECT X 15 PF page format 0 Non interleaved page X 01 Error recovery parameters page X 20 Format parameters SP save page RESERVE X 16 Extent Reservation Option RELEASE X 17 Extent Reservation Option COPY X 18 MODE SENSE X 1A DBD disable block descriptor START STOP UNIT X 1B immed immediate RECEIVE DIAGNOSTIC RESULTS X 1C SEND DIAGNOSTIC X 1D PREVENT ALLOW MEDIUM REMOVAL X 1E 1...

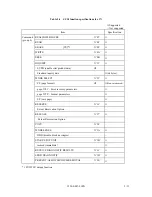
Page 43: ...A EBP erase bypass SEEK X 2B ERASE X 2C READ UPDATE BLOCK X 2D WRITE AND VERIFY X 2E DPO disable page out EBP erase bypass BytChk byte check VERIFY X 2F SEARCH DATA HIGH X 30 SEARCH DATA EQUAL X 31 SEARCH DATA LOW X 32 SET LIMITS X 33 PRE FETCH X 34 SYNCHRONIZE CACHE X 35 LOCK UNLOCK CACHE X 36 READ DEFECT DATA X 37 PList GList Defect List Format 0 1 FUJITSU unique function Command group 1 ...

Page 44: ...BUFFER X 3C MODE VU 1 Buffer ID 0 UPDATE BLOCK X 3D READ LONG X 3E CORRECT 0 WRITE LONG X 3F CHANGE DIFINITION X 40 LOG SELECT X 4C PCR parameter code reset SP save parameter 0 PC page control 01b LOG SENSE X 4D PPC parameter pointer control 0 SP save parameter 0 PC page control 01b page X 00 Suppoted Log Pages page X 30 Statistics Log Pages VU 1 1 FUJITSU unique function Command group 2 Command g...

Page 45: ...SENSE X 5A READ X A8 WRITE X AA WRITE AND VERIFY X AE VERIFY X AF SEARCH DATA HIGH X B0 SEARCH DATA EQUAL X B1 SEARCH DATA LOW X B2 SET LIMITS X B3 READ DEFECT DATA X B7 Command link function Relative block addressing function Command stack function Read ahead cache feature Write cache feature Cache control feature Command group 5 ...

Page 46: ...cartridge may lower drive performance Table 2 5 Recommended optical disk cartridge specifications Model Order number Optical disk cartridge 128 MB CA90002 C010 Optical disk cartridge 230 MB CA90002 C011 Optical disk cartridge 540 MB CA90002 C012 Optical disk cartridge 640 MB CA90002 C013 Overwrite optical disk cartridge 230 MB CA90002 C041 Overwrite optical disk cartridge 540 MB CA90002 C042 Overw...

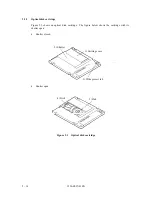
Page 47: ...isk cartridge Figure 2 1 shows an optical disk cartridge The figure below shows the cartridge with its shutter open Shutter closed Shutter open Figure 2 1 Optical disk cartridge 4 Disk 5 Hub 3 Write protect tab 1 Cartridge case 2 Shutter ...

Page 48: ...rite protect tab 2 Shutter Protects the disk against dust When the cartridge is inserted into the optical disk drive the shutter metallic door is opened 3 Write protect tab The write protect tab selects whether write is enabled or disabled 4 Disk Holds information which can be read by an optical beam 5 Hub The hub is placed at the center of the disk and is linked to the spindle of the drive The hu...

Page 49: ...1 00 mm Track shape Spiral Track pitch 1 6 0 1µm 1 39 0 08 µm 1 10 0 05 µm Direction of rotation Counterclockwise viewed from lens Number of zones 10 18 11 Number of logical tracks side 17 940 42 042 18 480 Number of logical tracks zone 1 380 to 2 208 1 750 to 2 772 1 260 to 2 100 Number of physical tracks side 11 500 15 700 15 708 Number of physical tracks zone 1 150 875 825 1 428 Number of user ...

Page 50: ...041 Reliability Read cycle 108 Erase write read cycle 106 Load unload cycle 2 5000 Archival life according to acceleration test results 10 years 1 Shelf life according to acceleration test results 10 years 2 Operating temperature 5 to 55 C Operating relative humidity 3 to 85 RH 3 Storage temperature 20 to 55 C Storage humidity 3 to 90 RH 3 1 Archival life is the period in which recorded informatio...

Page 51: ...nitialization are handled by a linear replacement algorithm Figure 2 2 shows the algorithms for alternate processing a Sector slipping algorithm b Linear replacement algorithm Figure 2 2 Algorithms for alternate processing The user area is divided into several groups during media initialization Each group contains data sectors and spare sectors Spare sectors are used as replacements for defective ...

Page 52: ...C156 E097 01EN 2 21 Figure 2 3 Example of alternate processing ...

Page 53: ...This page is intentionally left blank ...

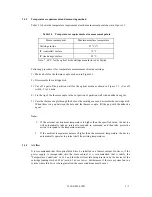
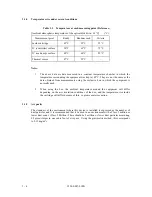
Page 54: ...2 1 3 3 1 1 Temperature measurement point When a drive is operating the ambient temperature measured 3 cm from the base surface of the optical disk drive and the PCA unit surface must satisfy the environmental requirements specified in Subsection 2 1 3 For the temperature of each surface during operation the contact temperature at each measurement point shown in Figure 3 1 must satisfy the require...

Page 55: ...a Inside optical disk cartridge b IC controller read map Figure 3 1 Surface temperature measurement points Hole for incerting thermo couple IC controller IC read amp Tip of thermo couple Operating of inner partition wall ...

Page 56: ...gh the hole at the cartridge case and assemble the cartridge disk When there is a gap between the hole and the thermo couple fill the gap with the adhesive agent Note 1 If the external environment temperature is higher than the specified value the device will automatically take an interval to respond to command and then take protective action to respond to the temperature increase 2 If the ambient...

Page 57: ...ata obtained from measurements using the exclusive box in which the equipment is normally used 2 When using the box the ambient temperature around the equipment will differ depending on the air circulation conditions of the box and the temperature rise inside the cartridge will differ because of this so please exercise caution 3 1 5 Air purity The cleanness of the environment where this device is ...

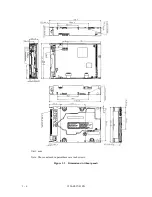
Page 58: ...ounting Requirements 3 2 1 External dimensions Figures 3 2 to 3 3 show the dimensions of the drive and the positions of the mounting holes Unit mm Note The height length is 25 4 0 8 besides the panel size Figure 3 2 Dimensions ...

Page 59: ...3 6 C156 E097 01EN Unit mm Note Those enclosed in parentheses are inch screws Figure 3 3 Dimensions without panel ...

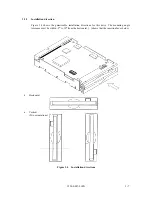
Page 60: ...igure 3 4 shows the permissable installation directions for this drive The mounting angle tolerance must be within 5 to 10 from the horizontal shows that the insertion faces below Figure 3 4 Installation directions Vertical Two orientations Horizontal ...

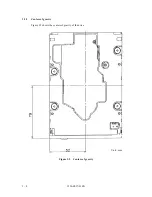
Page 61: ...3 8 C156 E097 01EN 3 2 3 Centers of gravity Figure 3 5 shows the centers of gravity of the drive Figure 3 5 Centers of gravity Unit mm ...

Page 62: ...ame and the user s frame structure must be at least 1 5 mm d The clearance between the top and bottom surfaces and the user s frame structure must be at least 1 5 mm e When mounting the optical disk drive the screw tightening torque should be 0 4 to 0 45Nm 4 to 4 6kgcm f When the optical disk drive with panel is mounted in a locker there should be no deformation of the mounting fittings provided a...

Page 63: ...etic circuit may leak the magnetic field Maximum 25 Gauss at distance of 4 mm from the drive Do not place a device sensitive to a magnetic field near the optical disk drive 5 External light source Mount the optical disk drive away from strong light sources e g camera flash 6 System ground The optical disk drive should be grounded to the signal ground SG of the power supply of the system This SG li...

Page 64: ...must satisfy the requirements in Section 2 1 3 For other requirements see items 4 and 5 below 2 Current waveform reference Figure 3 8 shows the 5 VDC waveform at start of spindle motor rotation Figure 3 8 Current waveform 5 VDC 3 Power on off sequence a In a system which uses the terminating resistor power supply signal TERMPWR of the SCSI bus the requirements for 5 VDC given in Figure 3 9 must be...

Page 65: ...oes not matter if the requirement in a or b is satisfied In a system containing an SCSI device which is not designed to prevent noise leakage to the SCSI bus the requirement given in Figure 3 11 must be satisfied between the SCSI device and the drive Figure 3 11 Power on off sequence 3 4 Power supply to SCSI terminating resistor If the power for the terminating resistor is supplied from the drive ...

Page 66: ...lter should be installed at the AC input terminal on the power supply unit of the drive The noise filter specifications are as follows Attenuation 40 dB or more at 10 MHz Circuit configuration The T configuration shown in Figure 3 12 Figure 3 12 AC noise filter recommended ...

Page 67: ...s drive is equipped with the connectors and terminals shown below for external connection Figure 3 13 shows their locations Power supply connector SCSI connector External operator panel terminal CNH2 Figure 3 13 Connector and terminal locations External operator panel terminal CNH2 ...

Page 68: ... with two rows of 25 pins on 2 54 mm 0 1 inch centers Figure 3 15 shows the SCSI interface connector Table 3 3 shows the signal assignment of the SCSI bus connector See Chapter 7 for details on the electrical requirements of the interface signals Note Tolerance is 0 127 mm 0 005 inch unless otherwise specified Figure 3 15 SCSI interface connector drive side 1 12 VDC or N C 2 12 VDC RETURN GND or N...

Page 69: ...ND DB5 12 13 GND DB6 14 15 GND DB7 16 17 GND DBP 18 19 GND GND 20 21 GND GND 22 23 GND GND 24 25 Open TERMPWR 1 26 27 GND GND 28 29 GND GND 30 31 GND ATN 32 33 GND GND 34 35 GND BSY 36 37 GND ACK 38 39 GND RST 40 41 GND MSG 42 43 GND SEL 44 45 GND C D 46 47 GND REQ 48 49 GND I O 50 1 Terminating resistor power supply jumper selectable input only both input and output or open ...

Page 70: ...the connector on the drive is not connected to ground 3 4 2 Cable connection requirements Figure 3 16 shows the cable connection mode between the drive host system and power supply unit Table 3 4 lists recommended components for the connection Figure 3 16 Cable connection mode CN01 CN01 ...

Page 71: ...y chained with an SCSI cable A terminating resistor must be mounted in the SCSI device at each end of the SCSI cable A terminating resistor is mounted on the drive when the drive is shipped A terminating resistor must be disconnected when the drive is not connected to an end of the SCSI cable Select a method of power supply to the terminating resistor circuit according to the setting pins on the d...

Page 72: ...C156 E097 01EN 3 19 Figure 3 17 SCSI cable connector ...

Page 73: ...00 to 132 Ω Each pair of wires must be connected to pins n and n 1 where n is an odd number on the interface connector All cables used on the same SCSI must have the same characteristic impedance to reduce signal reflection and to maintain transmission characteristics When an SCSI device is not connected to an end of the SCSI cable connection to the SCSI connector must be at a branching point of t...

Page 74: ...C156 E097 01EN 3 21 a Connection to a point along the cable Link connector Link connector SCSI cable SCSI cable Figure 3 18 SCSI cable connection b Connection to a point along the cable ...

Page 75: ...h the external operator panel interface Figure 3 19 shows a recommended circuit for the external operator panel Since an external operator panel is not provided as an option the user must design one based on the system requirements and the recommended circuit Provide switches and LEDs required for the system on the external operator panel See the recommended circuit shown in Figure 3 21 A signal w...

Page 76: ...C156 E097 01EN 3 23 Figure 3 19 External operator panel circuit example EJSW SCAM mode Write verify mode Macintosh mode Logical type 0 ...

Page 77: ...tion of SW1 03 by shorting with 0 V Device type mode 9 SW1 06 Equivalent to ON position of SW1 06 by shorting with 0 V See 3 4 4 1 SCAM mode 10 See 3 4 4 2 Verify mode 11 See 3 4 4 3 Macintosh mode 13 See 3 4 4 4 SCSI type 0 14 See 3 4 4 5 SCSI terminating resistor mode 15 CNH1 5 6 Equivalent to shorting CNH1 05 06 by shorting with 0 V LED 3 LED terminal for external connection LED 5 LED terminal ...

Page 78: ...7 shows the device type settings which are returned when the INQUIRY command is issued to the optical disk drive Table 3 7 Device type mode setting Device Type CNH 2 Pin 9 GND X 07 Optical memory device Open X 00 Direct access device Shorted Setting when delivered 2 SCAM mode Table 3 8 shows the settings which determine whether to use SCAM mode Table 3 8 SCAM mode setting SCAM mode CNH 2 Pin 10 GN...

Page 79: ... invalid Shorted Performs verification for the WRITE command valid Open Setting when delivered NOTICE Loss of data When the verify function is invalid the write data quality is not guaranteed This mode should not be used for storing important data When using the mode for storing important data a preventive system measure such as file duplication is required 4 Macintosh mode The SCSI operation of t...

Page 80: ... SCSI 1 specification is compatible with that of the old unit M2511A Table 3 11 shows the command and message specification settings Table 3 11 Logical specification type setting Command specification and message specification CNH 2 Pin 14 GND SCSI 2 specification Open SCSI 1 specification Shorted Setting when delivered ...

Page 81: ...This page is intentionally left blank ...

Page 82: ...es Note the following points to maintain drive performance and reliability 1 Shock or vibration applied to the drive that exceeds the values defined in the standard damage the drive Use care when unpacking 2 Do not leave the drive in dirty or contaminated environments 3 Since static discharge may destroy the CMOS devices in the drive pay attention to the following points after unpacking Use an ant...

Page 83: ...etween installation locations is 10 degrees or more leave the drive in the new location for at least two hours before unpackaging it 3 Installation a Do not connect or disconnect the connectors or change the terminal settings when the power is on b Do not move the drive with the power on 4 Packaging a Before packaging remove the optical cartridge b Store the drive in an antistatic vinyl bag with d...

Page 84: ...he drive in one of the orientations described in Subsection 3 2 2 after unpacking The horizontal direction is recommended 6 Storage a Use moistureproof packaging when storing the drive b The storage environment must satisfy the requirements specified i n Subsection 2 1 3 when the drive is not operating c To prevent condensation avoid sharp changes in temperature Packaging box Cushion 2 pcs MCE3064...

Page 85: ...e and other SCSI equipment can be connected to the SCSI bus in arbitrary combinations Install a terminating resistor on the SCSI devices connected to either end of the SCSI cable See Section 3 4 for the cable connection requirements and power cable connections a Connecting one optical disk drive Figure 4 2 SCSI bus connection modes 1 of 2 b Connecting more than one optical disk drive single host ...

Page 86: ...l setting switches and SCSI terminating resistors Setting terminal CNH1 Setting switches SW1 Figure 4 3 shows the positions of the setting terminal and switch 1 The user must not change the settings of terminals not described in this section The terminals must remain as set when shipped 2 Do not change terminal settings when the power is on 3 To strap setting terminals use the jumper shipped with ...

Page 87: ...ches Setting items are as follows SW1 SCSI ID SCSI data bus parity check Write cache mode Device type mode Spindle automatic stop mode Factory test mode user setting inhibited CNH1 SCSI terminating resistor power supply SCSI terminating resistor CNH2 SCSI ID Device type mode SCAM mode Verify mode Macintosh mode SCSI type SCSI connector SCSI signal Power connector 5VDC GND ...

Page 88: ...Board Setting switch 8 7 6 5 4 3 2 1 SCSI ID SCSI ID SCSI ID OFF SW1 Switch number Signal name At shipment SW1 01 02 03 SCSI ID OFF OFF OFF 04 SCSI data bus parity check ON 05 Write cache mode OFF 06 Device type mode ON 07 Spindle automatic stop mode OFF 08 Factory test mode user setting inhibited OFF Figure 4 4 Setting switch SW1 ...

Page 89: ...bus must have a unique SCSI ID 2 If contention occurs in the ARBITRATION phase the priority of the SCSI use authority depends on SCSI IDs as follows 7 6 5 4 3 2 1 0 2 SCSI data bus parity checking Table 4 2 shows the settings which determine whether to check the SCSI bus parity bit Regardless of the settings the parity bit is ensured for data transmitted by the drive Table 4 2 SCSI data bus parity...

Page 90: ...W1 06 0x07 optical memory drive ON 1 0x00 direct access drive OFF 1 Setting when delivered 5 Spindle automatic stop mode Normally with the cartridge loaded the spindle rotation is maintained until the spindle is instructed to stop by the START STOP UNIT command The spindle auto stop function automatically stops the spindle after the command has not been issued from the host for about 30 minutes de...

Page 91: ...ting resistor module on the drive and how to use TERMPWR lines on the SCSI bus Table 4 6 SCSI terminating resistor power supply CNH1 SCSI terminating resistor power supply CNH1 01 02 CNH1 03 04 Power is supplied from both of the drive and TERMPWR pin Short 1 Short 1 Power is supplied from the drive only TERMPWR pin is not used Short Open Power is supplied from TEMPWR pin only Drive s power supply ...

Page 92: ... SCSI terminating resistor mode CNH 1 05 06 SCSI terminating resistor module on the PCA is enabled Short 1 SCSI terminating resistor module on the PCA is disabled Open 1 Setting when delivered Open CNH1 5 6 pins when the SCSI terminating resistor set by CHN 2 15 pin ...

Page 93: ...05 OFF OFF ON 4 Device type mode SW1 06 ON OFF ON 5 Spindle automatic stop mode SW1 07 OFF OFF ON 6 Factory test mode user setting inhibited SW1 08 OFF OFF ON Setting item Setting on Default Check 1 Supplied from both ODD and TERMPWR pin CNH1 1 2 CNH1 3 4 Short Short Short Open Short Open 2 Supplied from ODD CNH1 1 2 CNH1 3 4 Short Short Short Open Short Open 3 Supplied from TERMPWR pin CNH1 1 2 C...

Page 94: ...ghtened See Figure 3 6 When mounting with screws the screw tightening torque should be 0 4 to 0 45Nm 4 to 4 6kgcm Be careful not to damage the parts on the PCA when mounting the drive 3 After securing the drive make sure that the drive does not touch the chassis of the system cabinet There must be at least 1 5 mm clearance between the drive and chassis See Figure 3 6 4 5 Cable Connections Use the ...

Page 95: ...be connected to the end of the cable 3 The cables must be kept away from the rotating part of the spindle motor 4 6 Operation Confirmationand Preparation for Useafter Installation 4 6 1 Confirming initial operations This section provides the operation check procedures after the power is turned on 1 Initial operation when the power is turned on When the power is turned on the drive starts initial s...

Page 96: ...n initial operation checks out normally after the power is turned on check whether the drive is correctly connected to the SCSI bus from the host system Checking the SCSI connection depends on the host system configuration This section describes the general procedure 1 Procedure Figure 4 5 shows the recommended checking procedure Note Steps a to c correspond to a to c in Figure 4 5 a Issue the TES...

Page 97: ...4 16 C156 E097 01EN Figure 4 5 SCSI connection check 2 ...

Page 98: ...optical disk drive for setting terminal checking setting change or device replacement depends on the system cabinet configuration Determine the demounting procedure in consideration of the requirements of each system This section describes the general demounting procedure and notes on demounting drives Before demounting the optical disk drive turn off the system power Do not remove screws securing...

Page 99: ...This page is intentionally left blank ...

Page 100: ...explains loading and ejection methods assuming that the drive is mounted horizontally When mounted vertically the drive is operated in the same manner as when mounted horizontally Figure 5 1 shows the front view of the optical disk drive For operation users should be familiar with the parts in the figure and their function Loading and ejection methods are described below 5 1 1 Optical disk drive F...

Page 101: ...erformance and reliability of the drive keep the following point in mind When the drive is in the busy state do not eject the optical disk cartridge Particularly do not manually eject the cartridge by force Be careful sufficiently not to insert the different drive etc floppy disk or substance so it is cause of the accident 5 1 3 Inserting cartridge Insert the cartridge as explained below 1 When th...

Page 102: ...ace upward 3 Insert the cartridge shutter first into the disk insertion slot 4 Push the cartridge into the slot until it completes moving below a little further in than the operator panel The cartridge remains inserted in the drive The BUSY LED indicator lamp lights when the drive power is turned on The cartridge remains inserted in the drive Turning on the drive power starts loading The LED indic...

Page 103: ... depending on the ambient environment and the cartridge s condition 2 When the drive power is off If the drive power is off the cartridge cannot be removed by pressing the eject button The cartridge can be removed by insert the eject jig accessary or a pin diameter about 1 mm into the manual eject hole Notes 1 NEVER attempt to eject the cartridge while the BUSY LED lamp is on The data may be destr...

Page 104: ...C156 E097 01EN 5 5 3 The optical disk drive unit should not be carried around with a cartridge loaded inside Figure 5 3 Removing cartridge Push the eject button ...

Page 105: ...art name Order number Head cleaner CA90002 C980 1 Cleaning method Clean the head actuator with following method 1 Turn on the power of the drive 2 Insert the head cleaner 3 When the head cleaner is automatically loaded the positioner moves back and forth and the cleaning brush mounted on the head cleaner cleans the object lens 4 When the cleaning is finished the head cleaner is automatically unloa...

Page 106: ... 4 shows the optical disk cartridge For operation and cleaning users should be familiar with the parts shown in the figure See Subsection 2 3 2 for the functions of the parts Shutter closed Shutter open Figure 5 4 Optial disk cartridge 5 Hub 4 Disk 3 Write protect tab 1 Cartridge case 2 Shutter ...

Page 107: ...rite protect tab it must be completely moved to the end because there is play in the middle Figure 5 5 shows the write protect tab location on the optical disk cartridge and the moving state of the write protect tab see write enabled and write disabled entered on the label Note The hatched part indicates the write protect tab location Figure 5 5 Write protect tab Write protect tab ...

Page 108: ...midity is high Do not store the cartridge in a dusty or smoky place 3 When transporting the cartridge Put the cartridge in a nylon bag to protect it from moisture Put the cartridge in a strong container and cover the cartridge with cushioning material 5 4 Cleaning Optical Disk Cartridge Dust or cigarette smoke pariticulates on the disk surface lowers the performance of the cartridge Regularly clea...

Page 109: ...able 5 2 If other than the specified items is used disk media surface may be damaged 2 Notes on usage and storage of cleaning kit When storaging the cleaning solution tighten the cap As the magnet is used at revolving knob of the setting case do not place the floppy disk near the revolving knob Do not use or storage where exposed to direct sun ligth or near the inflammables Keep out of the reach o...

Page 110: ... media recommendation 1 Slide the shutter completely open Figure 5 6 Cleaning procedure 1 2 Set the cartridge with keeping label side down and shutter open to the shutter stopper of the setting case as shown in Figure 5 7 Figure 5 7 Cleaning procedure 2 Shutter stopped Setting case Setting case as shown Disk media Spindle Shutter Cartridge ...

Page 111: ...he center hub of the cortridge Figure 5 8 Cleaning procedure 3 4 Remove a slender piece that causes a defect from the disk surface at wiping the disk media 5 Moisten the cleaning cloth with a few drops of cleaning solution In case of contact with eyes immediately flush eyes with water 6 Wipe the disk surface from the hub outward Cartridge opening Disk media Disk hub Setting case cover Revolver ...

Page 112: ...097 01EN 5 13 7 Turn the revolving knob then wipe the disk surface Figure 5 9 Cleaning procedure 4 8 If the excess cleaning solution remains on the disk surface wipe out with the cleaning cloth Cleaning cloth ...

Page 113: ...This page is intentinally left blank ...

Page 114: ... has a self diagnostic function This function can check the basic operations of the drive A test program running in the host system is required to check general operations including operations of the interface with the host system See Subsection 6 1 3 Table 6 1 Self diagnostic function Diagnostic contents Target Initial self diagnosis Basic operation hardware function test Diagnostic command Basic...

Page 115: ...or the SCSI bus or the power is turned off or on The drive reexecutes initial self diagnosis when this status is cleared 6 1 2 Diagnostic command The host system can make the ODD execute the self diagnosis by issuing The SEND DIAGNOSTIC command with specifying the Self Test operation When the self diagnosis terminates successfully a GOOD status is reported When the self diagnosis terminates abnorm...

Page 116: ...l part number P N revision number serial number S N and date of manufacture b Failure status Date of the failure System configuration Environment conditions temperature humidity and supply voltage c Failure history d Failure Description of the failure Issued commands and specified parameters Sense data Other error analysis information Data loss In case of regular repair the optical disk cartridge ...

Page 117: ...ted with double lines See Figure 6 2 2 Changing the revision number on site When the revision number is changed on site because of parts replacement or modification the new revision number is indicated by circling the number on the line of alphabetic characters See Figure 6 2 NOTICE When a revision number is changed after shipment Fujitsu issues Revision Number Change Request Notice to indicate th...

Page 118: ...Up to eight SCSI divices can be connected to the SCSI bus Figure 7 1 shows sample system configurations Communication on the SCSI bus is allowed between only two SCSI divices an initiator INIT and a target TARG at any given time In the configured system any combination is allowed for an SCSI device to work as an INIT and as a TARG Also there may be an SCSI device that works as both an INIT and a T...

Page 119: ...7 2 C156 E097 01EN Host system A Host system B Figure 7 1 Example of SCSI configuration ...

Page 120: ...Interface Signal Definition There is a total of eighteen signals Nine are used for control and nine are used for data 1 byte data 1 odd parity bit Figure 7 2 shows interface signal lines RST RESET Figure 7 2 Interface signals ...

Page 121: ...e indicated on the DATA BUS Figure 7 3 shows the correspondence between DATA BUS bits and SCSI IDs Figure 7 3 DATA BUS and SCSI ID When the DB n signal is true the data bit n is 1 and when false it is 0 The use of a parity bit is a system option The ODD handles parity as shown below The ODD implements the bus parity check feature which can be enabled or disabled by a setting terminal on the ODD Fo...

Page 122: ...ection on the DATA BUS or to identify a SELECTION or RESELECTION phase See Table 7 1 6 MSG MESSAGE This signal is driven by a TARG to indicate that a message is being transferred on the DATA BUS See Table 7 1 7 REQ REQUEST This signal is driven by a TARG to indicate a transfer request to an INIT in INFORMATION TRANSFER phase 8 ACK ACKNOWLEDGE This signal is driven by an INIT to indicate a response...

Page 123: ...llowing output characteristics is used All signals are negative logic true L The receiver and non driver of the SCSI device under the power on state should satisfy the following input characteristics on each signal Output characteristics VOL 0 0 to 0 50 VDC IOL 48 mA VOH 2 5 to 5 25 VDC Input characteristics VIL 0 0 to 0 80 VDC IIL 0 4 to 0 0 mA VI 0 5 VDC VIH 2 0 to 5 25 VDC IIH 0 0 to 0 1 mA VI ...

Page 124: ...g resistor is installed outside the SCSI device or if there is a possibility of the power to the SCSI device with the terminating resistor being cut off power for the terminating resistor must be supplied to the TERMPWR line from an SCSI device on the bus The SCSI device always working as an INIT example host adapter should supply that power Power must be supplied to the TERMPWR line through a dio...

Page 125: ...A particular SCSI device drives the signal false Otherwise no SCSI device drives the signal True An SCSI device drives the signal true 1 In this manual the signal is said to be false if one of the following conditions is satisfied The signal is actually driven by an SCSI device to become false non OR tied type No SCSI device is driving the signal OR tied type or non OR tied type In the interface o...

Page 126: ...al at the same time I Only the SCSI device which operates as an INIT can drive the signal I T INIT TARG or both can drive this signal according to the interface sequence In the RESELECTION phase there is a sequence to be driven simultaneously by both ID Each SCSI device which is actively arbitrating the bus drives a unique data bit SCSI ID The parity bit may be undriven or driven to the true state...

Page 127: ...iod between the time either of the following events occurs and the time the SCSI device stops driving all bus signals 1 Detection of the BUS FREE phase when both BSY and SEL signal become false during Bus Settle Delay Note Maximum allowable period between the time both BSY and SEL signal became false and the time the bus is released is 1 200 ns An SCSI device that requires a period longer than Bus...

Page 128: ...om the trailing edge of an REQ signal to the leading edge of the next REQ signal or from the trailing edge of an ACK signal to the leading edge of the next ACK signal 12 Power On to Selection Time 10 sec max Maximum time from when the TARG is turned on to the time the TARG can post the correct status and sense data for the TEST UNIT READY INQUIRY or REQUEST SENSE command 13 Reset to Selection Time...

Page 129: ...nal sent by TARG for synchronous data transfer 19 Fast Cable Skew Delay 5 ns max In FAST SCSI data transfer mode maximum allowable difference in transmission time over the interface cable between any two bus signals from any two SCSI devices 20 Fast Deskew Delay 20 ns min In FAST SCSI data transfer mode time for compensation for skew involved in bus signal transmission 21 Fast Hold Time 10 ns min ...

Page 130: ...devices shall detect the BUS FREE phase after SEL and BSY signals are both false for at least 400 ns Bus Settle Delay SCSI devices which have detected the BUS FREE phase shall release all bus signals within 800 ns Bus Clear Delay after BSY and SEL become false for a Bus Settle Delay If an SCSI device requires more than 400 ns Bus Settle Delay to detect the BUS FREE phase it shall release all bus s...

Page 131: ... than the above if the TARG negates the BSY signal to enter a BUS FREE phase the TARG informs the INIT that it has detected an ERROR condition on the SCSI bus The TARG can enter a BUS FREE phase forcedly regardless of the ATN signal status the INIT must treat that phase transition as indicating abnormal end of a command The TARG clears all retained data or status and terminates the command being e...

Page 132: ... the SCSI device detects any ID bit which is assigned higher priority than its own SCSI ID the SCSI device shall release its signals BSY and its SCSI ID then may return to step 1 The SCSI device 1 in Figure 7 6 has lost the arbitration The SCSI device which detects no higher SCSI ID bit on the DATA BUS can obtain the bus control then it shall assert SEL signal The SCSI device 7 in Figure 7 6 has w...

Page 133: ...7 16 C156 E097 01EN Figure 7 6 ARBITRATION phase ...

Page 134: ...uring the ARBITRATION phase 2 The INIT then asserts its SCSI ID and that of the desired TARG on the data bus At this time the SCSI device becomes an INIT without driving the I O signal 3 The INIT releases the BSY signal after waiting at least 90 ns Deskew Delay 2 The INIT shall then wait at least 400 ns Bus Settle Delay before looking for the response from the TARG BSY signal 3 Response sequence W...

Page 135: ...7 18 C156 E097 01EN µ Figure 7 7 SELECTION phase 30 30 30 30 ...

Page 136: ...to have completed normally 7 5 4 RESELECTION phase The TARG selects an INIT during the RESELECTION phase The RESELECTION phase can only be used in systems with ARBITRATION phase implemented The TARG reconnects the INIT using this RESELECTION phase when the TARG restarts the command processing that is in the disconnect state on the SCSI bus 1 Start sequence A TARG performs the RESELECTION phase in ...

Page 137: ...econnection The INIT shall respond to the TARG by asserting the BSY signal within 200 µs Selection Abort Time When other than 2 bit SCSI ID is detected or when the parity error is detected on the system in which the parity bit of the data bus is valid the INIT shall not respond to the RESELECTION phase After the TARG detects the response BSY signal from the INIT the TARG asserts the BSY signal the...

Page 138: ...FER phase is determined by the combination of C D I O and MSG signals see Table 7 1 Since these three signals are specified by the TARG phase transition is controlled by the SCSI device operating as a TARG The INIT can request the TARG to initiate an MESSAGE OUT phase by sending an ATN signal Besides the TARG can change the bus phase to BUS FREE by ceasing transmission of the BSY signal Informatio...

Page 139: ...only once 2 Note that a new INFORMATION TRANSFER phase starts when the REQ signal that requests transfer of the first byte in the phase becomes true The phase ends when one of C D I O or MSG signal changes after the ACK signal becomes false The period between the time one phase ends and the time the REQ signal to initiate the next new phase becomes true is not defined 3 The INIT can predict the ne...

Page 140: ...o report the completion of reception 3 After the ACK signal becomes true on the TARG the TARG negates the REQ signal Thereafter the TARG can change the data of the data bus 4 The INIT negates the ACK signal after the REQ signal becomes false 5 After the ACK signal becomes false the TARG proceeds to transfer the next byte b Transfer from INIT to TARG When the I O signal is false information on the ...

Page 141: ...7 24 C156 E097 01EN Figure 7 10 Transfer in asynchronous mode 18 18 ...

Page 142: ...on cycle of REQ and ACK signals The TARG can send more than one REQ pulse before receiving the ACK pulse from the INIT if the number of REQ pulses is within the range defined by the REQ ACK Offset parameter When the difference between the number of REQ pulses sent by the TARG and the number of ACK pulses received by the TARG reaches the number assigned to the REQ ACK Offset parameter the TARG must...

Page 143: ...e after sending valid data on the data bus DB7 to DB0 P 2 The data on the data bus must be held valid for at least 100 ns Deskew Delay Cable Skew Delay at least 35 ns Fast Deskew Delay Fast Cable Skew Delay in FAST SCSI mode after the leading edge of the REQ pulse The pulse width of the REQ signal sent by the TARG must be at least 90 ns Assertion Period at least 30 ns Fast Assertion Period in FAST...

Page 144: ... the ACK pulse The INIT sends an ACK signal with a pulse width of at least 90 ns Assertion Period at least 30 ns Fast Assertion Period in FAST SCSI mode 4 The TARG fetches data from the data bus within 45 ns Hold Time within 10 ns Fast Hold Time in FAST SCSI mode after the leading edge of the received ACK pulse 3 Time monitoring of ACK response wait When the ODD operates as a TARG wait time for AC...

Page 145: ...7 28 C156 E097 01EN Figure 7 11 Transfer in synchronous mode 11 11 11 11 43 18 43 18 ...

Page 146: ...C156 E097 01EN 7 29 Figure 7 12 Transfer in FAST SCSI mode ...

Page 147: ...e TARG requests to transfer data from the TARG to the INIT The TARG keeps the I O signal true and the C D and MSG signals false during REQ ACK handshaking in this phase 2 DATA OUT phase In a DATA OUT phase the TARG requests to transfer data from the INIT to the TARG The TARG keeps the C D I O and MSG signals false during REQ ACK handshaking in this phase 3 Data transfer rate in asynchronous mode F...

Page 148: ...C156 E097 01EN 7 31 Figure 7 13 Data transfer rate in asynchronous mode ...

Page 149: ...4 The notation used in the formulas is as follows 1 If n T1 T2 700 Average data transfer rate in SCSI 1000 T1 MB s 2 If n T1 T2 700 Average data transfer rate in SCSI n 1000 T2 700 MB s where n Value assigned to REQ ACK Offset parameter T1 Value in ns assigned to Transfer Period parameter see Table 7 8 T2 Average time in ns from REQi pulse transmission to corresponding ACKi response at the pertine...

Page 150: ... byte of a multiple byte message If the message consists of more than one byte all bytes must be transferred in a single MESSAGE phase For details of message types and their operation see Chapter 5 1 MESSAGE IN phase In a MESSAGE IN phase the TARG requests to transfer message information from the TARG to the INIT The TARG keeps the C D I O and MSG signals true during REQ ACK handshaking in this ph...

Page 151: ...etection of the parity error Suppose that when the INIT retransmits a series of messages in the MESSAGE OUT phase the TARG has already executed some messages In this event the TARG must handle the received messages so that no logical contradiction will occur for example the TARG must ignore received messages that have already been executed If the TARG receives all message information normally with...

Page 152: ... Delay after making the I O signal true The INIT must stop driving the data bus within 400 ns Data Release Delay after the I O signal becomes true When changing the direction of transfer from In from TARG to INIT to Out from INIT to TARG the TARG must stop driving the data bus DBn within 45 ns Deskew Delay after making the I O signal false Figure 7 15 Switching direction of transfer over the data ...

Page 153: ...inst the REQ signal in the INFORMATION TRANSFER phase Time monitoring is executed during the following period ECOMMAND STATUS or MESSAGE phase Time taken from the moment of sending the REQ signal of the first byte to the moment of completing the reception of the ACK signal of the last byte of the phase DATA phase Time taken for completing eight REQ ACK handshakes average Note When the ACK signal i...

Page 154: ...fore 90 ns Deskew Delay 2 or more from the timing of setting the ACK signal false for the last byte being transferred in the current bus phase If the ATN sending timing is delayed the TARG may not be informed of the ATTENTION condition until the next bus phase The INIT may not operate as it should When transferring message information in several bytes in the MESSAGE OUT phase the INIT must keep th...

Page 155: ...ately after the DATA phase The TARG can enter the MESSAGE OUT phase at any time For example the data transfer need not be terminated at a logical data block boundary The INIT must continue REQ ACK handshaking DATA phase until the bus phase changes When the ATN signal becomes true in the STATUS phase the TARG must enter the MESSAGE OUT phase after the status byte transfer is completed When the ATN ...

Page 156: ...to be used in the command execution sequence Details are explained in Subsection 2 1 3 If the ATTENTION condition is not generated in the SELECTION phase the TARG uses a COMMAND COMPLETE message only The TARG does not respond to the ATTENTION condition even if it was generated in the subsequent bus phase Therefore the TARG does not enter the MESSAGE OUT phase ...

Page 157: ...the disk drive is reset 3 The operation mode set by a message or the command is initialized as when power is turned on The current value in the parameter set by a MODE SELECT command is initialized to the saved value last established If the value is not saved it is initialized to the default value Parameters defined for synchronous transfer between the ODD and SCSI device is cleared The mode defin...

Page 158: ...C156 E097 01EN 7 41 Figure 7 17 RESET condition ...

Page 159: ...owable bus phase sequence applied to systems without the ARBITRATION phase and sytems with the ARBITRATION phase Figure 7 22 provides an example of bus phase sequence during single command execution IMPORTANT Figure 7 21 shows the bus phase sequences applied to systems without the ARBITRATION phase systems with the ARBITRATION phase systems with the MESSAGE OUT phase and systems without the MESSAG...

Page 160: ...C156 E097 01EN 7 43 Figure 7 18 Bus phase sequence 1 of 2 ...

Page 161: ...7 44 C156 E097 01EN Figure 7 18 Bus phase sequence 2 of 2 ...

Page 162: ...C156 E097 01EN 7 45 Figure 7 19 Example of bus phase transition on execution of a single command 1 of 5 ...

Page 163: ...7 46 C156 E097 01EN Figure 7 19 Example of bus phase transition on execution of a single command 2 of 5 ...

Page 164: ...C156 E097 01EN 7 47 Figure 7 19 Example of bus phase transition on execution of a single command 3 of 5 ...

Page 165: ...7 48 C156 E097 01EN Figure 7 19 Example of bus phase transition on execution of a single command 4 of 5 ...

Page 166: ...C156 E097 01EN 7 49 Figure 7 19 Example of bus phase transition on execution of a single command 5 of 5 ...

Page 167: ...This page is intentionally left blank ...

Page 168: ... also determines whether to discard a sector that contains many errors In batch mode defect management is a guideline for disk rerecording and saving Disk case A case that covers the optical disk The case protects the disk from damage during handling and makes it possible to replace disks The case has space for a label write protection notch automatic handling preparation and medium identification...

Page 169: ...CSI bus has the following states Bus free phase Arbitration phase Selection phase Reselection phase Information transfer phase The information transfer phase is further classified into the following phases according to the type of information to be transferred Data in phase Data out phase Command phase Status phase Message in phase Message out phase Message Control information for a series of bus ...

Page 170: ... device on an SCSI bus An SCSI ID is unique to each SCSI device ID 0 to ID 7 that corresponds to the bit number of the SCSI data bus can be allocated SCSI device A general name for devices like input output units input output controllers and host adapters connected to an SCSI bus ...

Page 171: ...This page is intentionally left blank ...

Page 172: ...ent DCRT Disable CeRTification DDS Disk Definition Sector DMA Defect Management Area DPO Disable Page Out DPRY Disable PRimarY DSP Digital Signal Processor E EBC Enable Blank Check EBP Erase By Pass ECC Error Correction Code EN European Norm EVPD Enable Vital Product Data F FG Frame Ground FIFO First In First Out FOV Format Options Valid FRU Field Replaceable Unit I I O Input Output IC Integrated ...

Page 173: ...y Memory rpm revolutions per minute RST ReSeT RSV ReSerVed S S N Serial Number SB Spare Band SCSI Small Computer System Interface SCT SeCTor SDL Secondary Defect List SDTR Synchronous Data Transfer Request SEL SELect SDTR Synchronous Data Transfer Request SEL SELect SFP Standard Formatted Part SKSV Sense Key Specific Valid SM Sector Mark SNSKEY SeNSe KEY SP Save Page SP Save Parameter STPF SToP Fo...

Page 174: ...umber 6 4 Checks before mounting the drive 4 12 Checks if errors occur at initial self diagnosis 4 14 Class 5 millions 1 3 Cleaning 5 1 Cleaning Optical Disk Cartridge 5 9 Cleaning cloth 5 10 Cleaning Drive 5 6 Cleaning kit 5 9 Cleaning procedure 5 10 Cleaning solution 5 10 Cleaning tool 5 9 CNH1 4 12 CNH2 3 25 Collimator lens 1 8 COMMAND phase 7 21 7 30 Configuration 1 7 Confirming initial operat...

Page 175: ...e 3 23 External operator panel interface connector 3 24 External operator panel setting 3 25 F False 7 8 FAST SCSI Timing specifications 7 12 Features 1 1 Fixed optics section 1 7 Form factor 1 2 G General notes 4 1 Generation of attention condition 7 37 H Head actuator 1 8 1 9 Head cleaner 5 6 High speed data transfer 1 2 High speed mean seek time 1 2 Hub 2 17 I I O INPUT OUTPUT 7 5 7 21 If proce...

Page 176: ...Optical disk drive configuration 1 7 Optical disk drive front view 5 1 Optical Disk Drive Specifications 2 1 Order number 2 1 OR tied type 7 8 P Packaging 4 2 4 3 Panel 1 8 Parity check feature 7 4 Partial ROM 1 2 Performance 1 1 1 2 Period of bus phase transition 7 34 Position detector 1 7 Positioning error rate 2 6 Positions of setting switches 4 6 Positions of setting terminals 4 6 Power is tur...

Page 177: ... SCSI connector 3 16 Signal driving conditions 7 8 Signal driving method 7 8 Signal requirements 7 34 Signal sources 7 9 Signal status value 7 8 Slipping 1 5 Specifications 2 1 Spindle motor 1 7 Star chain connected 3 22 Start sequence 7 17 STATUS phase 7 21 7 33 Storage 4 3 Surface temperature measurement points 3 2 Synchronous mode 7 25 7 28 System Configuration 1 10 7 1 System ground 3 10 T TAR...

Page 178: ... the drive power is off 5 3 Wide operating environment 1 4 Write 6 3 Write cache feature 1 5 Write cache mode 4 9 Write cache mode setting 4 9 Write protect 5 8 Write protect tab 2 17 Write test 6 3 When using the cartridge 5 9 ...

Page 179: ...AÑA S A Almagro 40 28010 Madrid SPAIN TEL 34 91 681 8100 FAX 34 91 681 8125 FUJITSU AUSTRALIA LIMITED 2 Julius Avenue Cnr Delhi Road North Ryde N S W 2113 AUSTRALIA TEL 61 2 9776 4555 FAX 61 2 9776 4556 FUJITSU HONG KONG LTD Room 2521 Sun Hung Kai Centre 30 Harbour Road HONG HONG TEL 852 2827 5780 FAX 852 2827 4724 FUJITSU KOREA LTD Coryo Finance Center Bldg 23 6 YoulDo Dong Young DungPo Gu Seoul ...

Page 180: ...of this publication What is your occupation Your other comments may be entered here Please be specific and give page paragraph and line number references where applicable Your Name Return Address Sales Operating Installing Maintaining Learning Reference Fair Poor Very Good Good Very Poor Fully covered Well Illustrated Thank you for your interest Please send this sheet to one of the addresses in a ...

Page 181: ......
Reviews: