


(7)
(8)
(9)
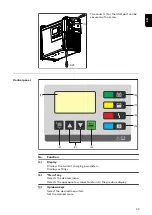
No.
Function
(8)
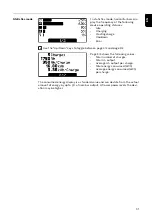
Control panel
(9)
Optional LED strip
Lights up in different colours
depending on the state of
charge, as explained in the
"Control panel" section
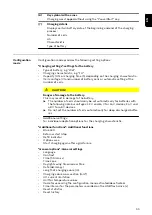
The option plug (A) is located behind the cover on the front of the device, upon
which the charging cables can be found. For the CAN connection area, the warn-
ing notices in the "Safety" section of the "Options" chapter apply.
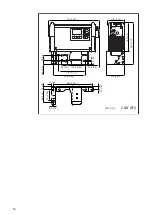
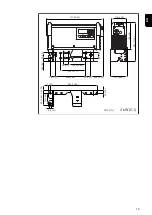
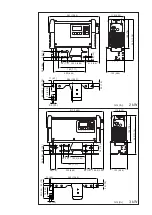
2 kW (B1)
3 kW (C1)
(9)
(7)
(5)
(3)
(1)
(A)
(10)
(8)
(6)
(4)
(2)
(13)
(11)
(9)
(7)
(5)
(14)
(12)
(10)
(8)
(6)
(3)
(4)
(1)
(2)
(A)
2 kW (B1)
3 kW (C1)
(13)
Status 3 /
red
(14)
Status 4 /
green
(11)
Status 1 /
blue
(12)
Status 2 /
yellow
CAN 2 GND
(9)
CAN GND
(10)
+ 13 V
(9)
CAN 1 GND
(10)
+ 13 V
Air-Puls
pressure
switch
(7)
CAN Low
(8)
CAN
termination
(7)
CAN 1 Low
(8)
CAN 2 Low
Air-Puls
pressure
switch
(5)
CAN High
(6)
CAN
termination
(5)
CAN 1 High
(6)
CAN 2 High
(3)
Not assigned
(4)
Not assigned
(3)
Not assigned
(4)
Not assigned
(1)
External
start/stop or
temperat-
ure-con-
trolled char-
ging
(2)
External
start/stop or
temperat-
ure-con-
trolled char-
ging
(1)
External
start/stop or
temperat-
ure-con-
trolled char-
ging
(2)
External
start/stop or
temperat-
ure-con-
trolled char-
ging
22
Summary of Contents for Selectiva 2060
Page 2: ......
Page 4: ...Option box 56 Mounting plate 57 Technical data 58 Selectiva 2 kW 58 Selectiva 3 kW 59 4 ...
Page 61: ...61 EN ...
Page 62: ...62 ...
Page 63: ...63 EN ...
Page 64: ......


