Frick Vyper 572 Installation Operation & Maintenance Download Page 19

VYPER

 VARIABLE SPEED DRIVE

INSTALLATION

100-210 IOM (

JUL

 09)

Page 19

should be taken to ensure that the Vyper

 and the associated 

piping and wiring do not obstruct access to service areas.

VYPER

 COOLING CONFIGURATION

The  Frick Vyper

  is  internally  cooled  with  a  factory  cali-

brated  liquid  cooling  circuit  that  offers  many  advantages 

over  traditional  air-cooled  systems. The  liquid  circuit  pro-

vides precisely controlled coolant temperatures to the heat 

generating components and delivers coolant into locations 

that air-over fan systems could not penetrate. The Vyper


liquid-cooling arrangement performs independently of fluctu-

ating ambient conditions. The NEMA 4 indoor-rated cabinet 

seals  the  internal  electronics  and  piping  from  corrosive 

refrigerant  vapors  while  providing  superior  cooling  for  the 

internal electronic components. Efficient liquid cooling also 

allows  for  smaller  cabinet  size  and  longer  component  life 

than traditional air-cooled units. Plant condenser water or a 

facility-supplied glycol loop subsequently removes the heat 

in the coolant via the heat exchanger located at the back of 

the Vyper

™ 

cabinet.

VYPER

 COOLING LOOP

While the compressor is running, the Quantum

LX control 

panel monitors the temperature of Vyper

 drive coolant. With 

this information, the Quantum

LX delivers a 4-20 mA signal 

to the 3-way mixing valve, based on the setpoints of a PID 

loop output from the Quantum

LX. This signal will maintain 

the Vyper

 coolant temperature at the control setpoint for 

the PID loop. This setpoint will be set at 110°F at the factory. 

There are also low and high temp alarms and shutdowns as-

sociated with the Vyper

 coolant temperature reading. These 

wil also be factory set for a Low Temp. alarm and shutdown 

at 85°F and 80°F with a 90 second delay, when running. The 

High Temp. Alarm and shutdown will be factory set at 125°F 

and 130°F with a 30 second delay when running. If the Vyper


coolant temperature drops too low, condensation may occur, 

damaging vital electronic components.
In addition to controlling the Vyper

 cabinet cooling system, 

the Quantum

LX panel also monitors the temperature of four 

components in the Vyper

 cabinet. If any of these tempera-

tures reaches a critical threshold, the Quantum

LX panel will 

enter a Stop Load condition, preventing either the slide valve 

position or motor speed from increasing. If the temperature 

continues to rise, the Quantum

LX panel will next go to a 

Force Unload condition. In this situation, the slide valve will 

unload to lower the motor torque required, in an effort to drop 

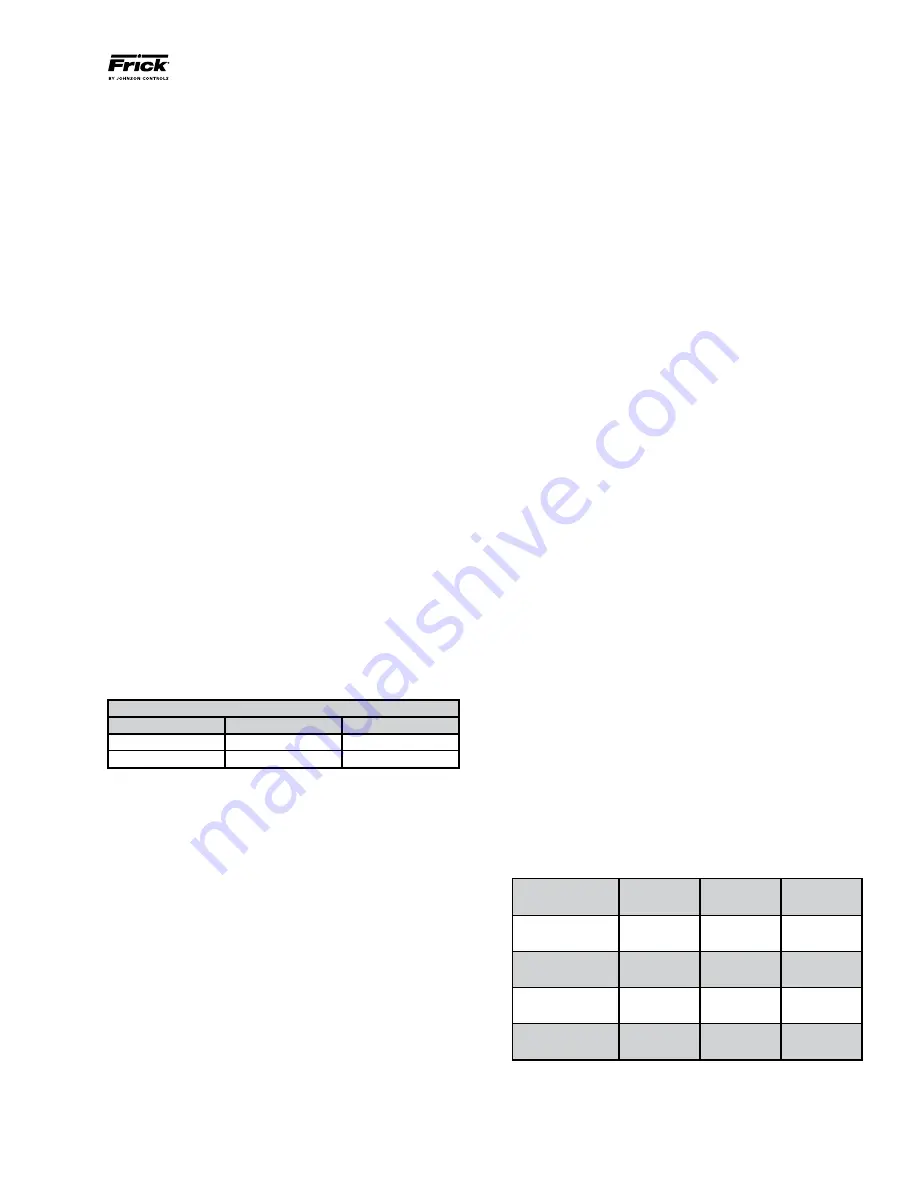
the temperature in the panel. Table 7 shows the Stop Load 

and Force Unload temperatures as well as the temperatures 

where the Vyper

 cabinet will automatically shut down.

Location

Stop Load

Force 

Unload

Shutdown

Baseplate Temp 
Inverter

160°F 

(71°C)

165°F 

(74°C)

170°F 

(77°C)

Heat Sink Temp

155°F 

(68°C)

160°F 

(71°C)

158°F 

(70°C)

Harmonic Filter

130°F 

(54°C)

135°F 

(57°C)

145°F 

(63°C)

Baseplate Temp

160°F 

(71°C)

165°F

(74°C)

175°F 

(79°C)

Table 7 – Vyper

™ 

Cabinet Component Temperature Thresholds

REMOTE MOUNTED UNITS

For  the  remote  mounting  method,  the Vyper

  cabinet  is 

mounted on a steel stand specifically designed for the VSD.  

The primary requirement for mounting the Vyper

 is that the 

foundation must be able to support the weight of the cabinet 

and stand. In addition, the remote stand and Vyper

 cabi-

net must be located so that no more than fifty (50) feet (15 

meters) of motor wiring length is needed between the VSD 

cabinet and the package motor.
The remote-mounted units have fastener holes located on 

the bottom feet for floor anchors and on the rear stand legs 

for wall anchoring of the stand.
Anchor bolts are recommended to firmly mount the unit to 

the foundation. Anchoring the cabinet to a firm foundation 

by proper leveling and employment of fastening bolts is the 

best assurance for trouble-free installation.  
Foundations must be in compliance with local building codes 

and  materials  must  be  of  industrial  quality.  All  electrical 

conduits must be metallic, no PVC or other materials are 

permitted. The  remote-mounted Vyper

™   

configuration  is 

shown in Figure 7. Table 6 provides the dimensions of the 

unit and stand. The mounting location of remote-mount units 

must be able to support the weight of the Vyper

. Dimen-

sions of the package-mount cabinets are identical except for 

the elimination of the stand. Coolant connections to the heat 

exchanger are 1½ in. NPT.

ENVIRONMENT

The Vyper

  is housed in a NEMA 4 indoor class enclosure.  

The electronics are sealed against ambient conditions, how-

ever it is recommended that the end user employ good stan-

dard practices in regard to moisture exposure and extreme 

temperature conditions. It is recommended that the Vyper


be operated within the ambient temperature range of 41°F 
(5°C) and 135°F (57°C) with the dew point no higher than 

90°F (32°C). Refer to Table 6 for temperature limits.

Recommended Ambient Temperature Limits

Unit Status

Min

Max

Storage

-4°F (-20°C)

158°F (70°C)

Operating

41°F (5°C)

135°F (57°C)

Table 6 – Ambient Temperature Operating Limits.

The Vyper

 can be used at altitudes up to 10,000 feet (3048 

meters)  without  derating  for  units  without  the  IEEE  519 

Harmonic Filter. A Vyper

 with the Harmonic Filter option 

included  can  be  operated  up  to  5,000  feet  (1524  meters) 

without  derating.  Remotely  mounted  units  must  have  the 

distance  limited  between  the Vyper

  and  the  compressor 

motor to fifty (50) feet (15 meters) of wire or less. Problems 

that may be encountered with wire lengths greater than fifty 

feet are as follows:

•  VSD picks up interference in the control wiring, causing 

the VSD to intermittently trip.  

•  Voltage  drop  becomes  excessive,  rising  above  the  5% 

voltage drop limit.

• 

Peak  voltage  applied  to  the  motor  windings  becomes 

excessive and may cause premature motor failure.

•  A 

dV/dt filter must be installed on remote-mounted units 

with motor power lead lengths between 3 to 50 feet (1 to 

15 meters).

Adequate  service  clearances,  including  door  swing,  must 

be maintained around the Vyper

. During installation, care 

Summary of Contents for Vyper 572

Page 1: ...RIGGING ASSEMBLY START UP AND MAINTENANCE INSTRUCTIONS READ THOROUGHLY BEFORE BEGINNING INSTALLATION FAILURE TO FOLLOW THESE INSTRUCTIONS MAY RESULT IN PERSONAL INJURY OR DEATH DAMAGE TO THE UNIT OR I...

Page 2: ...25 SYSTEM OPERATING CONDITIONS 25 PNEUMATIC CONTROLS 25 VYPER PREINSTALLATION SITE CHECKLIST 26 VYPER POWER AND CONTROL ENTRY LOCATIONS 26 EXTERNAL POWER AND CONTROL WIRING 27 INPUT POWER CONNECTION 2...

Page 3: ...gure 43 Vyper Screen 43 Figure 44 Harmonic Filter Screen 44 Figure 45 Low Motor Amps 45 Figure 46 Motor Screen 45 Figure 47 High Motor Amps 46 Figure 48 Ex 1 Motor Amps Safety Calculation Table 46 Fig...

Page 4: ...ation the equipment must be properly selected and connected to a properly de signed and installed system The engineering plans piping layouts etc must be detailed in accordance with the best practices...

Page 5: ...ns the Frick Part Number the unique Serial Number and the basic Model Number for the unit In addition the data label also has electrical information pertinent to the individual unit NOTE When inquirin...

Page 6: ...400 Volts Package Mount 7 5 HP Oil Pump VYF_RH_S 50 720C0168G19 572 HP Water Cooled 400 Volts Remote Mount 3 HP Oil Pump VYF_RH_M 50 720C0168G20 572 HP Water Cooled 400 Volts Remote Mount 5 HP Oil Pu...

Page 7: ...this manual and Frick publication S90 400 SB Verify that all control power 120 VAC communications analog wiring and 460 VAC power are in separate metallic con duits Properly shielded and grounded anal...

Page 8: ...correct use the tables in this manual to calculate what they should be 7 Verify proper operation of the motorized coolant mixing valve on the back of the drive Locate the Coolant mixing valve on the...

Page 9: ...itors in series to form a pair and then paralleling a suitable number of pairs to form a capacitor bank In order to assure an equal sharing of the voltage between the series connected capacitors and t...

Page 10: ...INSTALLATION OPERATION MAINTENANCE 100 210 IOM JUL 09 Page 10 Figure 2A Vyper Elementary Wiring Diagram NOTE Drawings for specific units can be found in the door of the VyperTM Drive or check with Fr...

Page 11: ...INSTALLATION OPERATION MAINTENANCE 100 210 IOM JUL 09 Page 11 Figure 2B Vyper Elementary Wiring Diagram NOTE Drawings for specific units can be found in the door of the VyperTM Drive or check with Fr...

Page 12: ...lized to ensure that the IGBT modules do not rupture if a catastrophic failure occurs on the DC link of the filter phase bank assembly The Trap Filter is composed of a series of capacitors C84 C92 ind...

Page 13: ...VYPER VARIABLE SPEED DRIVE INSTALLATION OPERATION MAINTENANCE 100 210 IOM JUL 09 Page 13 Figure 3 VSD Input Current Without Harmonic Filter Figure 4 VSD Input Current With Harmonic Filter...

Page 14: ...ALLATION OPERATION MAINTENANCE 100 210 IOM JUL 09 Page 14 Figure 5A Harmonic Filter Elementary Wiring Diagram NOTE Drawings for specific units can be found in the door of the VyperTM Drive or check wi...

Page 15: ...ALLATION OPERATION MAINTENANCE 100 210 IOM JUL 09 Page 15 Figure 5B Harmonic Filter Elementary Wiring Diagram NOTE Drawings for specific units can be found in the door of the VyperTM Drive or check wi...

Page 16: ...ceed 8 The IEEE 519 Harmonic Filter is highly recommended for crucial applications such as hospitals computer networks airports etc GENERAL OPERATION DESCRIPTION The Vyper serves as the motor starter...

Page 17: ...the VFD cabinet and the motor Figure 6 shows Vyper cabinet mounted on a Frick RWF II refrigeration package Individual systems configurations will vary according to model and horsepower sizes selected...

Page 18: ...VYPER VARIABLE SPEED DRIVE INSTALLATION 100 210 IOM JUL 09 Page 18 Figure 7 Vyper Cabinet and Stand...

Page 19: ...5 F 57 C 145 F 63 C Baseplate Temp 160 F 71 C 165 F 74 C 175 F 79 C Table 7 Vyper Cabinet Component Temperature Thresholds REMOTE MOUNTED UNITS For the remote mounting method the Vyper cabinet is moun...

Page 20: ...tering Coolant Temperature Limits An upstream strainer is recommended to stop particulate matter from entering the heat exchanger The strainer should be cleaned several times during the first twenty f...

Page 21: ...DROP 912 752 700 572 Models Figure 9 Minimum Flow Rates GLYCOL In order to adequately size piping and booster pump require ments the pressure drop of the coolant across the heat exchanger must be kno...

Page 22: ...VYPER VARIABLE SPEED DRIVE INSTALLATION 100 210 IOM JUL 09 Page 22 Figure 11 Liquid Cooled Vyper P I Diagram Noneconomized Figure 12 Liquid Cooled Vyper P I Diagram Economized...

Page 23: ...ectronic control panel for proper operation See Figure 13 Driving a ground stake at the electronic control will cause additional problems since other equipment in the plant on the same circuits will g...

Page 24: ...equirement of theVSD controlled system and all branch circuits must be considered Size the trans former supplying the Vyper so that the transformer voltage does not sag more than 5 when subjected to l...

Page 25: ...nsitive electronic equipment However in some highly sensitive cases there may be electronic equipment that is affected byVyper originated EMI For those cases Johnson Controls Frick recommends a Harmon...

Page 26: ...top of the left side of the unit Power cables must be in accordance with local and national electrical codes and current safety standards See the Power Wiring section in this manual for more details V...

Page 27: ...s the wiring to be properly installed in order to supply power to the unit for processing The Vyper also outputs processed power to the motor of a compressor package The two connection points are at t...

Page 28: ...f a dV dt snubber filter between the Vyper and the motor to ensure a clean power signal into the motor OUTPUT POWER CONNECTION PACKAGE MOUNT Package mounted Vyper drives have a different output config...

Page 29: ...s refer to the wiring diagrams included inside the Vyper cabinet to ensure the unit is wired following the most up to date version of the wiring diagram QUANTUM LX COMMUNICATIONS WIRING The picture in...

Page 30: ...S LK10 LK8 A B B A LK17 LK7 LK6 LK2 LK5 LK3 LK4 LK8 LK16 422 485 COM1 BAT 1 B LK7 1 LK5 COM2 422 485 LK6 A TB2 4 3 2 2 3 4 LK2 PL10 PL1 2 1 3 COM2 COM2 FLASH SOCKET MEMORY MOD B B PL11 LK3 PL5 LK4 A A...

Page 31: ...OPTIONS The National Electrical Code NEC requires thermal protection for motors operating with variable speed drive systems Frick employs two types of thermal protection for motors One method uses th...

Page 32: ...ng drawings for the specific installation b Verify power wiring has been connected at the correct connection points and properly seated in ac cordance with the provided engineering drawings for the sp...

Page 33: ...ea son such as equipment repair discard the old coolant and replace with new If the color of the coolant turns a brown or green this indicates that a bacteria growth is taking place within the coolant...

Page 34: ...internal passages free from contaminants The illustration in Figure 26 shows the cooling circuit of a remote mounted water cooledVyper The cooling circuit for the glycol cooled version is identical Fi...

Page 35: ...hout the system Allow the pump to run at least 5 minutes until all trapped air is purged from the coolant system Figure 31 VSD Logic Board Connection J2 Step 6 Figure 32 Top off the cooling system unt...

Page 36: ...ll remain at its minimum speed until the slide valve loads above the capacity control Slide Valve setpoint If the slide valve cannot load due to a slide valve load inhibit condition or because the com...

Page 37: ...el Additionally the Quantum LX control panel will control the Vyper Drive and compressor to the user defined parameters programmed at the control panel interface ACCESSING THE VYPER SETUP Specific opt...

Page 38: ...36 Quantum LX Session Screen Step 2 See Figure 37 Once the User Level is programmed press the panel Enter and Submit keys to return to the Operating Status Screen As shown in Figure 36 the Operat ing...

Page 39: ...e time and select the capacity regulations and miscellaneous setpoints as necessary using the cursor arrow and Tab keys to move around the screen to each setpoint Press the Enter key to accept the new...

Page 40: ...ep 2 See Figure 39 Use the cursor arrow and Tab keys to navigate between setpoints Use the keypad to program the parameters listed in Table 12 under Comm1 Callout 1 at the Communications Screen Press...

Page 41: ...ate between setpoints With the keypad program the parameters listed inTable 13 under PID 5 on the PID Setup Screen Press the Enter key to accept each setpoint Step 3 Press the Submit key to accept the...

Page 42: ...nd then selecting Setpoints and Operating Values using the down cursor arrow key Step 2 See Figure 42 The Operating Values menu al lows the operator to select the Vyper or Harmonic Filter Screen Selec...

Page 43: ...nction clears the accumulated kWh totals from the counter since the last reset The value returns to zero upon selecting this option The following Vyper screen parameters display measured values in acc...

Page 44: ...ent Leg 1 2 3 Amps Voltages L1 N L2 N L3 N L1 L2 L2 L3 L3 L1 Voltage Total Supply kVA kVA Total Power Factor Baseplate Temperature F or C DC Bus Voltage Volts Manual Speed Switch Status RPM Figure 44...

Page 45: ...Press the Enter key to accept the value for each field Figure 45 Low Motor Amps High Motor Amps See Figures 46 and 47 The setpoints in High Motor Amps section of the Motor Screen are critical to prot...

Page 46: ...x Line 2 780 A 4 HP rating of Vyper Drive 700 HP 5 Vyper Amp Limit If Line 4 is 700 572 HP value is 880 A If Line 4 is 912 752 HP value is 1180 A 880 A 6 Multiply Line 5 x 1 05 924 A Figure 48 Ex 1 Mo...

Page 47: ...Vyper Amp Limit If Line 4 is 700 572 HP value is 880 A If Line 4 is 912 752 HP value is 1180 A 1180 A 6 Multiply Line 5 x 1 05 1239 A Figure 54 Ex 4 Motor Amps Safety Calculation Table The value of L...

Page 48: ...Minimum Drive Output Speed to a setpoint lower than the minimum speed recommended by the compressor motor may result in severe damage to the compressor motor Minimum Drive Output Speed This parameter...

Page 49: ...ned only by fixing the slide valve and modulating the capacity via Speed control The objective is to get the system into total speed control as quickly as possible and to maintain this strategy in the...

Page 50: ...to 1 turndown applications The Variable Speed Minimum Slide Valve Position is a factory default and is related to the Minimum Drive Output setting However an additional control feature is needed to ov...

Page 51: ...n selecting Setpoints and Compressor Press the ENTER key to advance to the Compressor Safeties Screen Step 2 Refer to Figure 61 Use the cursor arrow and Tab keys to navigate to the Highest Capacity To...

Page 52: ...ure 62 This control strategy is a variation on the generic control strategy described previously Not all applications require or are suitable for the very low speeds obtainable by the Vyper drive Many...

Page 53: ...ion to allow proper com munication Refer to Figure 66 Figure 66 Logic Board SW3 With the actual pressure at 21psig the proportional com ponent would be 20 The Proportional Component is calculated as A...

Page 54: ...of the Vyper Drive is now complete and ready for operation In addition to the eight DIP switches on SW3 jumper JP3 must be installed in order for Vyper control to be set at Refrigeration mode Refer t...

Page 55: ...dicators RX TX Logic Board to Quantum LX 8 J16 Communications Cable Logic Board to Quantum LX 9 Communications Indicators RX TX Logic Board to Filter Board 10 J15 Communications Cable Logic Board to F...

Page 56: ...larly and replace the coolant annually using the steps described previously in this manual Any time the coolant is removed from system always discard the old coolant and replace with new coolant Coola...

Page 57: ...n in Figure 72 15 Install the three 3 power wire connector tabs using 6 Phillip head screws and torque the screws to 48 in lb 5 5 Nm 10 16 Remove the six 6 Phillips head screws not yet tight ened at t...

Page 58: ...voltage as measured by an oscilloscope Phase to neutral is normally the phase to phase voltage divided by the square root of three or 265 VAC phase to neutral for a 460VAC system The peak value of th...

Page 59: ...pressor has been down for an extended period and the ambient temperature is less than the Low Vyper CoolantTemp warning or shutdown values it may be necessary to lower these settings temporarily in or...

Page 60: ...ake place during initialization Fault 5 message will appear before any other message can be generated Check to see that the serial commu nications have been established by selecting the Motor informat...

Page 61: ...and the converter heat sink temperature falls below the 37 F limit the unit will trip and energize the fan s and coolant pump This feature provides service personnel with a means to run the water pump...

Page 62: ...e B Gate Driver Message Quantum Fault 22 Quantum LX VSD Phase B Gate Driver Fault Same comments as Fault 21 except applying to Phase B Gate Driver Fault 23 Vyper Phase C Gate Driver Message Quantum Fa...

Page 63: ...enter or series capacitor connection to the negative bus and to the positive bus The center point is approximately half of the total DC link voltage When voltage is greater than 88 VDC from the half o...

Page 64: ...ide of the circuit is not shorted to the enclosure Fault 42 Vyperdrive Serial Communication Message Quantum Fault 42 Quantum LX VSD Serial Communications Fault When requesting Status data the response...

Page 65: ...s on the 50 Hz VSD If not the Quantum LX panel will display Fault 47 The unit is shut down and this message is generated if this condition is not met If this shutdown occurs measure the bus voltage at...

Page 66: ...LX panel displays Fault 65 Fault 66 Harmonic Filter Precharge Low DC Bus Voltage Message Quantum Fault 66 Quantum LX Harmonic Filter Precharge Low DC Bus Voltage The DC link voltage will reach at leas...

Page 67: ...nnection to the negative bus and to the positive bus This center point should be approximately half of the total DC link voltage Verify the problem exists using a pair of digital meters mea suring fro...

Page 68: ...speed Fault 83 Harmonic Filter Serial Communication Warning Only Message Quantum Fault 83 Quantum LX Harmonic Filter Serial Communication Warn ing Only When requesting Status data the response data f...

Page 69: ...trol Fan Pump 639A0211H34 10 Amp Cartridge Fuse 3Hp Oil Pump Blower Supply 639A0213H21 15 Amp Cartridge Fuse 5Hp Oil Pump Blower Supply 639A0213H22 20 Amp Cartridge Fuse 7 1 2Hp Oil Pump Blower Supply...

Page 70: ...er 24VAC 639A0211H39 Relay Control Fan Pump 639A0211H34 15 Amp Cartridge Fuse 5Hp Oil Pump Blower Supply 639A0213H22 20 Amp Cartridge Fuse 7 1 2Hp Oil Pump Blower Supply 639A0213H23 7 Amp Cartridge Fu...

Page 71: ...639A0213H49 Filter Upgrade 50Hz 639A0213H50 1 Shaded rows are recommended spare parts Also Used On the 305 437HP Drives MODEL 912 Part Desription Frick Part Filter Logic Board 639A0214H09 Filter Input...

Page 72: ...63 High Internal Ambient Temperature 64 High Inverter Baseplate Temperature 64 High Phase A Instantaneous Current 61 62 High Phase B Instantaneous Current 62 High Phase C Instantaneous Current 62 Ini...

Page 73: ...tor 45 46 47 54 setting user level 38 Standby Time 43 Vyper Screen 42 43 54 Quantum LX Panel 63 Quantum LX Control Panel 19 24 29 32 37 61 63 64 65 66 67 68 69 R Rate of Decrease 48 Rate of Decrease D...

Page 74: ...VYPER VARIABLE SPEED DRIVE NOTES 100 210 IOM JUL 09 Page 74...

Page 75: ...VYPER VARIABLE SPEED DRIVE NOTES 100 210 IOM JUL 09 Page 75...

Page 76: ...full advantage of Q NET technology with all Frick products System integration is what we do Q NET supports open protocols for SCADA systems i e Allen Bradley DF1 Modbus RTU Modbus ASCII and Industria...

Reviews: