background image

Ferm

65

OPERATION

Before setting up, repair or maintenance of the
appliance you must always turn off the operating

switch and pull out the mains plug!

Before initial operation

-

Check if the rated voltage and rated frequency of the
mains supply correspond to the details of the type
plate.

-

Place the workbench on a stable and even base.

Operation

-

To adjust the planing depth, turn the control knob
(Fig. 1, A) in a clockwise direction. On the control
knob there is a pointer (Fig. 1, A) which shows the
planing depth in mm. Turn the control knob until the
desired planing depth is shown.

Never alter the planing depth during an operating
cycle, otherwise this will result in an uneven

surface. To prevent operating errors turn the control knob
back to “0” when planing is completed.

-

Secure the work piece with clamps or similar.

-

Place the front sole on the edge of the work piece in
such a way that the planing tool does not yet touch
the work piece. The work piece must be level.

-

Now insert the mains plug into the socket. To switch
on, first press the release button (Fig. 1,E), keep it
pressed down while you press the operating switch
(Fig. 1,D). The appliance is now switched on and you
can let go of the release button.

-

When the machine has reached full speed it can be
pushed to the front over the work piece. At the
beginning of the planing operation, put some
pressure on the front and at the end of the operation,
on the rear of the appliance. This results in the
appliance remaining flat on the work piece and
prevents the corners from getting rounded off.

-

To obtain a level and smooth surface use a greater
planing depth when rough planing and a lesser planing
depth when planing a layer. Hold the electric tool
straight during the operation, otherwise you will
obtain an uneven surface. After the operation switch
off the electric tool and remove the mains plug.

WARNING!

1. Take care that your hand never comes in contact

with the work piece during the operation.

2. Only use the electric plane on the upper side of the

work piece, never from below or from the side.

3. Store the appliance only after it has come to a

complete standstill.

-

Use a suction device to suck off wood shavings or
dust. For this use the connecting pipe
and connect a suction pipe to it.

-

Use a holding device to work on small work pieces.

CARE AND MAINTENANCE 

Before undertaking any care or maintenance
always remove the mains plug from the socket.

The planing tool becomes worn after a period of
operation. If you use a blunt or damaged planing tool
operational efficiency is reduced and the electric motor
might become overloaded. Check the planing tool
regularly with regard to wear or damage. Depending on
its condition, the planing tool will have to be replaced.

REMOVAL OF PLANE BLADE (FIG. 2)

Use the enclosed open-jawed spanner (Accessories).
First unscrew the three clamping screws (6) with the
open-jawed spanner and remove the plane blade (3), the
plane blade holder (2) and the plane blade support (4)
from the holding shaft (1). 

INSTALLATION OF PLANE BLADE (FIG. 2)

Take the new plane blade (3) and position it between the
plane blade support (4) and the plane blade holder (2).
Now turn the clamping screws (6) as far as possible into
the plane blade support.
But not so far that the plane blade and the plane blade
holder become detached again from the plane blade
support. Afterwards put the plane blade, plane blade
holder and plane blade support together into the holding
shaft. The plane blade support, plane blade and plane
blade holder will now be fastened together in the holding
shaft by releasing the clamping screws with the open-
jawed spanner and thus the plane blade, plane blade
support and plane blade holder are clamped in position.

ATTENTION: 

Unscrew clamping screws as fas as possible so that a
sufficient attachment is ensured.

WARNING!

1. When installing and removing the plane blade, care

has to be taken that all parts (plane blade, plane blade
holder, plane blade support and holding shaft) are 
clean. Dirt or possible existing layers of dirt have to
be removed. 

2. The Allen screws (5) are secured with an adhesive.

These screws must not be adjusted. The position of
these screws may only be altered by the
manufacturer!

Check regularly if the clamping screws are
tightened firmly. Always tighten screws firmly.

REPLACEMENT OF THE CARBON BRUSHES 

The carbon brushes can become worn after frequent
use. A regular check after about every 100 running hours
is therefore necessary. If the carbon brushes are shorter
than 4 mm then these will have to be replaced with new
ones.
-

Remove the cover on the right.

-

Take out the carbon brushes and check these.

-

Replace the carbon brushes.

-

Replace the two screws and screw them tight.

4

Ferm

Summary of Contents for FP-650

Page 1: ...des H Változtatásjogátfenntartjuk CZ Změnyvyhrazeny R äÓÏÎ ÌËflFermÔÓÒÚÓflÌÌÓÒÓ Â ÂÌÒÚ Û ÂÚ ÔÛÒÍ ÂÏÛ Â Ô Ó ÛÍˆË èÓÁÚÓÏÛ ÚÂıÌË ÂÒËÂı ÍÚ ËÒÚËÍË ÏÓ ÛÚ ÌÓÒËÚ Òfl ÂÁÔ Â ËÚÂÎ ÌÓ Ó Û Â ÓÏÎÂÌËfl GR Art nr PPM1009 FP 650 www ferm com UK D NL F E P I S SF N DK H CZ SL PL USERSMANUAL 03 GEBRAUCHSANWEISUNG 06 GEBRUIKSAANWIJZING 10 MODED EMPLOI 14 MANUALDEINSTRUCCIONES 18 ISTRUÇÕNAUSAR 22 MANUALEUTILIZZATI 26 BR...

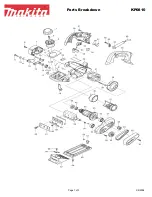
Page 2: ...Ferm 67 50 EXPLODEDVIEW Fig 1 Fig 2 1 2 3 4 5 6 3 2 Ferm A B C E D F G ...

Page 3: ...iance Becomefamiliarwiththe functionsandmethodofoperation Toensureproper operation alwaysmaintaintheapplianceaccordingto theinstructions Theoperatinginstructionsand associateddocumentsshouldalwaysbekeptclosetothe appliance Whenusingpowertools youmustobservethe follwingbasicsafetyprecautionsinordertoensure protectionfromelectricshocks injuryandfire Readandfollowalltheinstructionsbeforeusingthis pow...

Page 4: ...toit Useaholdingdevicetoworkonsmallworkpieces CAREANDMAINTENANCE Beforeundertakinganycareormaintenance alwaysremovethemainsplugfromthesocket Theplaningtoolbecomeswornafteraperiodof operation Ifyouuseabluntordamagedplaningtool operationalefficiencyisreducedandtheelectricmotor mightbecomeoverloaded Checktheplaningtool regularlywithregardtowearordamage Dependingon itscondition theplaningtoolwillhavet...

Page 5: ...seoffaultor damagehavetheelectrictoolrepairedonlybya specialistworkshoporbythemanufacturer CAUTION Useonlyoriginalsparepartsandoriginalplaneblades MAINTENANCE Make sure that the machine is not live when carryingoutmaintenanceworkonthemotor Theseappliancesaredesignedtofunctionwithout difficultyforalongtimeandtorequireminimum maintenance Youwillprolongtheappliance slifeby cleaningitregularlyandusing...

Page 6: ...ngunddiedazugehörende DokumentationmüsseninderNähederMaschine aufbewahrtwerden BeachtenbeimBenutzenvonElektromaschinen immerdieörtlichenSicherheitsvorschriften bezüglichFeuerrisiko Elektroschockund Verletzung LesenSieaußerdenfolgenden HinweisenebenfallsdieSicherheitsvorschriftenim einschlägigenSonderteil DieHinweisemüssensicheraufbewahrtwerden SCHALTENSIEDASGERÄTSOFORTAUS BEI 1 einerStörungamNetzs...

Page 7: ...dieSteckdose DrückenSiezumEinschaltenzuerstdenEntriege lungsknopf Abb 1 E haltenSieihngedrücktund drückenSiedenBetriebsschalter Abb 1 D Das Gerätistnuneingeschaltet undSiekönnenden Entriegelungsknopfloslassen WenndieMaschinedievolleDrehzahlerreichthat kannsienachvornüberdasWerkstückgeschoben werden ÜbenSiezuBeginnderHobelbewegung etwasDruckaufdieVorderseiteundamEndeaufdie RückseitedesGerätesaus Hi...

Page 8: ...erträger 2 Jetzt drehenSiedieKlemmschrauben 6 soweitwiemöglich indenMesserhalterhinein Abernichtsoweit daßsichdasMesserund MesserträgerwiedervonMesserhalterlösen AnschließendlegenSieHobelmesser Messerträgerund MesserhalterzusammenindieTrägerwelle Messerhalter MesserundMesserträgerwerdenjetzt zusammeninderTrägerwellebefestigt indemdie KlemmschraubenmitdemMaulschlüsselherausgedreht undsomitMesser Me...

Page 9: ...eisreparieren LeitungenimNetzsteckeroderSteckdoselose LassenSieSteckdoseundSteckerprüfenbzw reparieren Schalterdefekt LassenSiedenSchalterAuswechseln 2 DerBetriebsschalteristeingeschaltet aber essindungewöhnlicheGeräuschezuhören derMotorarbeitetnichtodernursehr langsam Schalterkontaktdurchgebrannt LassenSiedenSchalterauswechseln Bauteilblockiert LassenSiedasElektrowerkzeugprüfenbzw reparieren Zugr...

Page 10: ...isvoor handmatiggebruikgemaakt Devormisdaarop aangepastenhetapparaatisderhalvekleinvanafmeting Dit maakteeneenvoudigtransportmogelijk Het apparaatisveiligenbetrouwbaaringebruikenwordt aangedrevendooreeneenfase elektromotorviaeenV riem Ukunterhoutenbalkenofplankenmeeschaven ONDERDELENLIJST AFB 1 A Stelknopvoorschaafdiepte B Standvandeschaafdiepte C Afdekkkap rechts D Aan uit schakelaar E Ontgrendel...

Page 11: ...ÒÚ ÓÈÒÚ Ô ÎÂÛ ÎÂÌËfl ÑÎflÓ ÓÚÍËÌÂ ÓÎ ËıÁ ÓÚÓ ÓÍ ËÒÔÓÎ ÁÛÈÚÂÙËÍÒË Û ÂÂÔ ËÒÔÓÒÓ ÎÂÌËÂ 58 Ferm INBEDRIJFSTELLING Voordatuhetapparaatinstelt repareertofer onderhoudaangaatplegen dientualtijdde machineeerstuitteschakelenendestekkeruithet stopcontacttehalen Voorinbedrijfstelling Controleerofdenominalespanningendenominale frequentievanhetelektriciteitsnetovereenkomen metdegegevensophettypeplaatje Plaatsdew...

Page 12: ...ire Draai metdesleuteleerstdedrieklemschroeven 6 losen verwijderdeschaafbeitel 2 debeiteldrager 2 ende beitelhouder 4 uitdedraagas 1 MONTAGE SCHAAFBEITEL AFB 2 Neemdenieuweschaafbeitel 3 enplaatshemtussen beitelhouder 4 enbeiteldrager 2 Draaivervolgensde klemschroeven 6 zovermogelijkindebeitelhouders maardoedatnietzover datdebeitelendebeiteldrager weervandebeitelhouderlosraken Daarnalegtude schaaf...

Page 13: ...datde ventilatiesleuvenvrijvanstofenvuilzijn Gebruikbijhardnekkigvuileenzachtedoekbevochtigd metzeepwater Gebruikgeenoplosmiddelenals benzine alcohol ammonia etc Dergelijkestoffen beschadigendekunststofonderdelen Smeren Demachineheeftgeenextrasmeringnodig Storingen Indienzicheenstoringvoordoetalsgevolgvan bijvoorbeeldslijtagevaneenonderdeel neemdan contactopmetuwplaatselijkeFerm dealer Achterindez...

Page 14: ...rancyjnej Rysunekprzedstawiającyczęścizamienne któremożna zakupićznajdujesięnakońcuniniejszejinstrukcjiobsługi OCHRONAŚRODOWISKA Abyzapobiecuszkodzeniomwczasietransportu urządzeniedostarczanejestwsztywnymopakowaniu składającymsięgłówniezmateriałównadającychsiędo ponownegoprzetworzenia Prosimyoskorzystaniez możliwościponownegoprzetworzeniaopakowania Ferm 55 MACHINEÀRABOTER LESCHIFFRESDUTEXTESUIVANT...

Page 15: ... ostrza Uważajjednak abyostrzeioprawkanieodeszłyod podpórki Następniewłóżostrze oprawkęipodpórkę razemwwałekdociskowy Jeślizwolniszterazśruby zaciskowe używająckluczapłaskiego ostrze oprawkai podpórkazostanązamocowanerazem Tymsamym ostrze podpórkaioprawkazostanązablokowanewe właściwympołożeniu UWAGA Abyzapewnićodpowiedniemocowanie maksymalnie odkręćśrubyzaciskowe OSTRZEŻENIE 1 Wtrakciezakładanialu...

Page 16: ... Enfonctiondesonétat lalamede rabotdevraêtreremplacée DEMONTAGELAMEDERABOT SCHEMA2 Utiliserlaclé accessoire jointeàlalivraison Dévisser lestroisvisdeserrage 6 àl aidedelacléetretirerla lamederabot 2 leporte lame 2 etlesupportdelame 4 del essieuporteur 1 MONTAGELAMEDERABOT SCHEMA2 Prendrelanouvellelamederabot 3 etlaplacerentrele supportdelame 4 etleporte lame 2 Visseralorsles visdeserrage 6 aussilo...

Page 17: ...dnesinazbirališčetakšnih odpadkovoz vzatonamenjenkontejner dabo reciklirana Konapraveneželišvečuporabljatijeneodvrzivnavaden smetnjak Vrnijosvojemuprodajalcu kiboposkrbel da boekološkovarnoodstranjena GARANCIJA Pogojegarancijenajdemoposebejpriložene Spolnoodgovornostjoizjavljamo dajetaizdelekv skladuznaslednjimistandardialistandardiziranimi dokumenti EN50144 2 14 EN50144 1 EN55014 1 EN55014 2 EN61...

Page 18: ...ih100delovnihurah Koso krajšeod4mmjihjetrebazamenjati snemidesnipokrov snemiščetkeinjihpreveri popotrebijihzamenjaj trdnoprivijobavjaka Ferm 51 MÁQUINACEPILLADORA LOSNÚMEROSINDICADOSENELTEXTO SIGUIENTECORRESPONDENALAS ILUSTRACIONESDELAPÁGINA2 ESPECIFICACIONESTÉCNICAS DESCRIPCIÓNDELPRODUCTO BREVEDESCRIPCIÓN Estaherramientaeléctricacondobleaislamientoestá concebidaparaelaccionamientoamano Tieneuna f...

Page 19: ...ervicioyextraerelenchufedelatomadered Antesdelapuestaenmarcha Compruebesilatensiónyfrecuencianominalesdela redeléctricacoincidenconlosdatosdelaplaca indicadora Coloquelamesadetrabajosobreunasuperficie estableyplana Servicio Gireelbotóndeajuste ilustr 1 A enelsentidode lasagujasdelrelojparadeterminarlaprofundidadde cepillado Conelbotóndeajusteseencuentraun indicador ilustr 1 A queindicalaprofundida...

Page 20: ...cierto tiempodeutilización Sisigueutilizandounacuchilla despuntadaodeteriorada veráVd reducidalaeficacia desutrabajo yeventualmentepodríasobrecargarel motor Comprueberegularmentelacuchillapara detectarposiblesdesgastesodeterioros segúnsu estado seráconvenientesusustitución DESMONTAJEDELACUCHILLADEL CEPILLO ILUSTR 2 Utilicelallavedebocaanexa accesorios Primero suelteconlallavedebocalostrestornillos...

Page 21: ... Ferm 21 ÚDRŽBA Předtím nežzačnetesúdržbou vytáhnětevždy zástrčkuzezásuvky Želízkohoblíkujepourčitédoběpoužívání opotřebované Jestližebudeteinadálepoužívattupé nebopoškozenéželízko efektivitasetímzmenšía případněsemůžepřetížitelektromotor Kontrolujte pravidelněželízkahoblíku zdanejsouopotřebované nebopoškozené Želízkasemusívyměnitvzávislostiv jakémstavusenacházejí DEMONTÁŽŽELÍZKAHOBLÍKU OBR 2 Použ...

Page 22: ...LECTRICKÁBEZČPENOST Vždyzkontrolujte zdanapětívsítiodpovídá hodnotěnaštítkupřístroje StrojmádvojíizolacipodlenormyEN50144 uzemněníprotonenípotřeba Přivýměněkabelůazástrček Staréšňůryazástrčkyvždyokamžitěvyhoďte jakmileje nahradítenovými Jenebezpečnéstrkatdozásuvky zástrčkuuvolněnéhokabelu Připoužitíprodlužovacíchkabelů Používejtevýhradněschválenýprodlužovacíkabel který jevhodnýprovýkonpřístroje Je...

Page 23: ...tênciadamáquina Ocabotemdeter umdiâmetromínimode1 5mm2 Seaextensãoestiver numaunidadedeenrolamentodesenroletotalmenteo fio SERVIÇO Antesdeprocederaoajuste reparaçãoou manutençãodoaparelhodevedesligarsempreo interruptordeserviçoeretirarafichadatomadaderede Antesdacolocaçãoemserviço Verificarseatensčoeafrequźncianominaisdarede decorrenteconcordamcomosdadosconstantesda placadeidentificaćčodamáquina A...

Page 24: ...tlegessérülések elkerüléseérdekébenagépmeglehetősenerős csomagolásbankerülleszállításra Acsomagoláshoz felhasználtanyagoknagyrészeújrafeldolgozható Kérjük hogyezeketazanyagokatvigyeamegfelelő szemétfeldolgozótelepekre Amennyibengépétnemkívánjatovábbhasználni kérjük adjaleahelyiFerm forgalmazónál Agépek hulladékanyagkéntvalóeltávolításaittmindenesetben környezetkímélőmódontörténik GARANCIA Agaranci...

Page 25: ...tisztalegyen A szennyeződéseketelkelltávolítani 2 Ahatlapfejűcsavarokat 5 ragasztóanyagtartja helyükön Ezeketacsavarokatnemszabad elmozdítani Acsavarokhelyzeténcsakagyártó változtathat Rendszeresenellenőrizze hogyaszorítócsavarok elégszorosanhelyezkednek eel Acsavarokat mindigmaximálisanbekellszorítani ASZÉNKEFÉKCSERÉJE Sokszoroshasználatutánelkophatnakaszénkefék 100 üzemórautánezértszükségesarend...

Page 26: ...inór hálózatidugójátahálózaticsatlakozóaljzatbadugni veszélyes Hosszabbítókhasználataesetén Kizárólagengedélyezett szabványszerintihosszabbítót használjon ésolyat amelyagépteljesítményének megfelelő Avezetékerekátmérőjelegalább1 5mm2 legyen Haahosszabbítózsinórdobravanfeltekerve azt előszörteljesentekerjele AKÉSZÜLÉKETAZONNALKIKELL KAPCSOLNI 1 Ahálózaticsatlakozódugó ahálózatielektromos vezetékvag...

Page 27: ...i usarelamacchina Assicurarsidiconoscerelefunzioni dellamacchinaecomeattivarle Maneggiarelamacchina rispettandoleistruzionipergarantirneilfunzionamento corretto Conservareilpresentemanualeela documentazioneallegatainsiemeallamacchina Nell usareutensilielettriciosservaresemprele normedisicurezzavigentinelpropriopaeseper limitareilrischiodiincendio folgorazioneelesioni personali Leggerelepresentiist...

Page 28: ...kkeligtfastgjort PASPÅ 1 Vedde monteringafhøvlejernetskalmanvære opmærksompå atalledelene jern jernbærer jernholderogbæreakslen errene Snavsogevt smudslagskalfjernes 2 Sekskantskruerne 5 ersikretmedklæbestof Indstillingenafdisseskruermåikkeændres Kun fabrikantenmåændredisseskruersposition Kontrollérregelmæssigt omklemskruernesidder godtfast Sørgfor atskruernealtidergodtfast spændt UDSKIFTNINGAFKON...

Page 29: ...llarefilidellaspinaodellapresaeseè necessarioriparare Interruttoredifettoso Farecambiarel interruttore 2 L interruttoreON OFFèposizionatosu On masisentonodeirumoriparticolari il motorenonfunzionaofunzionamolto lentamente Contattodell interruttorebruciato Faresostituirel interruttore Componentebloccato Farecontrollareoripararel apparecchio Troppaforzadipiallatura ciòfrenailmotore Usaremenoforzadura...

Page 30: ...l Slikestofferskader kunststoffdelene Smøring Maskinentrengerikkeekstrasmøring Feil Hvisdetskulleopptreenfeilsomfølgeavf eks slitasjepå endel måmantakontaktmeddenlokaleFerm forhandleren Bakerstidennebruksanvisningenfinnesdeten deltegningmeddedelersomkanbestilles MILJØ Foråunngåtransportskaderleveresmaskinenisolid emballasje Emballasjeneridengraddetteermulig fremstiltavresirkulerbartmateriale Benyt...

Page 31: ... Taavhøyrevernedeksel Tautkullbørsteneogkontrollerdisse Settkullbørstenetilbake Settdetoskruenepåplassogtrekkdemgodttil 38 Ferm SÄKERHETSFÖRESKRIFTER Idennabruksanvisninganvändsföljandesymboler Angerattdetföreliggerriskförkroppsskada livsfaraellerriskförskadorpåmaskinenom instruktionernaidennabruksanvisninginteefterlevs Angerelektriskspänning Läsigenomdennabruksanvisningnoggrantinnan maskinentasib...

Page 32: ...skickkandebehövabytasut NEDMONTERINGHYVELSTÅL ill 2 Använddennyckelsomlevereratsmed tillbehör Skruvaförstlossdetreklämskruvarna 6 mednyckeln ochtauthyvelstålet 2 stålhållaren 2 ochhållaren 4 i bäraxeln 1 MONTERINGHYVELSTÅL ill 2 Taframdetnyahyvelstålet 3 ochsättdetmellanhållare 4 ochstålhållare 2 Skruvaseninklämskruvarna 6 så långtsommöjligtihållarna meninteförlångtfördåkan stålochstålhållarepånyt...

Page 33: ...urioidenvälttämiseksikoneonpakattu tukevaanlaatikkoon Tämäpakkausonmahdollisimman ympäristöystävällinen Kierrätäse Josvaihdatkoneenuuteen voitviedävanhankoneen Ferm jälleenmyyjällesi jokahuolehtii ympäristöystävällisestäjätehuollosta TAKUU Luetakuuehdotkoneenmukaanliitetystätakuukortista Todistammetätenjavastaammeyksinsiitä ettätämätuoteonallalueteitujenstandardienja standardoimisasiakirjojenvaati...

Page 34: ...amisenjaasentamisenyhteydessäkaikki osatonpuhdistettavahuolellisesti 2 Kuusioruuvit 5 onlukittulukitusaineella Näitä ruuvejaeisaakiertää Ainoastaanvalmistajasaa tehdämuutoksia Tarkistasäännöllisestipidätinruuvienkiristys HIILIHARJOJENVAIHTO Pitkänkäytönjälkeenhiiliharjatvoivatollakuluneita Tarkistaniidenkuntoaina100käyttötunninjälkeen Jos harjojenpituusonvähemmänkuin4mm neon vaihdettava Poistaoike...

Reviews: