background image


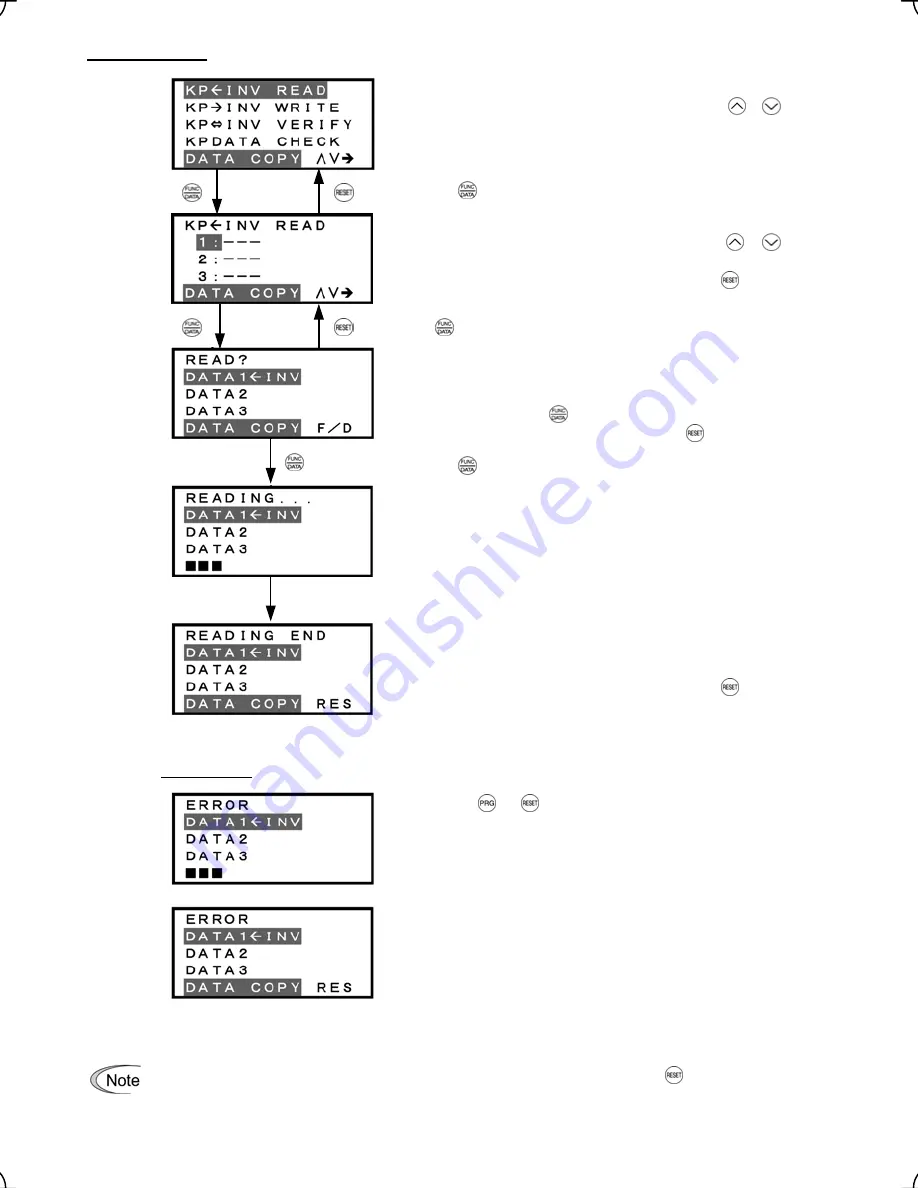
2) Read Operation 


List of data copy operations 

Select the target operation by moving the cursor with 

 / 


keys. 


Data selection screen 

Select the target data by moving the cursor with 

 / 


keys. 
To go back to List of data copy operations, press the 

 key.


Confirmation screen 

If "Read" is actually performed, the data read out from the 
inverter will overwrite the data held in this memory area in the 
keypad. If OK, press the 

 key. 

To go back to Data selection screen, press the 

 key.


"In progress" screen 

A bar indicating progress appears in the bottom. 


Completion screen 

This screen indicates that Read operation has completed 
successfully. 
To go back to List of data copy operations, press the 

 key. 


Error screens 


Pressing the 

 or 

  key during Read operation aborts the 

operation under way and displays this error.

(Note)


Once 

aborted, all the data held in the keypad’s memory would be 
deleted. 


If a communication error is detected between the keypad and 
the inverter, this error screen will appear. 


Figure 3.19  Screen Transition for "READ" 


If an ERROR screen or ERROR Ver. screen appears during operation, press the 

key to reset the 

error condition. When Reset is complete, the screen will go back to List of data copy operations.   

If a communications error occurs between the keypad and inverter during Read operation, all the data 
held in the keypad’s memory will be deleted. 

Press the 

  key to establish the target operation. 


Press 

  key to establish the target data. 

Press the 


key to start Read operation. 

Upon completion, Completion screen automatically appears. 


3-29


Summary of Contents for TP-G1-?LS

Page 1: ...d be familiar with the handling procedure for correct use Improper handling blocks correct operation or causes a short life or failure Deliver this manual to the end user of the product Keep this manual in a safe place until the multi function keypad is discarded For the usage of inverters and optional equipment refer to the instruction manuals prepared for the FRENIC Lift series of inverters and ...

Page 2: ...e reproduced or copied without prior written permission from Fuji Electric FA Components Systems Co Ltd All products and company names mentioned in this manual are trademarks or registered trademarks of their respective holders The information contained herein is subject to change without prior notice for improvement ...

Page 3: ... Lift Instruction Manual INR SI47 1038 E FRENIC Lift Reference Manual INR SI47 1068 E The materials are subject to change without notice Be sure to obtain the latest editions for use About the ROM version of multi function keypad Please read manual INR SI47 1056 E when ROM version of a multi function keypad is 8510 It might be dif ferent from the content of the description of this manual Please re...

Page 4: ...An accident or injuries could occur Do not touch the inverter terminals while the power is applied to the inverter even if the inverter stops Doing so could cause electric shock Wiring Do not operate the switch with wet hands Doing so could cause electric shock Before opening the cover of the inverter to install the multi function keypad turn the power off and wait for at least five minutes Furthe...

Page 5: ...terconnect it with an inverter Chapter 3 OPERATION USING THE MULTI FUNCTION KEYPAD This chapter describes the operation of the inverter using the multi function keypad More specifically this chapter gives an overview of the inverter s three operation modes Running Programming and Alarm modes and describes how to run and stop the inverter motor set function code data monitor running status view mai...

Page 6: ... Menu 1 Data Setting 3 10 3 4 2 Setting up function codes quickly Menu 0 Quick Setup 3 13 3 4 3 Checking changed function codes Menu 2 Data Checking 3 13 3 4 4 Monitoring the running status Menu 3 Drive Monitoring 3 14 3 4 5 Checking I O signal status Menu 4 I O Checking 3 16 3 4 6 Reading maintenance information Menu 5 Maintenance Information 3 20 3 4 7 Reading alarm information Menu 6 Alarm Info...

Page 7: ... Model name Language that can be displayed TP G1 CLS Chinese English Japanese TP G1 ELS English Japanese German French Spanish Italian If you suspect the product is not working properly or if you have any questions about your product contact your Fuji Electric representative Figure 1 1 Back of Multi function Keypad TP G1 CLS TP G1 ELS 1 2 Inverters with which the Multi function Keypad Interfaces T...

Page 8: ... 1S You have a choice of three lengths 5 m 3 m and 1 m Screws for mounting the multi function keypad M3 x 2 Provide 2 screws to be provided by the customer beforehand 1 Alternatively you can use an off the shelf 10BASE T 100BASE TX LAN cable straight type that meets the ANSI TIA EIA 568A Category 5 standard maximum length 20 m Recommended LAN cable Manufacturer Sanwa Supply Co Ltd Model KB 10T5 01...

Page 9: ... Install it directly on the inverter see Figure 2 1 Install it on the front panel of enclosure see Figure 2 2 Use it remotely in your hand see Figure 2 3 For FRN LM1S 4 Figure 2 1 Installing Multi function Keypad Directly on Inverter Figure 2 2 Installing Multi function Keypad on Enclosure Figure 2 3 Using Multi function Keypad remotely in Your Hand 2 2 ...

Page 10: ...ounted on the inverter Pull the blind cover toward you while holding down the hook as directed by the arrows in Figure 2 4 below Figure 2 4 Removing the Blind Cover Mount the multi function keypad onto the inverter Put the multi function keypad in the original slot while engaging its bottom latches with the holes as shown below and push it onto the case of the inverter arrow while holding it downw...

Page 11: ...this happens remove the terminal block cover and the front cover then secure the multi function keypad to the inverter with the attached screw Two After that reinstall those covers For the procedures for removing the covers refer to the FRENIC Lift Instruction Manual INR SI47 1038 E Chapter 2 Section 2 3 1 Removing and mounting the terminal block TB cover and the front cover Figure 2 6 Fixing the ...

Page 12: ...on keypad on the enclosure panel Cut the panel out for a single square area and perforate two screw holes in the panel of the enclosure as shown in Figure 2 7 Model name Figure 2 7 Dimensions of Square Cut out and Screw Holes 2 5 ...

Page 13: ... a LAN cable interconnect the multi function keypad and the inverter insert one end of the cable into the RS485 port with RJ 45 connector on the multi function keypad and the other end into that on the inverter See Figure 2 9 Figure 2 9 Connecting Multi function Keypad to the Inverter with Remote Operation Extension Cable or an off the shelf LAN Cable Using the multi function keypad in hand Follow...

Page 14: ...us data including maintenance information and alarm information set function codes monitor I O signal status copy data and calculate the load factor 7 segment LED monitor Program key Indicator indexes DOWN key Stop key UP key Function Data key Run forward key Run reverse key Reset key Shift key Remote Local key LED indicator LCD monitor 3 1 ...

Page 15: ... the inverter Shifts the cursor to the right when entering a number Pressing this key after removing the cause of an alarm will switch the inverter to Running mode This key is used to reset settings or screen transition UP and DOWN keys These keys are used to select the setting items or change the function code data and Program ming keys Function Data key This key switches the operation as follows...

Page 16: ...eed kW Input power Unit of number displayed on LED monitor X10 Data exceeding 99 999 min Not applicable sec Not applicable PID Torque bias balance adjustment and torque bias gain adjustment FWD Running in forward direction REV Running in reverse direction Running status STOP Stopped state No output or detected speed 0 REM Remote mode LOC Local mode COMM Via communication RS485 1 CAN JOG Jogging mo...

Page 17: ...ntenance Alarm mode If an alarm condition arises the inverter automatically enters the Alarm mode In this mode you can view the corresponding alarm code and its related information on the LED and LCD monitors Alarm code represents the type of alarms that have been triggered by the protection function For details refer to the FRENIC Lift Instruction Manual INR SI47 1038 E Chapter 8 Section 8 5 Prot...

Page 18: ...the one shown here Displaying the running status on the LCD monitor When function code E45 data LCD monitor item selection is set to 0 1 The LCD monitor displays the running status the rotational direction and the operation guide The lower indicators show the running status and run command source For the upper ones see Section 3 3 3 Figure 3 3 Display of Running Status The running status and the r...

Page 19: ...termined by source switching signals including function codes and communications link operation signal The keypad cannot be used as a command source Local mode The keypad is enabled as a run and speed command source regardless of the settings specified by function codes The keypad takes precedence over a communications link operation signal or other command sources Holding down the key for at leas...

Page 20: ...erence speed pre ramp can be specified with the keys E48 specifies the speed monitoring formats unit For details about the LED monitor refer to Section 3 3 3 When you start accessing the reference speed pre ramp with the keys the lowest digit on the display will blink and start changing As you are holding down the key blinking will gradually move to the upper digit places and the upper digits will...

Page 21: ...speed pre ramp E48 2 2 100 r min Motor rotation speed E48 3 3 Motor speed 1500 m min 5 Elevator speed Elevator speed E48 5 11 1 A Output of the inverter in current in rms 3 8 Output current 1 34 kW Input power to the inverter 9 9 Input power 1 25 Torque in based on the motor rated torque being at 100 2 10 Calculated torque 8 200 V 11 Output voltage Output of the inverter in voltage in rms 4 25 0 T...

Page 22: ... 5 I O Checking Displays external interface information Displays maintenance information including cumulative run time 5 3 4 6 Maintenance Information Displays four latest alarm codes Also this allows you to view the information on the running status at the time the alarm occurred 6 3 4 7 Alarm Information 7 Displays the cause of the alarm 3 4 8 Alarm Cause Allows you to read or write function cod...

Page 23: ...s for sophisticated control y code Link functions Link functions Functions for controlling communication L code Lift functions Lift functions Functions for controlling elevators lifts Function codes requiring simultaneous keying To modify the data for function code F00 Data Protection H03 Data Initialization H97 Clear Alarm Data or H99 Password Protection simultaneous keying is needed involving th...

Page 24: ...gure 3 11 Changing Function Code Data Select the target menu by moving the pointer Æ with keys Press the key to establish the target menu Select the target function code by moving the cursor with keys Press the key to establish target function code Press keys to change function code data 3 12 ...

Page 25: ...ting The blinking digit can be changed 5 Press the key to establish the function code data The data will be saved in the memory inside the inverter The display will return to the function code list then move to the next function code F04 in this example Pressing the key preceding the key cancels the change made to that function code data The data reverts to the previous value the screen returns to...

Page 26: ...ng function code H03 the set of function codes subject to Quick Setup will be reset to the factory default The LCD screen transition from Menu 0 is the same as with Menu 1 Data Setting Basic key operation Same as the basic key operation for Menu 1 Data Setting 3 4 3 Checking changed function codes Menu 2 Data Checking Menu 2 Data Checking in Programming mode allows you to check function codes toge...

Page 27: ...e motor rated torque being at 100 Reference torque TRQC Value based on the motor rated torque being at 100 Reference torque current TRQI Value based on the motor rated current being at 100 Electronic thermal for motor OLM Value based on the electronic thermal overload protection level being at 100 2 1 In vector control with PG this item shows the reference torque 2 It is not supported in a certain...

Page 28: ...ce torque Reference speed pre ramp Rotational direction and status Motor speed Not applicable Elevator speed Not applicable Not applicable Reference torque bias Reference torque Reference torque current Electronic thermal for motor Figure 3 13 Screen Transition for 3 OPR MNTR Common operation To confirm data call the desired page with keys Press the key to return to Menu 3 15 ...

Page 29: ...a communications link hexadecimal 12 Input voltage at terminal 12 C1 Input current at terminal C1 Analog input signals V2 Input voltage at terminal V2 θ e Output electrical angle θ re Magnet pole position detection angle only when the PP option is mounted θ m Detected mechanical angle only when the PS option is mounted Phase angle PPb Magnet pole position detection signal in binary only when the P...

Page 30: ...2 Select the target menu by moving the pointer Æ with Input current at terminal C1 Input voltage at terminal V2 Not applicable Not applicable Figure 3 14 Screen Transition for 4 I O CHECK keys Press the key to establish the target menu Input status at terminal Input status at terminal via communications link Output status at terminal Analog input status I O status hexadecimal Common operation To c...

Page 31: ...osition detection signal in binary only when the PP option is mounted Not applicable Not applicable Encoder pulse frequency for A and B phase Encoder pulse frequency for Z phase Figure 3 14 Screen Transition for 4 I O CHECK continued Phase angle Common operation To confirm data call the desired page with keys Press the Encoder pulse frequency key to return to Menu 3 18 ...

Page 32: ... 12 11 10 9 8 7 6 5 4 3 2 1 0 Input signal RST 1 1 XR XF 1 EN 2 X8 X7 X6 X5 X4 X3 X2 X1 REV FWD Output signal 30A B C Y5A C Y4 Y3 Y2 Y1 0 0 0 0 0 0 0 0 0 0 0 0 0 1 0 1 Binary Example input 0005 Hex H Unassigned 1 XF XR RST are for communication Refer to the section given below 2 EN is for monitoring and cannot be used for input entered via a communications link Input status at terminal via communi...

Page 33: ... the printed circuit board and a coefficient determined by the environmental condition When the total time exceeds 65 535 hours the counting will stop Cumulative run time of capacitors on printed circuit board TCAP As a guide 61 000 hours is considered as life Shows the cumulative run time of the cooling fan When the total time exceeds 65 535 hours the counting will stop Cumulative run time of coo...

Page 34: ... function selection will appear 2 Use the keys to move the pointer Æ to 5 MAINTENANC 3 Press the key to display the maintenance screen one out of a total of 7 pages 4 Use the keys to select the target item page and confirm the maintenance data for that item 5 Press the key to go back to the menu Figure 3 15 shows the LCD screen transition for 5 MAINTENANC 3 21 ...

Page 35: ... board Standard replacement intervals Cumulative run time of cooling fan Standard replacement intervals Number of startups Cumulative power consumption Not applicable Number Contents of RS485 communications errors Not applicable Not applicable ROM version of the inverter ROM version of the keypad ROM version of the option Option name Figure 3 15 Screen Transition for 5 MAINTENANC Common operation ...

Page 36: ...again Shows the total number of startups of the motor number of times when the run command for the inverter was turned ON Number of startups NST When the number of times exceeds 65 535 times the counter will be reset to 0 and the count will start again DC link circuit voltage EDC Shows the DC link circuit voltage of the inverter s main circuit Inverter internal air temperature TMPI Shows the tempe...

Page 37: ...the time of the alarm one out of a total of 7 pages on the LCD monitor 6 Use the keys to select the target item page and confirm the status data for that item 7 Press the key to return to the alarm list Press the key again to return to the menu Figure 3 16 shows the LCD screen transition for 6 ALM INF Cause No of occurrences of alarm history last Select the target menu by moving the pointer Æ with...

Page 38: ...emperature Input status at terminal Highlighted when short circuited normal when opened Input status at terminal via communications link Highlighted when 1 normal when 0 Output status at terminal Highlighted when ON normal when OFF Multiple alarm 2 Multiple alarm 1 Alarm sub code Figure 3 16 Screen Transition for 6 ALM INF continued Common operation To confirm data call the desired page with keys ...

Page 39: ...M CAUSE 3 Press the key to call up the alarm list screen that shows information on the four most recent alarm conditions alarm code and the number of occurrences for each alarm condition 4 Use the keys to select the alarm condition to be detailed 5 Press the key to display the alarm code on the LED monitor and the alarm cause screen can be more than 1 page on the LCD monitor 6 Use the keys to view...

Page 40: ...rn to alarm list screen Alarm cause 2nd page Figure 3 17 Screen Transition for ALM CAUSE Pressing the key on the Alarm list screen allows you to select the alarm cause of a multiple alarm to check Multiple alarm 2 Multiple alarm 1 Cause No of occurrences of alarm history last Cause No of occurrences of alarm history 2nd last keys Press the key to establish the target menu Select the target alarm b...

Page 41: ...dex screen list of data copy operations 4 Use the keys to select the target operation read write verify or check 5 Press the key to establish the selected operation and then select data stored in the keypad 6 Press the key to establish the selection and perform the operation of your choice for details refer to the LCD screen transition diagram below 7 Press the key to return to the menu Figure 3 1...

Page 42: ...ress the key Error screens Pressing the or key during Read operation aborts the operation under way and displays this error Note Once aborted all the data held in the keypad s memory would be deleted If a communication error is detected between the keypad and the inverter this error screen will appear Figure 3 19 Screen Transition for READ If an ERROR screen or ERROR Ver screen appears during oper...

Page 43: ...perations Select the target operation by moving the cursor with keys Data selection screen Select the target data by moving the cursor with keys To go back to List of data copy operations press the key Confirmation screen If Write is actually performed the selected data will overwrite the data held in the inverter If OK press the key To go back to Data selection screen press the key In progress sc...

Page 44: ...has been performed while the inverter is running The inverter is data protected The function code data held in the keypad is incompatible with that in the inverter Either data may be non standard or a version upgrade performed in the past may have made the keypad or inverter incompatible Contact your Fuji Electric representative Figure 3 20 Screen Transition for WRITE continued If an ERROR screen ...

Page 45: ...n is halted with the function code and its data displayed on the LCD monitor To resume the Verify operation from the next function code press the key again In progress screen A bar indicating progress appears in the bottom Completion screen This screen indicates that Verify operation has completed successfully To go back to List of data copy operations press the key Figure 3 21 Screen Transition f...

Page 46: ...splays this error Note If the keypad does not have any valid data this error screen will appear Figure 3 21 Screen Transition for VERIFY continued If an ERROR screen appears press the key to reset the error factor When Reset is complete the screen will go back to List of data copy operations 3 33 ...

Page 47: ... other function codes press keys To go back to List of data copy operations press the key Figure 3 22 Screen Transition for DATA CHECK Error screen If no valid data is found in the keypad this error screen will appear Note Figure 3 23 Error Screen for DATA CHECK If an ERROR screen appears during operation press the key to reset the error factor When Reset is complete the screen will go back to Lis...

Page 48: ...de In Running mode press t e h key to enter Programming mode The menu for function selection will appear 2 Use the keys to move the pointer Æ to 9 LOAD FCTR 3 Press the key to get the measurement mode selection screen 4 Use the keys to select the measurement mode 5 Press the key to start the measurement For start to stop mode you will be prompted to enter a run command via a confirmation screen Fo...

Page 49: ...gress the remaining time is displayed Specified duration Max output current Average output current Average braking power Display of measurement results Figure 3 25 Screen Transition for Hours Set Mode Press the key to establish the target mode of measurement Set the duration with and keys Press the key to establish the duration and start measurement When the key is pressed or the measurement durat...

Page 50: ...ransition for Start to Stop Mode 4 Going back to Running mode While the measurement of the load factor is in progress you can go back to the running mode by pressing the key or to the Mode selection screen by pressing the key In these cases the measurement of the load factor will continue You can go back to 9 LOAD FCTR and confirm on the Mode selection screen that the measurement is in progress Af...

Page 51: ...he addition or deletion 6 Press the key to return to the menu Figure 3 27 shows the LCD screen transition for 10 USER SET List of function codes Lists function codes with their names The function codes covered by Quick setup are highlighted names are highlighted Select the function code to be added not highlighted by moving the cursor with keys To go back to the menu press the key Select the funct...

Page 52: ...unication related function codes 4 Use the keys to move the cursor to the target function code 5 Press the key to check the function code 6 Press the key to return to the menu Figure 3 28 shows the LCD screen transition for 11 COMM DEBUG Select the target menu by moving the pointer Æ with List of communication related function codes This screen lists function codes with their names Select the func...

Page 53: ...If there is a multiple alarm you can view more detailed information by pressing the key In the examples below 1 Er2 corresponds to the first multiple alarm occurrence and 2 OH2 to the second multiple alarm occurrence Display of alarm history In addition to the most recent current alarm you can view three recent alarms and any multiple alarms by pressing keys while the most recent one is being disp...

Page 54: ...ormation being displayed returns to the display of the alarm code Transition to Programming mode Pressing the key with alarm information being displayed switches to Programming mode in which you can use a variety of features such as changing function code data Resetting alarm and transition to Running mode Removing the cause of the alarm and pressing the key will reset the alarm condition and swit...

Page 55: ...tor parameters Note 1 Figure 3 33 Screen Transition for Motor Tuning Note 1 Time for tuning Approx 15 sec when P04 1 Approx 25 sec when P04 2 Use keys to set P04 to either 1 or 2 key to establish the current tuning mode Press the Run command ON End of tuning Run command OFF Turn the run command off The run command given by the keypad or the link operation is automatically turned off Tuning complet...

Page 56: ...ommand OFF Turn the run command off The run command given by the keypad or the link operation is automatically turned off Tuning completes The lead through on the keypad ends the tuning process and moves to the next function code L04 Figure 3 34 Screen Transition for Magnet Pole Position Tuning The setting range of L03 may vary depending upon the inverter s ROM version For details about the settin...

Page 57: ...OPY 0 QUICK SET 4 I O CHECK 10 USER SET 1 DATA SET 5 MAINTENANC 2 DATA CHECK 6 ALM INF Note The function code list can be displayed but data of function codes cannot be accessed or changed except F00 and H03 7 ALM CAUSE 9 LOAD FCTR 11 COMM DEBUG Entering password Enabling the password protection Select H99 from Menu 1 Data Setting Set function code H99 to nonzero Changing the data of H99 requires ...

Page 58: ...o enable password protection In addition to the above procedure turn the inverter power off or leave the inverter with the password temporarily canceled for at least four hours and then switch the inverter to Running mode or Menu Enabling the password protection displays PASSWORD for all function codes except F00 and H03 on the DATA CHECK screen Selecting any function code except F00 and H03 with ...

Page 59: ...ying of keys or keys is required key to establish your password entry Press the The screen returns to the DATA SET one The password protection is temporarily canceled Figure 3 37 Screen Transition for the Password Protection Temporarily Canceled With the password protection temporarily canceled setting H99 data to a value other than 0000 enables you to register a new password 3 46 ...

Page 60: ...Transition for Canceling Password Protection If you forget your password you can reset the password protection by performing Initializing with H03 Initializing with H03 resets all the function code data to the factory defaults Be sure to restore the proper settings that match the specifications of the system Accidents or injuries may result 3 6 3 Connecting to other inverter series Connecting the ...

Page 61: ...ly Shall be free from corrosive gases flammable gases dust and direct sunlight Ambient temperature during operation 10 to 50 C Ambient humidity 5 to 95 RH no condensation Altitude 1000 m or below Vibration 3 mm max 2 9 Hz 9 8 m s 2 9 20 Hz 2 m s 2 20 55 Hz 1 m s 2 55 200 Hz Ambient temperature during storage 25 to 65 C Ambient humidity during storage 5 to 95 RH no condensation External dimensions ...

Page 62: ...arks 1 8 Vcc DC power source for multi function keypad 5 V 2 7 GND Signal ground 3 6 NC Unassigned reserved 4 DX RS485 communication data 5 DX RS485 communication data SW3 for the terminating resistor on the control circuit board in the inverter must be set to OFF open 4 3 Transmission Specifications Table 4 4 summarizes the transmission specifications Table 4 4 Transmission Specifications Item Sp...

Page 63: ...dling setting up and operating of Multi function Keypad TP G1 CLS TP G1 ELS for the FRENIC Lift series of inverters Please feel free to send your comments regarding any errors or omissions you may have found or any suggestions you may have for generally improving the manual In no event will Fuji Electric FA Components Systems Co Ltd be liable for any direct or indirect damages resulting from the a...

Page 64: ...ric FA Components Systems Co Ltd Mitsui Sumitomo Bank Ningyo cho Bldg 5 7 Nihonbashi Odemma cho Cyuo ku Tokyo 103 0011 Japan Phone 81 3 5847 8011 Fax 81 3 5847 8172 URL http www fujielectric co jp fcs 2006 06 CM ...

Reviews: