2-7
1
2
Installation and Connection
Wiring the Fiber Amplifier
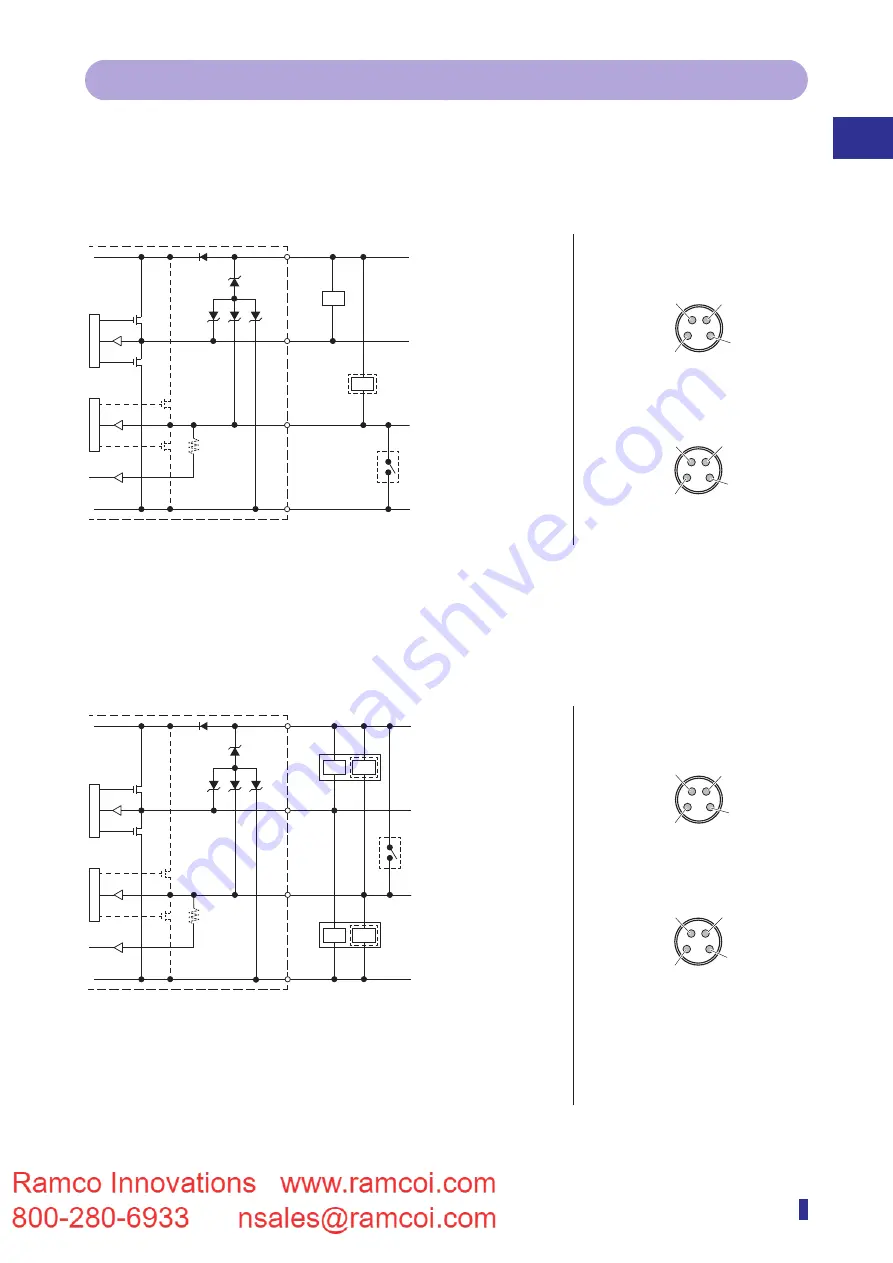
2-2-2 I/O Circuit Diagrams in SIO Mode (Standard I/O Mode)
The circuit diagram by I/O model is shown below.
1-Output and 1-Switchable-Output/Input Models
z
NPN setting
M8 connector pin layout
Brown
➀
*1
Black
➃
White
➁
Blue
➂
*1
12 to 30 VDC
(stand-alone unit)
12 to 24 VDC
(inter-connection main unit)
Control output 1
External input/
control output 2
0 V
When used as external input
*1: Power supply wires (Brown
➀
, Blue
➂
) are not equipped
on the inter-connection expansion units.
When used as control output 2
Load
Load
➀
12 to 30 VDC (stand-alone unit)
➃
Control output
➁
External input
➂
0 V
1- 1-input setting
2-output setting
➀
12 to 30 VDC (stand-alone unit)
➃
Control
output 1
➁
Control output 2
➂
0 V
➀
12 to 24 VDC (inter-connection main unit)
➀
12 to 24 VDC (inter-connection main unit)
z
PNP or Push-pull setting
Brown
➀
*1
Black
➃
White
➁
Blue
➂
*1
12 to 30 VDC (stand-alone unit)
12 to 24 VDC
(inter-connection main unit)
Control output 1
External input/control output 2
0 V
Load Load
Load Load
When used as external input
When used as control output 2
When used as control output 2
*2
*3
*1: Power supply wires (Brown
➀
, Blue
➂
) are not equipped on the inter-connection
expansion units.
*2: When I/O polarity is set to Push-pull and the sensor is connected with plus common
circuits.
*3: When I/O polarity is set to Push-pull or PNP and the sensor is connected with minus
common circuits.
M8 connector pin layout
➀
12 to 30 VDC (stand-alone unit)
➃
Control output
➁
External input
➂
0 V
1- 1-input setting
2-output setting
➀
12 to 30 VDC (stand-alone unit)
➃
Control
output 1
➁
Control output 2
➂
0 V
➀
12 to 24 VDC (inter-connection main unit)
➀
12 to 24 VDC (inter-connection main unit)
Summary of Contents for D4RF Series
Page 2: ......
Page 12: ......
Page 13: ...1 Read This First This section explains the accessories and the names of this product s parts...
Page 16: ...1 4 Part Names...
Page 17: ...2 Installation and Connection This section explains how to install and wire this product...
Page 25: ...3 Basic Usage This section explains the types of display screens and transitions...
Page 82: ...3 58...
Page 83: ...4 Settings Menu This section explains how to set the parameters of this product...
Page 122: ...5 8 Errors and Countermeasures...
Page 137: ......


