15
ENGLISH
ENGLISH
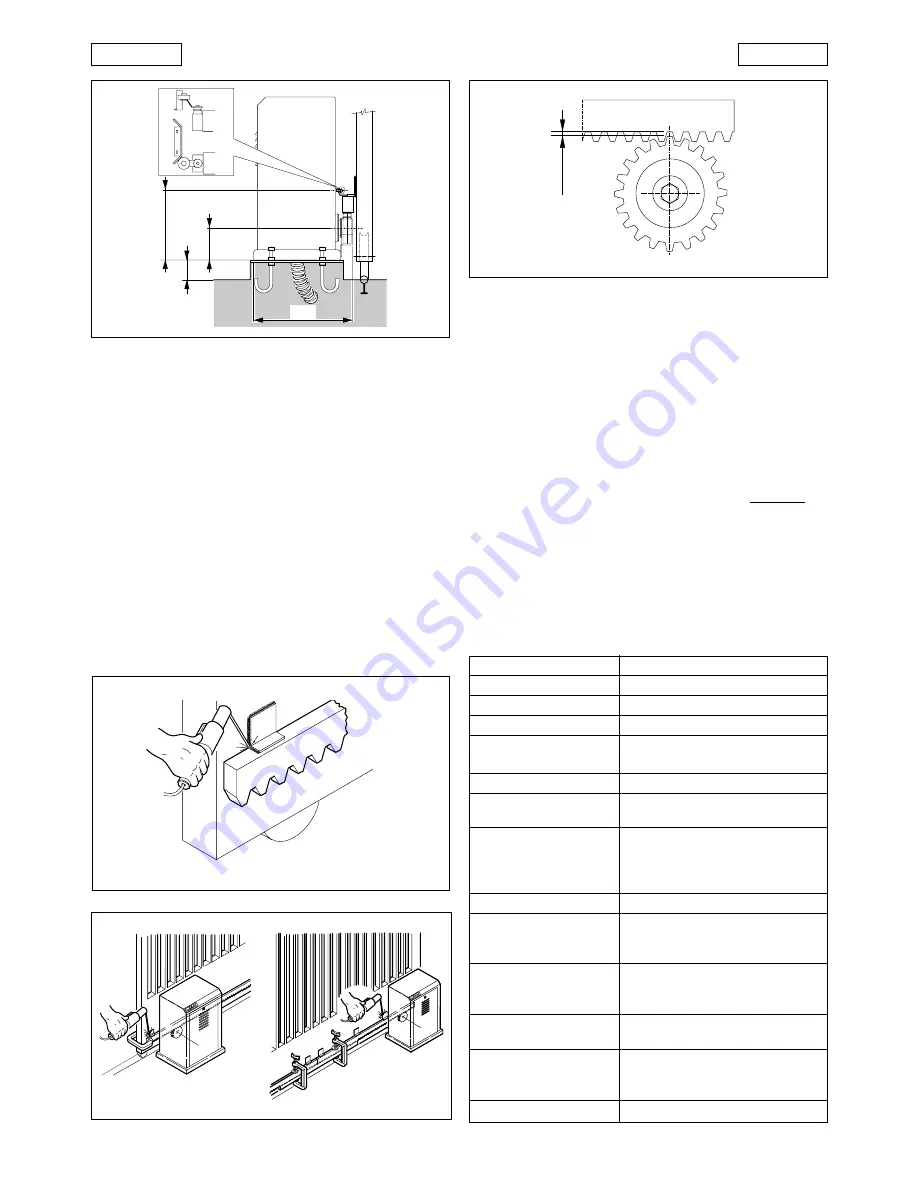
Fig. 9
Fig. 11A
Fig. 11
Fig. 12
A
354
116
207
4 mm
Fig. 10
4) Place another rack element next to the first and use a
section of rack to set the teeth of the two elements in phase
as shown in 11A.
5) Open the gate manually and weld the remaining supports.
Proceed in this manner for all the rack elements and
supports until the entire gate has been covered.
N.B.:
Check that none of the rack elements come off the pinion
during the movement of the gate.
Important: Do not weld the rack elements together.
After installing the rack, lower the position of the gear motor
(fig. 12) by adjusting the level screws (A, Fig. 8) by about 4 mm
to ensure correct meshing with the pinion.
Screw up tightly the 4 gear motor securing nuts.
Check manually that the gate reaches the mechanical
travel limits correctly and that it does not encounter friction
during its travel.
Do not use grease or other lubricants between the pinion
and the rack.
5.
START-UP
5.1.
CONNECTION OF CONTROL BOARD
Important: Before attempting any work on the control board
(connections, programming, maintenance), always turn off
power.
Observe points 10, 11, 12, 13 and 14 of the GENERAL SAFETY
OBLIGATIONS.
Install, upstream of the system, a differential thermal cutout
with adequate tripping threshold.
Connect the earth cable to the appropriate seat on the operator
base (see fig.20).
The operator is equipped with a safety device (fig.1 - ref.7),
activated by the release device. If enabled, it prevents any
manoeuvre by the operator.
Observing the instructions in Fig.3, lay the raceways and make
the electric connections of the 884 T control board to the
selected accessories.
Always separate power cables from control and safety cables
(push-button, receiver, photocells, etc.). To prevent any
electronic noise whatever, use separate sheaths.
TAB. 2 Technical specifications of 884 T
Power supply
400V 3ph+N / 230 3ph (+6 -10 %) 50Hz
Motor max load
1300W
Power supply for accessories
24 Vdc
Accessories max load
0.5A
Power supply to
24 Vac (5W max)
indicator-light
Operating ambient temperature
-20 °C +55 °C
Protection fuses
transformer primary winding
accessories
Function logics
Automatic 1/Automatic 2
Semi-automatic 1/Semi-automatic 2
Safety device 1/Safety device 2
Semi-automatic B/"Dead-man" C
Pause time
Adjustable by dip-switch
Terminal board inputs
Open/Partially open (Close) / Stop
Closing safety devices/Limit-switch
Power supply
Terminal board outputs
Flashing Lamp/Motor
24 Vdc power supply for accessories
24 Vac power supply to indicator-light
Rapid connector
SL-DS decoding cards
and RP card receivers
Selectable functions
Function logics
Pause times/Pre-flashing
Indicator-light behaviour
Safety timer
255 sec.


