background image

|   English

12

Adjusting the spindle return spring (Fig. 16):

It  may  be  necessary  to  adjust  the  spindle  return 

spring because its tension has changed and the 

spindle moves back too quickly or too slowly. To 

do so:

1. 

Lower the table for more work space.

2.  Work on the left side of the drill.

3. 

Insert a screwdriver into the lower front groove 

(1) and hold it.

4. 

Remove the outer nut (3) with a wrench.

5. 

With the screwdriver still in the nut, loosen the 

inner nut (4) until the notch detaches from the 

hub (6). 

WARNING: 

Spring is under tension.

6.  Carefully turn the spring cap (2) counterclock-

wise  with  the  screwdriver  until  you  can  press 

the nut (1) into the hub (6).

7.  Lower the spindle to the lowest position 

and hold the spring cap (2) in position. When 

the  spindle  moves  up  and  down  as  you  wish, 

tighten the inner nut (4) again.

8.  If it’s too loose, repeat steps 3-5. If it’s too 

tight, reverse the step 6.

9.  Secure the outer nut (3) against the inner 

nut (4) with an open-ended wrench. 

NOTE: 

Do not tighten excessively and do not restrict the 

movement of the spindle.

The axial operation of the spindle (Fig. 17):

When the spindle is in the lower position, turn it 

by hand. If you find that the operation is too big, 

proceed as follows:

1.  Loosen the lock nut (19).

2.  Turn the screw clockwise (20), to balance the 

operation, without interfering with the up and 

down movement of the spindle (a little opera

-

tion is normal).

3.  Tighten the lock nut (19) again.

Positioning the work piece:

As a general rule, use a machine vice or another 

suitable clamping device to secure a work piece in 

position. Never hold the work piece in place with 

your hand. When drilling, the work piece should 

be able to travel on the drill table for self-center

-

ing purposes. Ensure that the work piece cannot 

rotate. This is best achieved by placing the work 

piece /machine vice on a sturdy block.

NOTE: 

Sheet  metal  parts  must  be  clamped  in  to  prevent 

them from being torn up. Properly set the height and 

angle of the drill table for each work piece. There 

must be enough distance between the upper edge 

of the work piece and the tip of the drill bit.

NOTE: 

Place a piece of backup material (e.g. wood) on the 

table  underneath  the  work  piece.  This  will  prevent 

splitting or making a heavy burr on the underside of 

the work pieces as the drill bit breaks through. 

WARNING: 

To  keep  the  backup  material  from  spinning  out  of 

control  it  must  contact  the  left  side  of  the  column 

as illustrated. If the work piece or the backup mate

-

rial  is  not  long  enough  to  reach  the  column,  clamp 

them to the table. Failure to do this could result in 

personal injury. 

NOTE: 

For small pieces that cannot be clamped to the ta

-

ble,  use  a  drill  press  vise  (optional  accessory).  The 

vice must be clamped or bolted to the table to avoid 

injury from spinning or breakage.

Choosing speed:

Ensure that you drill at the proper speed. Drill 

speed  is  dependent  on  the  diameter  of  the  drill 

bit and the material in question.

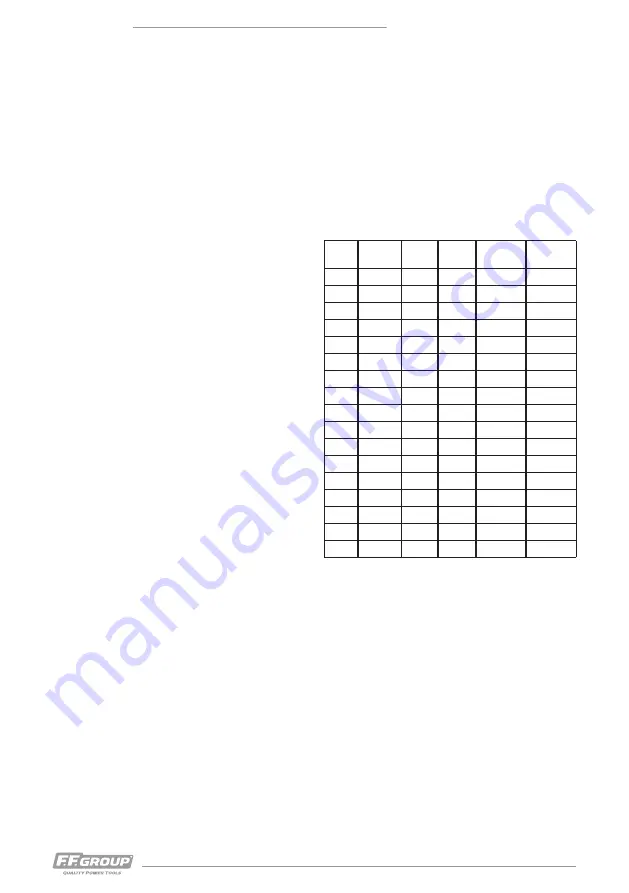
The table below acts as a guide for selecting the 

proper speed for various materials:

Drill 

bit ø

Cast

iron

Steel

Iron

Alu 

minium

Bronze

3

2.550

1.600 2.230

9.500

8.000

4

1.900

1.200 1.680

7.200

6.000

5

1.530

955

1.340

5.700

4800

6

1.270

800

1.100

4.800

4.000

7

1.090

680

960

4.100

3.400

8

960

600

840

3.600

3.000

9

850

530

740

3.200

2.650

10

765

480

670

2.860

2.400

11

700

435

610

2.600

2.170

12

640

400

560

2.400

2.000

13

590

370

515

2.200

1.840

14

545

340

480

2.000

1.700

16

480

300

420

1.800

1.500

18

425

265

370

1.600

1.300

20

380

240

335

1.400

1.200

22

350

220

305

1.300

1.100

25

305

190

270

1.150

950

NOTE: 

The drill speeds specified above are merely suggest

-

ed values.

Countersinking and center-drilling:

With this table drill, you can also countersink and 

center-drill.  Please  observe  that  countersinking 

should be performed at the lowest speed, while a 

high speed is required for center-drilling.

MAINTENANCE AND CLEANING

WARNING: 

For your own safety, turn the switch off and remove 

plug from power source outlet before any operation 

of maintenance on the drill press.

Keep your appliance clean. To avoid motor damage, 

blow  out  or  vacuum  frequently  this  motor  to  keep 

drill press dust from interfering with normal motor 

ventilation.

DPB 16/12 PLUS | DPF 16/12 PLUS

Summary of Contents for DPB 16 PLUS

Page 1: ...DPB 16 12 PLUS DPF 16 12 PLUS ORIGINAL INSTRUCTIONS ISTRUZIONI ORIGINALI IT ORIGINALNO UPUTSTVO ZA RAD SR INSTRUC IUNI DE FOLOSIRE ORIGINALE RO NOTICE ORIGINALE FR EL ORIGINALNE UPUTE ZA RAD HR...

Page 2: ...PERCEUSE COLONNE 45939 PERCEUSE COLONNE D TABLI 14 IT 45938 TRAPANO A COLONNA 45939 TRAPANO A COLONNA 20 EL 45938 45939 27 SR 45938 STUBNA BU ILICA 45939 STUBNA BU ILICA 34 HR 45938 STUPNA BU ILICA 4...

Page 3: ...3 www ffgroup tools com 1 2 3 4 9 10 11 12 14 A B 15 2 1 2 C D 2 C 4 14 4 B 4 3 4 1 2 C D 2 C 4 14 4 B 4 5 6 DPB 16 12 PLUS DPF 16 12 PLUS...

Page 4: ...4 4 3 12 2 7 8 6 10 9 11 9 10 6 10 9 11 11 12 DPB 16 12 PLUS DPF 16 12 PLUS...

Page 5: ...5 www ffgroup tools com 9 13 17 18 13 14 3 4 14 20 19 15 16 3 4 14 20 19 17 DPB 16 12 PLUS DPF 16 12 PLUS...

Page 6: ...un adeguata protezione dell orecchio quando si opera Always wear appropriate protective breathing mask when operating Portez toujours un masque respiratoire protecteur appropri lors de l op ration In...

Page 7: ...ov araju u za titu za u i prilikom rada Purta i ntotdeauna o protec ie adecvat a ure chii n timpul func ion rii Uvek nosite odgovara ju u za titnu masku za disanje prilikom rada Prilikom rada uvijek n...

Page 8: ...ric cables and in particular the main plug cable must be in perfect condition to avoid the generation of any sparks or the risk of electric shock The handgrips and protection devices must be clean and...

Page 9: ...ine and out of the reach of children REMAINING HAZARDS The machine was built using modern technology and in accordance with recognized safety rules Even when all safety measures are in place some rema...

Page 10: ...into the base plate and tighten them using a hexagon spanner Installing the drilling table holder Fig 4 7 1 In order to install your drill you must first re move the rack C Use an Allen key to remove...

Page 11: ...ly use a tool that is sharp and free of defects Do not use tools whose shaft is damaged or which are deformed or flawed in any other way Use only ac cessories and attachments that are specified in the...

Page 12: ...enough distance between the upper edge of the work piece and the tip of the drill bit NOTE Place a piece of backup material e g wood on the table underneath the work piece This will prevent splitting...

Page 13: ...ten loose screws nuts or bolts 2 Lubricate and apply grease where required 3 Store the unit in its original packaging ENVIRONMENTAL PROTECTION Recycle raw materials instead of disposing as waste Machi...

Page 14: ...ces rotatives et l outil de forage apr s avoir travaill Certaines surfaces peuvent devenir tr s chaudes pendant l utilisation et doivent avoir le temps de refroidir avant de les toucher AVERTISSEMENT...

Page 15: ...ec de tels mat riaux et utilisez un dispositif d extraction de poussi re Travaillez uniquement la lumi re du jour ou avec une lumi re artificielle appropri e dans de bonnes conditions de visibilit Ess...

Page 16: ...x1 Fig 2 4 fPoign e d alimentation x3 Fig 2 9 fProtecteur pliant x1 Fig 2 10 fMandrin de per age x1 Fig 2 11 fT te de machine x1 Fig 2 12 fManivelle x1 Fig 214 fVis hexagonale x4 Fig 2 15 fCl Allen x...

Page 17: ...re REMARQUE Le moteur lectrique install est enti rement c bl et pr t fonctionner La connexion du client au sys t me d alimentation lectrique et les c bles d exten sion pouvant tre utilis s doivent tre...

Page 18: ...ous tension 6 Tournez avec pr caution le capuchon du res sort 2 dans le sens antihoraire avec le tourne vis jusqu ce que vous puissiez enfoncer l crou 1 dans le moyeu 6 7 Abaissez l axe la position la...

Page 19: ...ou pose du c ble de raccordement 3 Coupures r sultant du passage sur le c ble de raccordement 4 Dommages d isolation r sultant d un retrait forc de la prise murale 5 Fissures dues au vieillissement d...

Page 20: ...et minima dell operatore Tenere presente che l ope ratore o l utente responsabile di incidenti o eventi im previsti che si verificano ad altre persone animali o loro propriet Non esporre il prodotto a...

Page 21: ...causare lesioni gravi Evitare di entrare in contatto con le parti rotan ti quando sono ancora in rotazione e assicurarsi di tenere lontano tutto ci che potrebbe essere intrappolato nella macchina oper...

Page 22: ...rniti dal produttore fCon accessori originali ma in un modo non confor me alle istruzioni fSenza ricambi originali fCon modifiche non autorizzate NOTA Secondo le leggi applicabili sulla responsabilit...

Page 23: ...sul piede della colonna 6 Utilizzare l anello D per fissare il rack C Assi curarsi che la guida della cremagliera sull anello D sia rivolta verso il basso Stringere la vite a brugola integrata per fis...

Page 24: ...o non scivoli durante la foratura Girare la chiave del mandrino in senso orario per stringere in senso antiorario per allentare NOTA Il trapano a colonna dotato di un mandrino senza chiave Ci consente...

Page 25: ...ad esempio legno sul tavolo sotto il pezzo da lavorare Ci eviter la rottura o la formazione di una bava pe sante sul lato inferiore dei pezzi da lavorare quando la punta del trapano si rompe AVVERTIME...

Page 26: ...e o danneggiate Ripa rare o sostituire le parti danneggiate e serrare viti dadi o bulloni allentati 2 Lubrificare e applicare grasso se necessario 3 Conservare l unit nella sua confezione origi nale P...

Page 27: ...27 www ffgroup tools com f f f f f f DPB 16 12 PLUS DPF 16 12 PLUS...

Page 28: ...28 1 5 mm2 f DPB 16 12 PLUS DPF 16 12 PLUS...

Page 29: ...mm 250 340 x mm 190 x 190 255 x 255 45 0 45 45 0 45 mm 59 5 70 x mm 334 x 203 428 x 255 45 938 45 939 DPB 16 12 PLUS DPF 16 12 PLUS LpA db A 70 7 73 8 LwA db A 84 5 86 8 K dB 3 3 mm 840 1 610 kg 25 51...

Page 30: ...3 1 2 2 1 4 7 1 C Allen D 2 C 2 C 4 3 C 4 4 C 4 5 4 C 2 C 6 D C D Allen D 7 14 4 Allen Allen B 8 3 4 8 12 2 Allen Allen A 9 9 11 10 Phil lips 12 11 f f 25m 1 5mm2 25m 2 5mm2 DPB 16 12 PLUS DPF 16 12 P...

Page 31: ...31 www ffgroup tools com f 1 6 13 17 1 2 13 17 3 17 13 14 18 18 15 3 14 3 16 1 2 3 1 4 3 5 4 6 6 2 1 DPB 16 12 PLUS DPF 16 12 PLUS...

Page 32: ...90 680 960 4 100 3 400 8 960 600 840 3 600 3 000 9 850 530 740 3 200 2 650 10 765 480 670 2 860 2 400 11 700 435 610 2 600 2 170 12 640 400 560 2 400 2 000 13 590 370 515 2 200 1 840 14 545 340 480 2...

Page 33: ...33 www ffgroup tools com 1 2 3 4 5 1 2 3 DPB 16 12 PLUS DPF 16 12 PLUS...

Page 34: ...blovi i poseb no glavni kabl za utika moraju biti u savr enom stanju kako bi se izbegla generacija bilo kakvih var nica ili rizik od elektri nog oka Ru ne i za titne ure aje moraju biti iste i suve ka...

Page 35: ...obavlja na suvom i bezbednom mestu daleko od operativne ma ine i van doma aja dece PREOSTALE OPASNOSTI Ma ina je napravljena pomo u savremene teh nologije i u skladu sa priznatim bezbednosnim pravili...

Page 36: ...kolonu 2 na osnovnu plo u tako da se rupe na koloni 2 poravnaju sa rupama na osnovnoj plo i 1 Zajebite etiri heksagonalna rafa da biste pri vrsli kolonu u osnovnu plo u i zategli ih koriste i heksago...

Page 37: ...biti stegnuti u scroll chucku Koristite samo alatku koja je o tra i oslobo ena nedostataka Nemojte koristiti alate ije je okno o te eno ili koje su deformisane ili manjkave na bilo koji drugi na in Ko...

Page 38: ...ovoljna razdaljina izme u gornje ivice radnog dela i vrha dela bu ilice BELE KE Stavite komad rezervnog materijala npr drvo na sto ispod radnog dela Na taj na in ete spre iti ce panje ili pravljenje t...

Page 39: ...bavih ili o te enih delova Popravite ili zamenite o te ene delove i zategnite labave rafove orahe ili rafove 2 Podma ite i nanesite mast tamo gde je potreb no 3 Uskladi tite jedinicu u originalnom pak...

Page 40: ...ni ure aji moraju biti isti i suhi kao i sigurno pri vr eni na stroj Upravljajte strojem objema rukama Obavezno koristite ispravan alat za svaki posao kako biste izbjegli kvar ili ozljede stroja i izb...

Page 41: ...bogpreostalih opasnosti SPECIFIKACIJE PROIZVODA NAMJENA KORI TENJA Ovaj je stroj dizajniran i proizveden za obradu radnih komada bu enjem npr komadi i drveta plastike metala i sli nog materijala Nije...

Page 42: ...olje Pritegnite integrirani imbus vijak da biste pri vrstili prsten D 7 Postavite ru nu radilicu 14 na osovinu dr a a stola za bu enje 4 i u vrstite je imbus vijkom Da biste to u inili upotrijebite im...

Page 43: ...j u stanju mirovanja Osigurajte da stroj mo e raditi bez prekida npr Uklonite radne dijelove svrdla itd UPOZORENJE Nikada ne pu tajte da bu ilica stupa radi dok je poklopac klinastog remena otvoren Uv...

Page 44: ...170 12 640 400 560 2 400 2 000 13 590 370 515 2 200 1 840 14 545 340 480 2 000 1 700 16 480 300 420 1 800 1 500 18 425 265 370 1 600 1 300 Svrdlo Lijevano eljezo elik eljezo Aluminij Bron ana 20 380...

Page 45: ...ta toate situa iile considerate dincolo de capacitatea ta Nu utiliza i n timp ce sunte i obosit sau sub influen a drogurilor a alcoolului sau a oric rui alt medicament n timpul func ion rii p stra i s...

Page 46: ...lucru care ar putea fi prins n ma ina de operare cum ar fi p rul liber i mbr c mintea ine i v m inile departe de zona de prelucrare atunci c nd folosi i ma ina Piesele i instrumentele de lucru pot ri...

Page 47: ...zate de produs care apar din cauza fManipularea necorespunz toare nu a fost respec tat cu instruc iunile de utilizare fRepara ii de c tre ter i i nu de c tre tehnicieni de service autoriza i fInstalar...

Page 48: ...a capului i coloanei ma inii Fig 8 A eza i capul ma inii 12 pe coloana 2 Alinia i axul burghiului cu masa i placa de baz i str n ge i urubul Allen care este situat pe partea late ral a capului ma inii...

Page 49: ...neta de reglare a vitezei 6 n timp ce ma ina este n modul de mers n gol Asigura i v c ma ina poate func iona f r ntreru pere de exemplu ndep rta i piesele de prelucrat burghiele etc AVERTIZARE Nu l sa...

Page 50: ...i de materialul n cauz Tabelul de mai jos ac ioneaz ca un ghid pentru se lectarea vitezei adecvate pentru diferite materiale Burghiu Font O el Fier Aluminiu Bronz 3 2 550 1 600 2 230 9 500 8 000 4 1...

Page 51: ...Componentele din plastic sunt etichetate pentru reciclare clasi ficat Acest produs nu trebuie eliminat mpreun cu de eurile menajere n conformitate cu legisla ia relativ referitoare la de eurile de ec...

Page 52: ...bama naknadno navedenih smernica u uredaba i da su u skladu sa slede im standardima 45938 STUBNA BU ILICA 45939 STUBNA BU ILICA Broj predmeta HR EU IZJAVA O SUKLADNOSTI Pod punom odgovorno u izjavljuj...

Page 53: ...53 www ffgroup tools com DPB 16 12 PLUS DPF 16 12 PLUS...

Page 54: ...www ffgroup tools com info ffgroup toolindustries com 30 210 55 98 400 19300 Athens Greece 9 5 Km Attiki Odos Aspropyrgos FF GROUP TOOL INDUSTRIES...

Reviews: