background image

8

3111001 Xzense UK 20190731

Product information

2.2.  General use of the control panel 

Function of buttons and touch screen
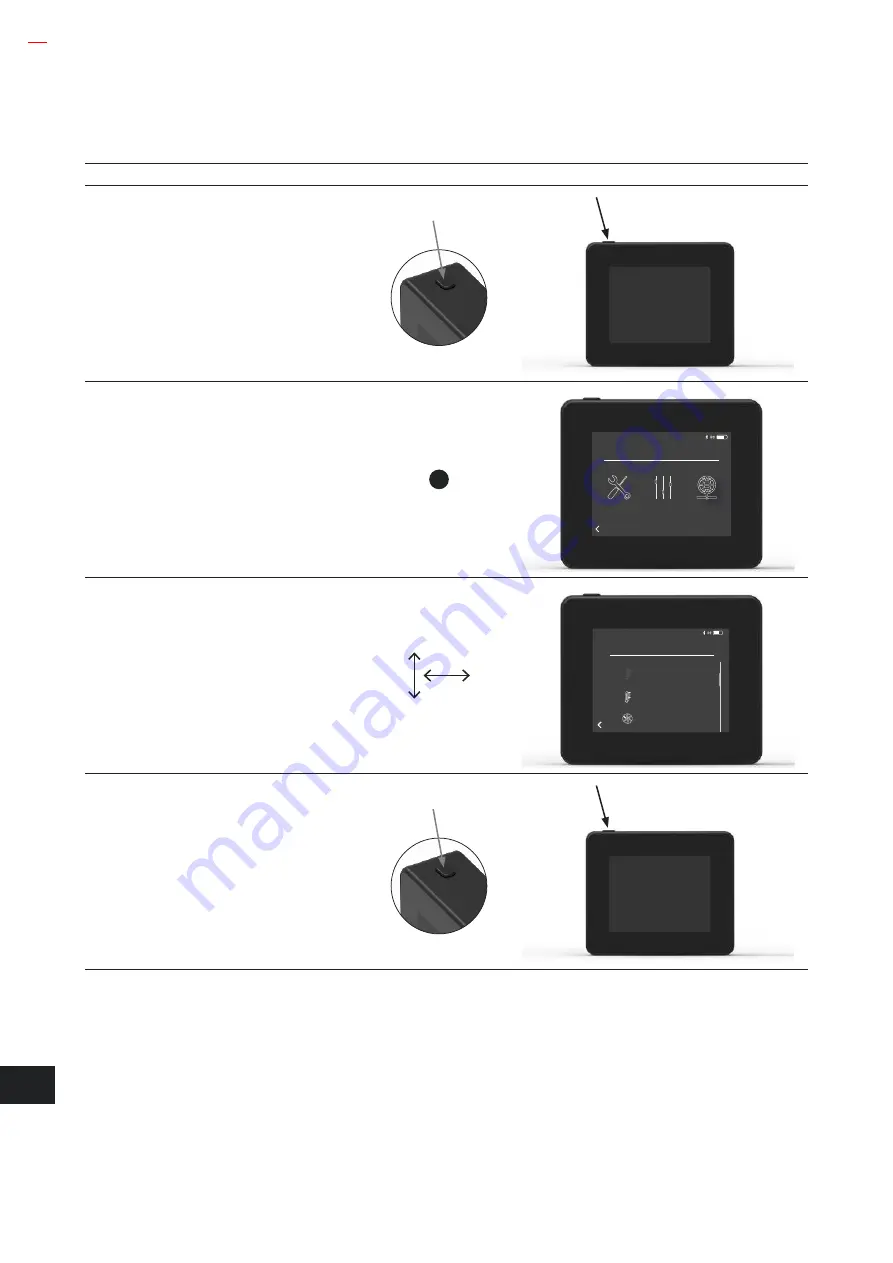
Action

Illustration

Example

Display activation

Press the button on the top with one click to 
activate the display.
The control panel is activated when it lights up.

The control panel goes into standby/deepsleep 
by pressing the button once more while the 
display is on. After approx 10 seconds, the 
display will even go into the deepsleep if there is 
no activity on the display.  

Tap lightly

Tap a finger to navigate the menus, or to change 
the values of the properties

MENU

Interface

Setup

Network

Scroll

Move a finger (up/down or to the sides) across 
the screen without lifting it, to scroll up and 
down/back and forth in the respective 
drop-down menus

OPSÆTNING

Starttemperatur

Stoptemperatur

Boost time

Boost time

Stop temperature

Start temperature

SETUP

Restart or switch off the control panel

To restart the control panel, hold down the 
button for approx 4 sec.
A dialog box appears and asks if you want to 
restart the control panel.

If you want to switch off its panel completely, 
ress the button for more than 10 sec.  
To reactivate the panel, it needs to be powered 
by a USB-charger. 

Summary of Contents for Xzense

Page 1: ...UK Always read and save the instructions 3111001 Xzense UK 20190731 ...

Page 2: ...smartphone via Bluetooth 23 2 15 Basic features of the app 28 2 16 Ventilation with the app 32 2 17 Weather station in the app 33 2 18 Setup and history in the app 34 2 19 FAQ in the app 38 2 20 Software update 40 3 Accessories Repeater 41 3 1 Setup Mounting 41 3 2 Range 41 3 3 Setting up one repeater 41 3 4 Technical data 42 4 Accessories XTP sensor 43 4 1 Setup Mounting 43 4 2 Electrical connect...

Page 3: ...e correctly as illuminated manufacturer If you have any questions please contact your dealer 2 Before servicing unit Disconnect the power and make sure no one can accidentally reconnect 3 Installation work should be carried out by competent persons and in accordance with applicable national rules 4 Follow the device s instructions from the manufacturer and general safety instructions 5 This unit m...

Page 4: ...r example In connection with operation via an App from a smartphone this requires a USB charger 1100702 Fittings for mounting on the steel chimney If the Power Unit is to be mounted on a steel chimney a mounting kit can be purchased 5220000 Additional control panel If you want to be able to control the chimney fan from several control panels several can be connected to the same system 1 3 Applicat...

Page 5: ... factory default setting the controller ensures that the chimney fan stays in operation for a while to ensure that the last smoke is pulled out also called Afterrun The factory setting for Afterrun is 30 min High temperature warning The control panel display will light and an alarm tone 5 beeps will sound if the temperature of the temperature sensor exceeds the set value The factory setting is 330...

Page 6: ...r between an Xzense Power Unit and a control panel The repeater is placed between the Xzense control panel and the Power Unit which is typically mounted on the chimney In some situations it would be appropriate to set up the repeater outdoors e g under the overhang or on another building The signal may have difficulties penetrating certain materials such as steel and aluminum structures Mounting o...

Page 7: ...n installing cables wires should be used be approx 8 cm free of the jacket Note There must be no power on device when connecting wires A C B 4 Attaching armoured hose from chimney fan E Remove the screw connector from the armoured hose Keep the small plastic clamping ring F Fit the nut from the connector from the power unit G Fit the plastic clamping ring on the armoured hose Attach the armoured h...

Page 8: ...ap lightly Tap a finger to navigate the menus or to change the values of the properties MENU Interface Setup Network Scroll Move a finger up down or to the sides across the screen without lifting it to scroll up and down back and forth in the respective drop down menus OPSÆTNING Starttemperatur Stoptemperatur Boost time Boost time Stop temperature Start temperature SETUP Restart or switch off the ...

Page 9: ... hours The control panel has a lifetime of approx 30 days in normal use Mounting of control panel Step Action Illustration 1 Mark the distance on the wall from the steel plate Drill 2 holes with a diameter of 6 mm Insert rawlplugs and mount the steel plate in the two holes with two screws 2 Slide the plastic bracket outside the steel plate 3 Fit the stop at the end of the bracket The Xzense contro...

Page 10: ...wer Unit F1EE Repeater UNITS 3 If the desired device you want to pair with is not available you can add the device via code pairing Select the Add Device feature Power Unit Repeater Tilføj enhed Power Unit F1EE Repeater UNITS 4 If you want to pair with a Power Unit you must enter the correct code from the pairing code card that came with the Power Unit Use the arrows to navigate the numbers and us...

Page 11: ... device select the waste bin icon to delete the pairing Power Unit Repeater Tilføj enhed Power Unit F1EE Repeater UNITS 2 A dialog box appears and you finally confirm with YES if you want to delete the pairing to the device Power Unit Repeater Tilføj enhed Power Unit F1EE Repeater UNITS Disconnect the Power Unit F1EE YES NO ...

Page 12: ...he use of ID or code The connection can thus be made by using Add device which is found in the start menu ntilation Vejrstation Tilføj enhed Weather Add device 2 Select the Power Unit with the correct ID under units The ID number can be found on the pairing card enclosed with the Power Unit Power Unit Repeater Tilføj enhed Power Unit F1EE Repeater UNITS 3 If the connection has been made correctly ...

Page 13: ...he connection can thus be made by using Add device which is found in the start menu ntilation Vejrstation Tilføj enhed Weather Add device 3 Select the Power Unit with the correct ID under units The ID number can be found on the pairing card enclosed with the Power Unit Power Unit Repeater Tilføj enhed Power Unit F1EE Repeater UNITS 4 Then enter the supplied code and end with OK If the connection h...

Page 14: ... page under the Power Unit section 2 The connection can thus be made by using Add device which is found in the start menu ntilation Vejrstation Tilføj enhed Weather Add device 3 Select the Power Unit with the correct ID under units The ID number can be found on the pairing card enclosed with the Power Unit Power Unit Repeater Tilføj enhed Power Unit F1EE Repeater UNITS 4 If the connection has been...

Page 15: ...OWER lights up continuously when voltage is applied to the Power Unit CONNECT lights up when searching for a device C Button to connect The control panel and Power Unit can be connected Press the button C on the Power Unit for more than 5 sec Note the search may take up to 2 min D Fuse Secure the chimney fan against overload E The Power Unit serial number located on the inside of the box ...

Page 16: ...t is supplied with The connection can thus be made by using Add device which is found in the start menu ntilation Vejrstation Tilføj enhed Weather Add device 2 Choose Add device in the lower right corner Power Unit Repeater Tilføj enhed Power Unit F1EE Repeater UNITS 3 Then enter the supplied ID and the supplied code Exit with OK If the connection has been made correctly the control panel will rep...

Page 17: ...t can receive signal from this location Always check if there is a signal before mounting by pressing the signal icon under the Signal Test SIGNAL TEST Waiting for client results 2 6 Signal test Step Action Display 1 To test the signal strength enter the Signal Test menu which is available using the following menu 1 General 2 Network 3 Communication 4 Signal test KOMMUNIKATION Signalastyrke Tilføj...

Page 18: ... control panel by clicking the button at the top Select the top menu General Lightning Ventilation Weather 2 Select the menu Interface MENU Interface Setup Network 3 Select the menu Language Kontrast Lysstyrke Language Contrast Brightness Sound SETTINGS 4 Select the desired language by moving your finger to the side of the language menu Click on the desired language To return to the menus use the ...

Page 19: ...the chimney before turning on the chim ney fan will automatically start when the temperature at the top of the chimney has reached the start tem perature setting The factory setting is 40 o C Note We recommend that the chimney fan be switched on manually every time At the same time you avoid soot and ach to escape the fireplace stove during lighting 10 min BOOSTING 4 After the boost period it swit...

Page 20: ...cted and the Afterrun will start The afterrun has a factory setting of 30 minutes 30min 2 10 Turn off the chimney fan Step Action A Manual The chimney fan is switched off by pressing the switch off Note If the temperature sensor is activated the chimney fan cannot be switched off as long as the temperature at the chimney fan is higher than the stop temperature setting B Automatic After the last re...

Page 21: ...fire place is being cleaned When the chimney is cleaned the chimney fan must also be cleaned Step Action Display 1 Select the function Ventilation to make a ventilation without a lighting Lightning Ventilation Weather 2 Start the chimney fan by press the Start button 100 Start 3 To increase or decrease the speed use the buttons to adjust with The display shows in percentage how fast it is running ...

Page 22: ...nd chimney temperature For eXotelligence to work it requires the Power Unit to be outdoors and not directly in sunlight Pressure controlled To be able to run with Pressure controlled system it requires one purchased an XTP sensor Rather than having to regulate the chimney speed If you want to know more about eXotelligence you can find more information on our website www xzense com 2 13 Weather sta...

Page 23: ...isplay 1 Turn on the control panel by clicking the button at the top Select the General menu in the left corner Lighting Ventilation Weather 2 Select the function Network MENU Interface Setup Network 3 Select the function Bluetooth NETVÆRK Signal Bluetooth NETWORK 4 Turn Bluetooth on by pressing the OFF button It then switches to ON BLUETOOTH On 5 To see the control panels ID and PIN you can tap t...

Page 24: ...ay 1 Get the Xzense app on your smartphone Xzense Værktøjer Xzense DOWNLOAD Cancel Tools Today Games Apps Updates Search 2 Open the Xzense app on your smartphone On the next pages it is an iPhone that is illustrated but the app can also be used on an Android smartphone ...

Page 25: ...Bluetooth connection to your control panel Remember to turn Bluetooth on both your smartphone and your control panel Add device with Bluetooth Connects Cancel 4 Select OK to add pair your control panel with your smartphone Ready for Lighting Add Xzense device Add first a Xzense device ...

Page 26: ...by selecting ON on the control panel you want to pair with The control panel ID is seen in parentheses after the Xzense text Eg Xzense CFEE Add device with Bluetooth 6 Enter the code and finish with OK Add device with Bluetooth Pin code missing Insert pin code to connect ...

Page 27: ...3111001 Xzense UK 20190731 27 App infomation 7 The app is now paired with the control panel and you can now make a lighting by using your app Ready for Lighting ...

Page 28: ... app will synchronize with each other along the way Lighting Step Action Display 1 Press the lighting icon to start the boost function Ready for Lighting 2 The boost period starts and runs in the time interval the control panel is on At the factory setting the boost period is set 10 min Make sure to turn on during the boost period ie when The chimney fan runs at maximum speed Boosting ...

Page 29: ... A dialog box appears Press YES to stop firing Press NO if you do not want to stop lighting firing Boosting YES Do you want to stop NO 4 After the boost period it switches on in operation To increase or decrease the chimney speed and hence the chimney draft is used up and down buttons Operating speed and chimney temperature Chimney ...

Page 30: ...x appears on both screens and asks if you want to refire It is possible to turn off the alarm signal on the control panel in the Settings menu Genfyring Ønsker du at genfyre YES NO Do you want to refire Refire 2 If you want to refire press YES in the dialog box before refiring To avoid smokes in the room increase the chimney fan speed to maximum output in 3 minutes before falling back to the previ...

Page 31: ...3111001 Xzense UK 20190731 31 App infomation 3 If you do not want to refire choose the NO function and the Afterrun will start The Afterrun has a factory setting with time period of 30 min Afterrun ...

Page 32: ...fan can ventilate the room or make sure that soot and dust particles are sucked away while the fireplace is being cleaned When the chimney is cleaned the chimney fan must also be cleaned Step Action Display 1 Select the Ventilation function to make a ventilation without a lighting Not in operation 2 Start the chimney fan by pressing the Start button Not in operation ...

Page 33: ...ng Turn off the chimney fan by pressing Stop In operation Stop 2 17 Weather station in the app Also as on the control panel you also have the Weather Station on the app Select the Weather function at the bottom of the menu to get an overview of temperatures and air pressure at the given time 19 44 Skorsten 45 C 8 Udendørs C Vejrstation FAQ Weather Outdoor Chimney ...

Page 34: ... history in the app Bluetooth Step Action Display 1 Select the Settings option in the bottom menu Select Bluetooth Bluetooth System control History 2 The overview in the Bluetooth menu shows which devices your smartphone can connect to Add device with Bluetooth ...

Page 35: ...m control History 2 Choose between Manual eXotelligence or Pressure controlled use See detailed review in 2 12 System control on page 22 Changing the system control on its smartphone app also makes a change on the control panel The same is true if you make the change from the control panel this will also affect the app eXotelligence Manual Pressure controlled System control ...

Page 36: ...ry Step Action Display 1 Select the Settings option in the bottom menu Select the History menu Bluetooth System control History 2 Choose either Error Log or History to get one overview of any error messages operating hours etc History Error Log History ...

Page 37: ...ir pressure Chimney fan speed Operation hours Number of lightings History DAY WEEK MONTH YEAR Temperature outside History DAY WEEK MONTH YEAR History DAY WEEK MONTH YEAR Operation hours 4 Error Log In the Error Log there is an overview of the error messages that may be have been on the way The same overview can be found in the control panel Error Log Low battery 28 05 2019 Service switch Off 26 05...

Page 38: ...ing Xzense Step Action Display 1 Select the FAQ menu in the upper right corner Frequently asked questions Quick Guide Videos 2 Frequently asked questions Find the frequently asked questions in connection with Xzense You can find some information on the following 1 General 2 Installation 3 Use and maintenance 4 Technical specifications Frequently asked questions GENERAL ...

Page 39: ...quick and easy review of 1 Pairing with Power Unit 2 The use of Xzense Lighting Refiring and Afterrun 3 Xzense user settings language volume brightness etc 4 Pairing with Smartphone 5 Xzense App features 6 Signal test software update 7 eXotelligence Quick Guide Videos ...

Page 40: ...at there is power on your smartphone and the control panel when during the update Ready for Lighting New software version is now available Install now Yes No 2 Select YES to update the software version The app now downloads the software update Ready for Lighting Ready for Lighting Downloading software update Cancel Transfers 1 complete Cancel 3 When the software update is downloaded 100 into the a...

Page 41: ...luminum constructions 3 2 Range Range between units should not exceed 18 meters 3 3 Setting up one repeater In the example to the right is shown a control panel 2 at the stove a power unit 3 on the chimney and a repeater 1 Add the repeater to the control panel 1 Turn on the display and go to the Signal menu and select Devices 2 Select the repeater in the overview to pair the devices Enter the four...

Page 42: ...peater at the location where signal can still be obtained 4 Activate the repeater by holding it for 2 seconds 5 Turn on the display and go to the Signal menu and select Devices 6 Select the repeater in the overview to pair the devices Enter the four digit code ID of the specific repeater finish with OK 7 If the repeater does not appear by itself Add device in the right corner can be used and the c...

Page 43: ...makes it possible to achieve a constant draft in the chimney thereby ensuring optimum combustion during firing Xzense XTP sensor must always be mounted with the hose connectors downwards fig 1 fig 1 When underpressure measurement the pressure hose is mounted on the stud Overpressure stud must keep the black cap on Do not blow in the stud of an Xzense XTP sensor 4 2 Electrical connection All instal...

Page 44: ...wer control panel and XTP sensor during pairing Enhederne er nu parret OK 4 To run with the XTP sensor s system control this must be selected below the System management menu located under the Setup menu System management 5 Change system mangement from Manual use to Pressure con trolled use by activating the ON function Pressure controlled 4 4 Technical data Responsibilities 5 Pa 150 Pa 0 1 Full s...

Page 45: ...rol panel Announcement Battery low in a dialog box Charge the control panel No draft in the chimney but the display shows it is in operation Check if the wing of the chimney fan is rotating Check if the chimney is blocked The temperature does not appear in the display Check the activation of the sensor in the menu The chimney fan does not start or stop automatically Check the activation of the sen...

Page 46: ... 55 ø6 x 200 Voltage 5 V USB 230 V 10 50 Hz Protection IP20 IP54 Material ABS PC Steinless Steel Ambient 0 C til 40 C 30 C til 60 C Sensor 50 C til 300 C Cable 50 C til 125 C Frequency for radiocommunications 868 MHz 868 MHz Bluetooth LE 2 4 GHz Battery type Li Po Battery Battery life 30 days preliminary Fuse T 2 0 A Power output 2 A Standby consumption 1 W Type PT 1000 ...

Page 47: ...draft from 8 60 Pa 12 Pa Minimum fan speed Minimum voltage level 80 120 V Note Min 100 V if the chimney fan is an RS009 100 V Eternal start Fatory reset Restores all factory settings Yes No No Error log Displays errors and alarms with date Software version Displays software version for enabled units control panel power unit repeater and pres sure sensor System control Control systems in the unit M...

Page 48: ...Possibility of refiring Ja Nej 35 C Afterrun Run time at the end of a burning cycle 30 min at 50 VENTILATION Start Start the fan Start fans Start Turn off 0 100 50 Stop Turn off the fan Sluk ventilatoren Sluk Start WEATHER Outdoor Outdoor temperature The current temperature outside Variable Chimney Chimney temperature The current temperature in the chimney Variable Air pressure The air pressure ou...

Page 49: ...ften uit de hieronder genoemde normen en standaards Som omfattas av denna deklaration överensstämmer med följande standard er Jota tämä selvitys koskee on seuraavien standardien mukainen Sem eru meðtalin i staðfestingu Pessari eru i fullu samræmi við eftirtalda staðla Sono stati fabbricati in conformità con le norme degli standard seguenti EN60335 1 EN60335 2 80 DS EN ISO 12100 2012 I h t bestemme...

Page 50: ......

Page 51: ......

Page 52: ...draft se www exodraft se NO exodraft a s Storgaten 88 NO 3060 Svelvik Tel 47 3329 7062 info exodraft no www exodraft no UK exodraft Ltd 10 Crestway Tarleton GB Preston PR4 6BE Tel 44 0 1494 465 166 Fax 44 0 1494 465 163 info exodraft co uk www exodraft co uk DE exodraft GmbH Soonwaldstraße 6 DE 55569 Monzingen Tel 49 0 6751 855 599 0 Fax 49 0 6751 855 599 9 info exodraft de www exodraft de 3111001...

Reviews: