background image

66


04-2017 5325 00

7. Reassemble the powder drawers and 

the powder funnels after having carefully 

rinsed and dried them.

8. Reposition the mixer. 

Check that the water funnel has been 

correctly inserted.

Fig. 44

9. Turn the water funnel locking ring anti-

clockwise in order to secure the mixer to 

the appliance.

After reassembling the components, it 

is necessary to:  

Wash the mixer and add a few drops of the 

sanitising solution into the various funnels 

and rinse thoroughly to remove any resi-

dues from the solution that has been used.

DiffusEr


NozzlE

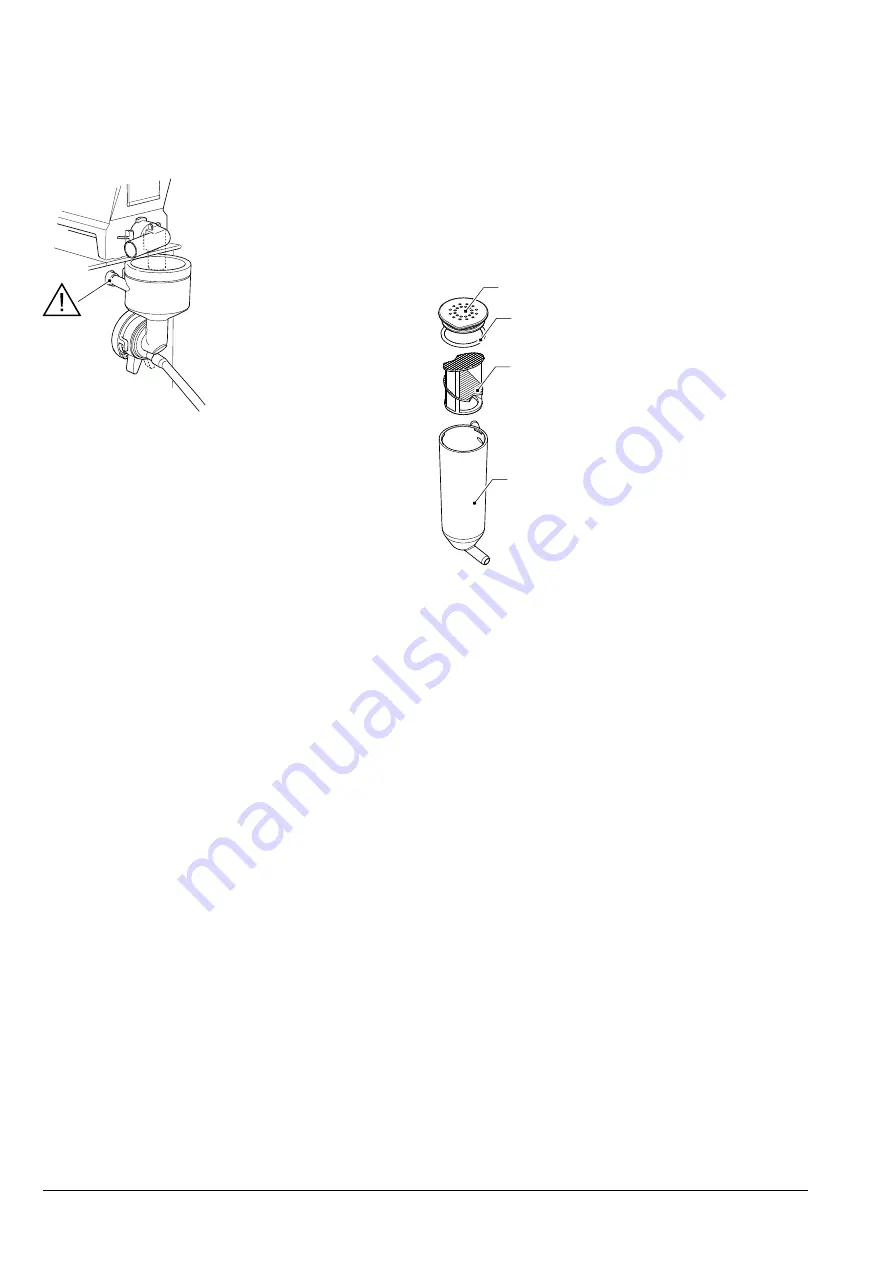
For models with the Z4000 ESFB brewing 

unit only.

1. Unhook the diffuser nozzle from the sup-

port bracket.

2. Separate the diffuser nozzle compo-

nents.

3. Check that the seal does not have any 

tears or has not lost its elasticity; if nec-

essary, replace it.

3

2

1

4

Fig. 45

1.  Cover

2.  Seal

3.  Diffuser

4.  Diffuser nozzle body

Summary of Contents for Krea Touch

Page 1: ...INSTALLATION USE MAINTENANCE Translation of the original instructions EN English Doc No H5325EN00 Edition 1 04 2017 Krea Touch 120V 60Hz...

Page 2: ......

Page 3: ...4 24030 Valbrembo BG Italia Tel 39 035 606111 Fax 39 035 606463 www evocagroup com Sede legale Via Tommaso Grossi 2 20121 Milano MI Italia Cap Soc 41 138 297 00 i v Reg Impr MI Cod Fisc e P IVA 050356...

Page 4: ...ic body which manufactures radio equipment and or electric material or has it engineered manufactured or marketed by putting its own trademark or name on it An importer or distributor who places radio...

Page 5: ...se the VM for use The machine can be used by children over 8 years and by people having reduced physical sensorial or mental skills under the supervision of people responsible for their safety or spec...

Page 6: ......

Page 7: ......

Page 8: ......

Page 9: ...ons 21 payment system 21 initial start up 22 first sanitisation 22 operation 23 es fb brewing unit 23 cup sensor 24 dispensing compartment lighting 24 dispensing instant beverages 24 grinder doser 25...

Page 10: ...atures 55 component test 56 sensor and input device tests 56 output device tests 56 touchscreen test 56 filling and emptying the heating unit 57 machine parameter tests 57 restore factory settings 57...

Page 11: ...gerous areas The operations described in Chapter 2 and Chapter 3 must solely be carried out by personnel with specific knowl edge of the appliance s operation both from an electrical safety and hygien...

Page 12: ...ht side The nameplate is the only identification rec ognised by the manufacturer and contains all the information that allows the manufac turer to quickly and safely provide all kinds of technical inf...

Page 13: ...t Positioning on top of a cabinet The appliance can be placed on a table or other suitable support the recommended height is 32 inches We suggest using where possible the appropriate cabinet where you...

Page 14: ...present Liquid residue container is empty Heating unit temperature reached safety measures Door switch The microswitch disables connectivity when the door is open Heating unit safety thermostat has a...

Page 15: ...maintain the safety of the appliance The party that performed the installa tion is responsible for any damage that may occur to the appliance or to things and people due to incorrect installation Impo...

Page 16: ...d on the keys Avoid using the programming key to regularly open the lock as this may damage the lock To change the combination 1 Open the door of the appliance to avoid having to force the rotation 2...

Page 17: ...d the door open must EXCLUSIVELY be performed by qualified personnel who are aware of the specific risks that the machine in this condition entails connectivity switch When the door is opened a specif...

Page 18: ...brushes USING HOT BEVERAGES DISPENSERS e g plastic cups ceramic cups jugs The machines that dispense beverages into open containers must be used ex clusively for the sale and distribution of drinks w...

Page 19: ...Fill the container with coffee beans 4 Check that the container s shutter is open INSTANT PRODUCTS It is recommended to use high quality instant products in order to avoid appliance failure due to the...

Page 20: ...ontrolling the possible growth of bac teria Under the current health and safety regulations the operator of the appli ance must apply the self control proce dures identified in accordance with the HAC...

Page 21: ...er from the appliance 4 Separate all the components the instant products funnels the water funnels the conveyors the powder trays 5 Remove the fans a gentle pull will be enough to free them Fig 9 6 So...

Page 22: ...mptying and cleaning quicker For safety reasons the solid residue con tainer can only be removed with the door open liquids The appliance displays the liquid residue full warning when the float valve...

Page 23: ...e container 5 Microswitch for the residue full float valve 6 Liquid residue container full float valve Not fitted on instant models CLEANING THE BREWING UNIT After each load or at least once a week it...

Page 24: ...ssemble the components for regular sanitisation Remove the cups and or glasses from the dispensing area Do not place your hands under the nozzles during the wash cycles there is a danger of scalding F...

Page 25: ...sed by an accumulation of dirt on the touchscreen Use a soft dry cloth when cleaning and avoid using abrasive products which contain solvents or alcohol Clean the touchscreen using a little pres sure...

Page 26: ...o be sterilised in order to eliminate any bacteria which could have formed while the machine was in storage MAIN SWITCH The manual main switch cuts off the power to the appliance and is positioned on...

Page 27: ...itch is activated and deactivat ed at close range the appliance disables the connectivity components to reactivate them the appliance will need to be restart ed 1 3 2 Fig 13 1 Door switch 2 Main switc...

Page 28: ...l diameter of 6 mm Installing a tap on the water system outside the appliance in an accessible position is recommended To connect the machine to the water mains only use one set of new gaskets and hos...

Page 29: ...stallation and subsequent test operations must be performed by quali fied personnel with specific knowledge of the appliance s operation both from an electrical safety and hygiene point of view descal...

Page 30: ...loads and short circuits The switch the socket and the plug must be placed in an accessible position The electrical safety of the appliance is ensured only when the machine is correctly connected to a...

Page 31: ...tection Configure the Wi Fi settings from the ap pliance s connectivity menu and set the encryption to be used by the network that the appliance will be connected to Contact the network administrator...

Page 32: ...he heating cycle status of the heating unit s When the heating cycle has finished the beverages will be available FIRST SANITISATION When the appliance has been installed it is necessary thoroughly di...

Page 33: ...or espresso type selections this de pends on the quantity of ground coffee inside the infusion chamber or For fresh brew selections this is fixed and at the highest possible position inside the infusi...

Page 34: ...a few seconds after the beverage has finished being dis pensed DISPENSING INSTANT BEVERAGES The dispensing cycles of the various selec tions are designed to obtain the best result in terms of producti...

Page 35: ...2 Fig 19 1 Dose adjustment lever 2 Reference notches 3 Dosing device adjusting the coffee grinder If the degree of grinding needs to be changed turn the grinder s knob in the de sired direction Turn...

Page 36: ...determines the amount of water to be dispensed After setting the water value on the refer ence selection the machine will ask you to enter the infusion time brewing time The degree of the grinding has...

Page 37: ...Wi Fi encryption systems A Wi Fi network which uses one of the lat est encryption systems is more secure The appliance s connectivity fea tures are disabled when the door is open TOUCHSCREEN Only use...

Page 38: ...croll through the screen dispensing a beverage Select a beverage The screen with the beverage customisa tions can be displayed Whilst the beverage is being prepared the preparation status is shown alt...

Page 39: ...e enables the appli ance s features to be used and the settings to be changed via the graphical user inter face GUI The application software does not work without the operating system The application...

Page 40: ...nction menu Touch menu to view the appliance s menu functions The available functions for the current user profile will be displayed Some functions and or parameters may not be displayed simply scroll...

Page 41: ...alues in the programming menu can be entered modified as follows keyboard 1 2 3 4 9 5 6 7 8 Fig 26 1 Uppercase shift 2 Key to switch the number symbol keyboard to the letter keyboard 3 Key to switch t...

Page 42: ...the change giver function Check the total amount of money in the coin box SELECTION SETTINGS available selections Select the selections to be displayed during normal user mode from the default ones To...

Page 43: ...ontent playlist to be displayed whilst dispensing Dispense a test beverage recipes The currently used recipes are displayed available recipes and recipes that are not compatible with the used configur...

Page 44: ...screen tap to add other ingredients and or customisations To change the settings of individual ingre dients e g the amount of water powder etc touch the ingredient bar to open the context menu Fig 31...

Page 45: ...the coffee and the milk is dispensed It can help the beverage be presented bet ter pod squeezing The squeezing is carried out by the upper piston which by mechanically compressing the pod favours the...

Page 46: ...pressure fresh brew and how long it takes place at high pressure espres so to be established Modifying the parameter will result in the absence or a change in the quantity of cream in the beverage Fo...

Page 47: ...ists of multiple ingredients is created For example when creating the Hot choc olate with milk recipe a time delay can be set between when the powder and the milk is dispensed It can help the beverage...

Page 48: ...espresso 2 espressos etc Set the maximum capacity of the container in order to manage the product running out check Change the colour associated with the container mechanical layout It is the mechani...

Page 49: ...ing restored the settings from the configuration file enter the configu ration menu and Select configuration importing from a usb Allows the new machine settings to be imported from a configuration fi...

Page 50: ...lists with entertainment content to be created and managed A playlist contains videos and or image se quences that are played whilst a selection is being dispensed If a playlist only contains images y...

Page 51: ...ibration The flow meter calibration allows the cor rect amount of water to be obtained for the recipes To calibrate the flow meter proceed as fol lows 1 Dispense and draw the preset amount of water 2...

Page 52: ...wing unit No coffee a sensor detects the rotation of the grinder when it is grinding if a block e g foreign bodies or excessive speed grinder empty occurs the control blocks the selections which use t...

Page 53: ...r which manages the maintenance alerts Only reset the counter to zero after all of the maintenance work has been carried out wash messages Manages the wash message settings Set after how many hours an...

Page 54: ...s a number of sensors which keep the various functional groups under control When an anomaly is detected the appli ance displays the type of fault and the ap pliance or part of it is put out of servic...

Page 55: ...ctivated by the float valve never signals a lack of water after water has been dispensed time out for filling the air break The air break microswitch activated by the float valve does not signal that...

Page 56: ...due container is full When the liquid residue container breaks its contact the liquid residue container is full message is displayed Empty the liquid residue container and re position it to reset the...

Page 57: ...vourites are shortcuts to frequently used functions After having added a function to the fa vourites simply view the favourites and tap the function for quick access list of favourites Displays all fr...

Page 58: ...ance temperature of the heating unit s in the energy saving mode Enable disable the appliance s lighting Select the touchscreen brightness level from those that have been predefined deep mode profile...

Page 59: ...even if the system type is changed common parameters immediate change Usually the amount related to a selection is cashed in after the appliance sends the Selection made signal By enabling this functi...

Page 60: ...r collected if a se lection hasn t been made validator line value Allows you to set the value of the validator s 6 coin lines from A to F executive version You must choose between the following paymen...

Page 61: ...to be checked returned coins It is possible to define which coins among those available in the tubes shall be used for giving change This parameter is only active with coin boxes which do not auto ma...

Page 62: ...as transactions made by the second cashless system revalue Enable disable the banknote reader to only top up the credit on the cashless system key or card second cashless Enable disable the operation...

Page 63: ...the password to dispense multiple selec tions for free price per time frame Allows the time frames standard or promo tional to be set for sales at differentiated prices Tap the day for which the time...

Page 64: ...dex ucs These have the following configurable pa rameters Baud rate is the transmission speed to be used in communications between the appliance and data acquisition devices videos Allows videos to be...

Page 65: ...sequential and chronologi cal recording of the operations gradually carried out by the appliance The events are recorded in the logfile when this function is enabled under advanced features in the dev...

Page 66: ...dispensing area sensor and input device tests Displays the status screen of the appli ance s control devices probes micros witches etc The function is useful for having a general overview of the mach...

Page 67: ...water in the heating unit to cool down The appliance has a procedure for quickly cooling the heating unit The emptying function opens a solenoid valve to allow air to enter the heating unit machine p...

Page 68: ...ance will be connected to and the adopted network protections Contact the network administrator system administrator to find out the suitable network parameters of the network that the appliance will...

Page 69: ...e Wi Fi network access password must be set manually The MAC address is a unique address as signed by the manufacturer that identifies the appliance s network card The MAC address cannot be modified b...

Page 70: ...on the appliance Enable the function to be able to set the parameters for sending emails and the noti fication recipients email addresses The parameters vary depending on which email server is used I...

Page 71: ...ore complex interventions should be carried out by a technician with specific knowledge of the appliance In order to generally avoid risks of oxidation or chemical aggressions the painted and stainles...

Page 72: ...onnectivity components to reactivate them the appliance will need to be restart ed 1 3 2 Fig 37 1 Door switch 2 Main switch 3 Connectivity switch MAINTAINING THE BREWING UNIT After 10 000 dispensed it...

Page 73: ...nd seal In order to remove or replace the upper filter and seal proceed as follows 1 Unscrew the side key s fixing screw 2 Rotate the upper piston upwards 3 Remove and replace the upper seal 4 Unscrew...

Page 74: ...f control pro cedures identified in accordance with the HACCP Hazard Analysis Critical Control Point Directive and national legislation At least every year or more frequently de pending on the utilisa...

Page 75: ...to fully lock it when reassembling it 3 Separate the instant powder funnel the powder tray and water funnel 4 Remove the fans pull gently to free them 1 2 3 2 Fig 43 1 Fan 2 Stuffing box seal 3 Shaft...

Page 76: ...omponents it is necessary to Wash the mixer and add a few drops of the sanitising solution into the various funnels and rinse thoroughly to remove any resi dues from the solution that has been used di...

Page 77: ...5 7 6 1 8 3 5 7 4 Fig 46 1 Powder nozzle 2 Container 3 Wheel pin 4 Auger 5 Sprocket 6 Scraper 7 Container covers 8 Container CIRCUIT BOARDS The circuit boards are designed to be used on several model...

Page 78: ...ting status of the instant drinks heating unit heating ele ment The green LED 1 26 indicates the flow meter pulses The green LED 2 1 indicates 34 V DC The green LED 3 4 indicates regulated 34 V DC RL1...

Page 79: ...connection 2 Modem connection 3 JP2 CAN Bus jumper 1 closed 4 JP5 CAN Bus jumper 2 closed 5 USB connector 6 Yellow reset LED 7 J45 Cup sensor 8 J48 Not used 9 J34 Not used 10 SIM card slot 11 JP4 SIM...

Page 80: ...tem HEATING UNIT CONTROL BOARD The board controls when the heating unit s heating element kicks in J1 J2 1 2 Fig 51 1 J1 At the activation board 2 J2 To the heating unit heating element ELECTRIC PANEL...

Page 81: ...cts the heating unit from overheating by deactivating the heating unit heating element should a fault occur in the heating unit control system The thermostat intervenes if the internal water temperatu...

Page 82: ...B OTG port of the CPU board 4 Turn on the appliance 5 Some messages regarding the update process are displayed The update can take several minutes 6 Once the update has finished a mes sage will appear...

Page 83: ...04 2017 5325 00 73 Appendix...

Page 84: ...modem GND V_BACKLIGHT 5V USB D USB D This drawing contains confidential information and is the property of the holding company of N W or one of its subsidiaries without whose permission it may not be...

Page 85: ...CN9 1 2 3 4 5 CN34 6 CN23 CN35 2 2 0 0 90 7 0 20 70 0 9 5 1 4 6 7 8 2 0 9 5 1 4 6 7 8 2 0 X1 14 X1 15 X1 13 X1 12 X1 11 X1 10 X1 9 X1 8 X1 7 5 9 4 1 6 7 8 2 0 PL PIP 3 8 9 3 8 2 1 Sled 2 1 Sled 2 1 2...

Page 86: ...1 2 1 J15 2 2 P4A1 1 1 5 PM EE KS3 2 J9 12 13 2 J17 4 7 0 EV1 9 EV2 91 EV3 6 J13 3 J13 4 J13 5 J13 6 J13 2 9 96 6 7 1 5 4 3 2 J15 4 J15 3 MMA1 91 6 7 ER 5 7 6 6 10 9 8 79 79 28 7 8 1 1 20 12 3 0 1 J...

Page 87: ...5 J10 9 J10 4 PM MAC 7 J10 8 ESC 5 4 J10 7 3 3 3 5 3 4 3 1 6 6 6 J16 1 MD1 MD2 MD3 J12 2 2 J12 3 70 J12 4 60 J12 5 71 MF1 3 J13 7 MF2 J13 8 8 J13 1 2 12 4 5 7 8 1 2 3 2 2 0 0 5 9 1 3 4 5 1 KS1 5 PM EE...

Page 88: ...g unit 1 water inlet solenoid valve 2 mechanical filter 3 air break 4 air break emptying hose 5 heating unit 6 Pump 7 diffuser nozzle 8 flow meter 9 liquid residue container 10 conveying tray HYDRAULI...

Page 89: ...water pump alternative 4 water inlet solenoid valve alternative 5 air break 6 appliance drains 7 to the appliance 8 liquid residue draining container 9 liquid residue collecting bucket HYDRAULIC CIRCU...

Page 90: ...________________ ________________________________________________ ________________________________________________ ________________________________________________ ____________________________________...

Page 91: ...ies contained in this publication which can be ascribed to printing and or transcription errors All the instructions drawings tables and information contained in this publication are confidential and...

Page 92: ......

Reviews: